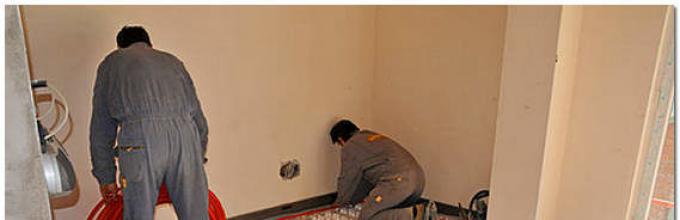
Indoor comfort starts with temperature control. To create a cozy atmosphere, you need to take care of heating during cold seasons. However, heating systems and heating devices are not enough to move around the apartment barefoot. It is quite common for floors to stay cold even when the heaters are on.
The electric underfloor heating system, offered for house insulation, comes to the rescue. Installation of an electric floor heating can be carried out both by specialists and on our own. If you have instructions, floor installation can be done correctly with your own hands and save a decent amount.
Types of floor heating systems
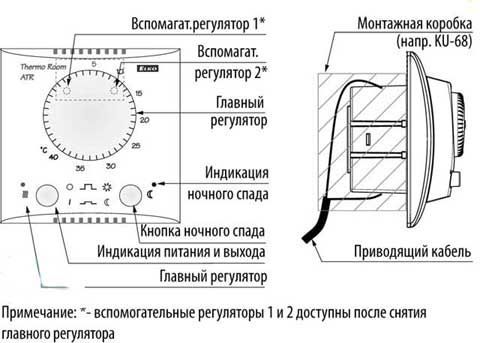
The main element in the electric floor system is the thermostat. They are available in two versions:
- mechanical, which are regulated using a rheostat;
- electronic, which are controlled by an electronic relay. They have a built-in programmable device that regulates the temperature level.
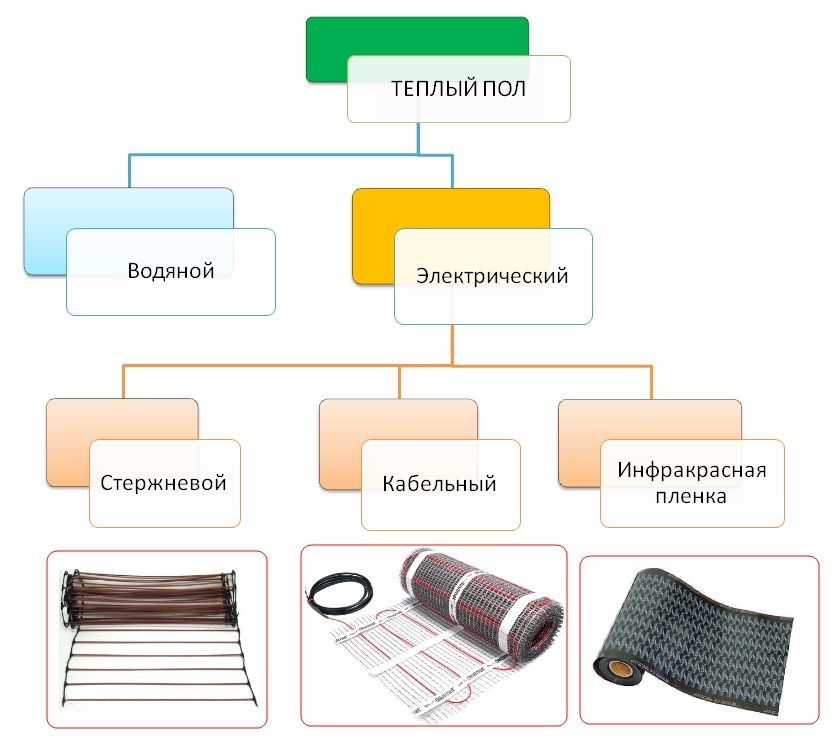
The following types can act as electric heating elements in the underfloor heating system:
The diagram for connecting the cable floor to the power cord provides for a thermostat. With its help, you can save the electricity needed to heat the room. The installation of the thermostat can be done by hand, in accordance with the instructions, which usually contain a connection diagram.
Important! It is better to connect the thermostat through a separate switch with automatic control.
Tools
Before proceeding with the installation of the floor with your own hands, you need to prepare the tool that you will need in the process. This will require:
- underfloor heating system;
- fasteners;
- copper cable (for grounding);
- wires for connection;
- protective system RCD;
- regulator;
- thermal sensor.
Calculation of underfloor heating systems
In order not to be mistaken with the amount of material, you can calculate it yourself, or you can use the ready-made tables offered by the manufacturer. When calculating the cable floor, you need to be guided by the heat loss of the room in order to choose the optimal wire laying step and its length for the entire room. Installation of a film floor is much easier: it is enough to select so many elements so that they completely cover the perimeter of the floor.
Installation of underfloor heating under laminate and linoleum
Note! When calculating the cable, it is necessary to take into account the length of the wire from the floor structure itself to the regulator, and from the regulator to the meter.
Distribution of heating elements
In order not to be mistaken with the location, you need a pre-developed layout of the entire structure of the future floor on paper. When creating it, you need to remember that heating cables cannot be located in places where it is planned to install large household appliances and furniture, as well as where pipes and various sources of heat pass.
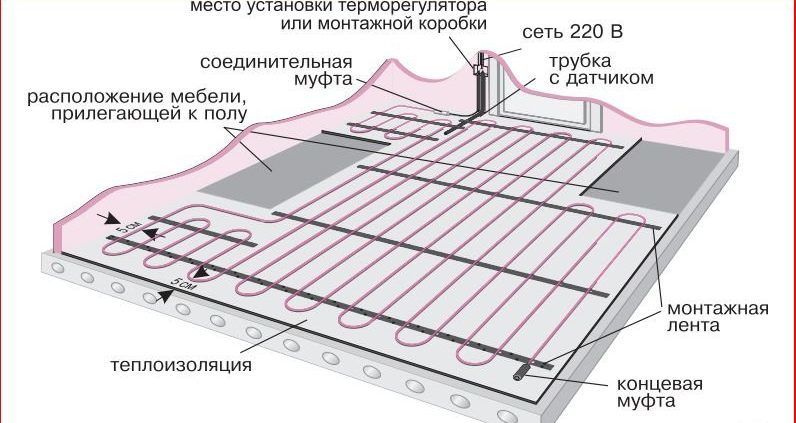
This is fraught with failure of household appliances from overheating and deformation of furniture. The diagram will look like an irregular geometric shape, enclosed in a rectangle of the room. After the scheme has been worked out on paper, its plan must be repeated on the floor surface.
Action plan step by step when installing systems
Do-it-yourself installation of a floor heating system begins with the preparatory process. It includes:
It is important to choose a location on the wall where the regulator will be installed. It must be at least 30 cm from the floor line. The location of the regulator in the most convenient place is marked on the wall. A hole is made under it for a mounting box, and a strobe is lowered to the floor, intended for placing plastic pipes or a corrugated pipe for wires in it.
Before starting work, it is necessary to clean the floor of debris and dust, as well as level the surface using special building mixtures. For this, a preliminary screed with a thickness of 3-7 mm is made, which can be done by hand. In order for the screed to better contact the floor surface, it can be treated with a primer. After the primer has dried, areas are marked on it where the installation of such a heating method as a warm floor will not be carried out. It must be borne in mind that the distance from the walls to the heating cable must be at least 5 cm.
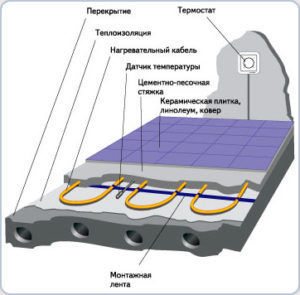
- Laying the heat-insulating layer.
Thermal insulation can be positioned vertically and horizontally:
- the first option covers the entire perimeter of the walls of the room. For this, a damper tape or polystyrene sheets of centimeter thickness is used. Vertical installation of thermal insulation helps to significantly reduce heat loss;
- horizontal installation involves the insulation of the concrete floor using heat-insulating material. Its thickness must be at least 2 cm, and it itself must be durable and resistant to temperature extremes. For do-it-yourself insulation, you can use the following materials: expanded polypropylene, expanded polystyrene or fiber-mineral plates.
If the floor is installed in a bathroom, a waterproofing layer must be installed on top of the thermal insulation layer. Installation of a heat-insulating layer can reduce the loss of thermal energy by up to 30%.
If it is not possible to organize a screed, then the cable can be fastened to a metal mesh located on top of the thermal insulation layer. Installation of the floor in this version provides for the pouring of the finishing screed together with the cable in one procedure. The mesh acts as a reliable frame, so the screed is reliable.
After the screed has hardened, it is covered with a heat-insulating foil layer. At the joints, it must be laid with a certain margin, and the free edges must be glued with tape. Foil covering ensures uniform heating of the room.
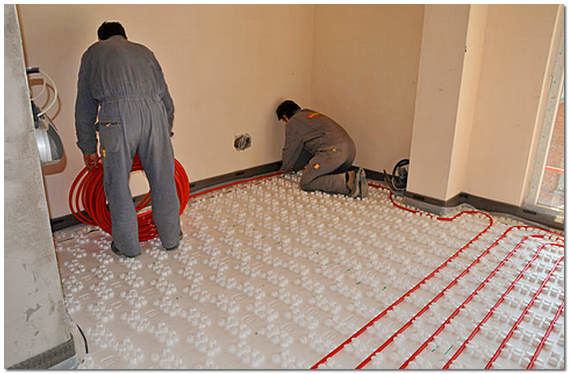
To fix the heating element of the cable floor, a mounting tape is used, which is laid every half a meter and fixed with self-tapping screws (nails). There are special brackets on the mounting tape, which are located at a certain pitch. This allows the heating elements to be evenly spaced. The main stage includes the installation of heating elements.
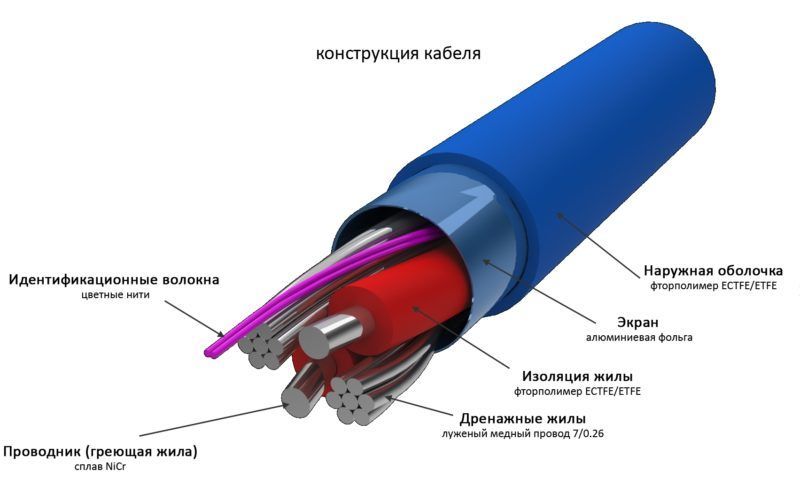
First you need to unwind the cable and check its resistance. The resistance level must correspond to the indicated numbers on the label. Next, the end of the two-core cable is inserted into the corrugation and placed in the prepared groove. One end of the cable and the joint for the connection are fixed to the construction tape, after which the installation of the cable element begins. The joint must be completely filled with a tie.
Do-it-yourself installation of the floor heating system must be carried out, observing a certain distance and making sure that the cables do not touch. The end sleeve is fixed to the mounting tape so that it can be completely filled with the tie. If a single-core cable is used to install the cable floor, it must be taken into account that both ends of the wire will be connected to the thermostat.
Do-it-yourself installation of an electric underfloor heating with infrared elements is the simplest option. Spread strips of foil all over the floor. Such plates do not require taking into account the location of the furniture, and the installation itself does not require preliminary filling of the screed. These plates can be installed on any type of surface.
Installing the sensor and thermostat
After laying the cable, it is necessary to install the temperature sensor. It is mounted in a corrugated pipe. To save space, it is laid together with the supply end of the cable in one strobe.
During operation, the sensor may fail. To replace it with your own hands, it will be enough to remove it through the thermostat box. For normal operation of the sensor, it must be fixed in the middle of the cable lines with mounting tape. After three cables (sensor, power supply and network) are connected to the connecting tube, the thermostat is installed.
After the main stage, it is necessary to fill the cable system with a tie. It is made from a special mixture and is about 3-5 mm. Drying completely can take about a month. After it is completely dry, you can cut off the protruding parts of the insulating layer and proceed with the flooring.
Video: Do-it-yourself installation of a warm floor based on a heating cable
Secrets of joint pain treatment from our regular reader.
Hello!
My name is Gennady Alekseevich. I am a stove-maker with over 20 years of experience. I am engaged in both the repair and construction of Russian stoves and fireplaces. I always do the work very efficiently and carefully, which negatively affects the condition of the joints. With age, the pains started getting stronger, up to the point where I could no longer work. Having tried a lot of both medicinal and traditional methods of treatment, I realized how serious my disease is, since there was no positive effect. Until I came across one tool, which I want to tell you about.
It is a unique blend of the rarest and most powerful natural healing substances. This tool has proven its effectiveness not only for patients, but also for science, which has recognized it as an effective drug. Joint and back pain go away in 10-15 days, studies have shown. The main thing is to clearly follow the instructions in the methodology. You can order the product in its original packaging, with a quality guarantee, at


