Installing the plinth for the ceiling The case is quite simple to those times as we are talking about how to make the corners of the ceiling plinth.
Docile the plinth on the corners is the most difficult thing in its installation, while if you make a junction wrong, the material will look ugly, and immediately spoil the impression of your fresh repairs.
The standard junction of 45 degrees is not always suitable for different types of rooms, and even cut such an angle exactly from the first time.
In this article you will find several tips on how to make a console base attachment to attach it exactly, and the auxiliary video will help you to do it with your own hands, without spoiling the material, as well as we will tell you how to glue fittings on the ceiling.
To cut the corner for the ceiling right from the first time, many are resorted to the use of this tool - Stusla - which has long become a well-known and popular among those who make repair on their own and wants to cut the plinth for corners.
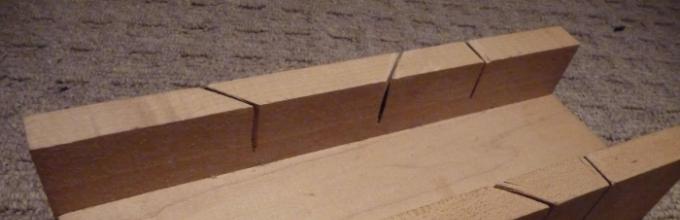
Stuslo has an appearance of a small box equipped with slots. With it, you can cut the corners of the ceiling plinth at the same angle that you need.
The stub is metallic, wooden or plastic, and this is the simplest and an ancient device, with which you can cropped wooden parts, or, in our case, cut out accessories at an angle of 45 or 90 degrees.
For home use, the simplest models are produced, the professional stusla for work in production is equipped with a rotary mechanism that allows you to install and cut the part under any inclination.
However, the simplest stusing will be enough to trim the ceiling fittings for docking in the corners of the rooms.
If you do not have such a tool, then you can easily make it yourself. To do this, you will need three trimming plywood or boards having the same size.
First, lock them in the form of the expanded letter "P" and place the corners, and then make long slots using the hacksaw, following the markup made, and secure the boards or plywood.
Then you need to make another measurement and determine where the plinth should be trimmed at what angle. When this is done, put the bar in the stub, which refers to the position of the fittings is the same as on the ceiling.
The plinth must be strongly pressing to the other side of the stouch and secure it in this position.
Making sure that the material is installed smoothly, you need to put the hacksaw under 45 degrees in the hole intended for this and cut the part. So the inner corner is processed.
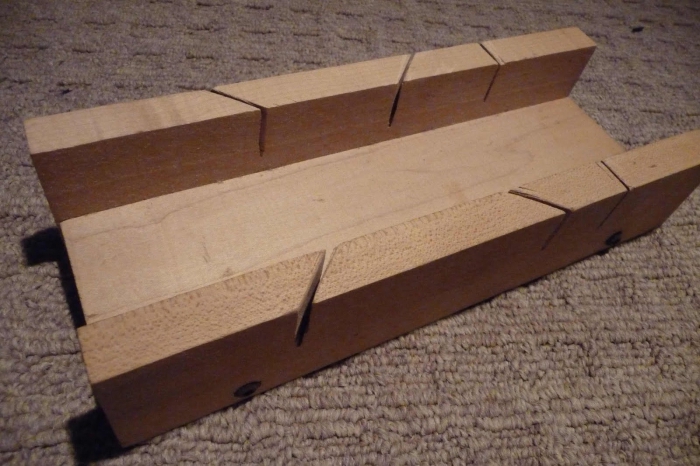
The adjacent item can be cut in the same way, just it is necessary to trim it so that it is mirroring from the first.
Please note that if your plinths are made of PVC or polystyrene foam, the inner joint is better to cut with a hacksaw to work with a metal or a building knife, because The edges in this case will be obtained smooth and neat.
To cut the accessories correctly, start working with its face.
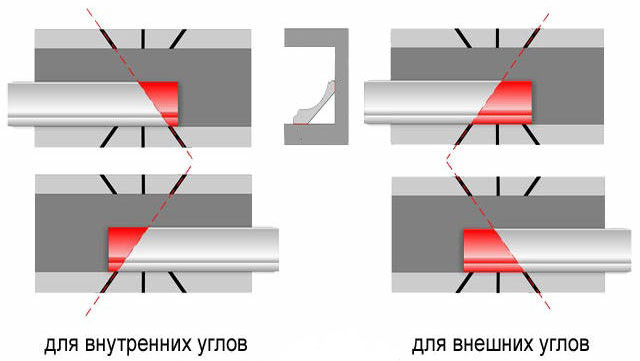
A little different technology will be when the external angle should be processed.
First of all, you need to find out the distance from the near wall to the outer angle and fix it from the inside of the material (you can write to a conventional pencil).
It is better to round the value in the right direction, with the fact that the edge of the fittings should perform the outside of several millimeters. When everything is ready, you need to clamp the material in stupid and cut off the unnecessary part.
The adjacent part is treated in a similar way, simply rearring it mirror in relation to the first.
After this work is over, and before you begin to glue, you need to dock parts - if everything is cut true, then they must be perfect to each other.
If a fully flat joint did not succeed, it can be a little bit of the edge of the material using a knife - in most cases it should help, and then the docking will be completely smooth.
Look at the video about how to do and dock the plinth - it will relieve you from excessive consumption of details and a possible marriage, and will also make work much easier.
Pruning without additional tools
It is possible to fit smooth angles at the plinths and without the help of additional funds using the markup method.
To work, you will need the following tools:
- line;
- stationery knife;
- corner.
The first step needs to know what size angle indoors is to do you need a corner. Attach it to the corner on the feet where the material will be allowed.
The size should be 90 degrees, or have a value approximate to this, depending on how the correct form is your room.
If the junctions in the room do not correspond to this mark, then they are not even and carrying the docking correctly will be somewhat more complicated.
After you have calculated the size, attach a line of 45 degrees to the ceiling plinth, and cut off the unnecessary part of the material by the stationery knife.
So that the joint is to be smooth and clear, you need to cut it quickly and clearly, but do not push the fittings too much, otherwise it may be damaged.
If you want to make a bog of a wooden plinth, then use the knife instead of a knife or an electrolovka, and the location of the cut silent with a pencil so that it was clearly visible.
Before glue angles, make sure that they turned out to be smooth: for this you need to attach them to the place of docking and connect at one point.
Properly trimmed plinths must be perfectly connected, without seams or irregularities.
If you find that the joints of the walls in the room are uneven, then you first need to know their degrees, and then divide this value to two - so you will find out, at what angle you need to cut part of the fittings.
For example, if the ceiling joint has a slope of 80 degrees, then it is necessary to crop the ceiling plinth at an angle of 40.
Also, as in the case of the use of stub, some uneven angles can once again wash it yourself or walk along the edge of sandpaper, which can somewhat align the surface and make a dock better.
After that, attach again the plinth to the junction - after re-processing, they must be better to converge.
To make an angle right from the first time, see the video with the stages of work.
In fact, there is nothing complicated, the most important thing is to correctly calculate the size of the corner on the ceiling, as well as the angle under which you need to cut the plinth so that there are smooth joints.
The easiest option is to "close" the joint with special fittings, however, this is possible only with external corners of the room.
Such accessories are sold in all building stores, and if the device device allows you, you can choose this option, and do not engage in the docking of the plinths yourself.
This is especially true if the corners in your apartment are uneven, and they are quite difficult to dock them.
Installation of material
Of course, it is most important to cut and pour the plinth on the joints on the joints - this is the most important stage in work, however it is important and correctly glued them, otherwise, even with even angles, the ceiling plinth will look slightly and spoil all the repair.
Glue always start with the corners - it's easier to track how much the material goes around, plus it is just more convenient, because The size of the direct segment of the plinth cut will be easier than customized accessories not only under the size of the angle, but also under the already glued ceiling plinth.
If you take the material into the joints correctly, then the rest of the plinth will also have no problems.
Before glue ceiling plinth, you need to prepare the surface. This is done by primer, with a simpler version of the repair, you can simply moisten the surface with a sponge with water.
Processing provides the best clutch of the material, which greatly facilitates the work, because The accessories immediately clutches with the surface, and will not leave and fall off.
First of all, you need to apply glue or putty composition on the plinth, depending on which material you have chosen to work.
If this is a putty, then it is processed not only the rear, but also the front part of the fittings, but the strip must be narrow enough so that there is no too much glue.
Before applying glue, spend another pre-dock and make sure that the material is connected exactly, without cracks and gaps.
After that, process with glue the first part of the part and press it to the ceiling. Then you need to dock the second part of the angle.
To the hitch of plinths and the ceiling occurred, do not glue the material immediately after applying the composition, but wait a little so that the glue manage to grab.
If the rounded angles must be separated by plinth, then the material is first cut into several parts, and then alternately glued to the desired surface.
A little differently is the case with wooden plinths - usually screw them with screws, and not put on glue.
This means that the correctness of their docking should be taken even more carefully, because to redo the work after their installation and it will be no longer possible to connect the plinth.
If despite all your measurements and docks, you have noticed that after stickers of the ceiling plinth in the corners, slots or irregularities still appeared, use the sealant to eliminate them.
White sealant will be almost invisible on the plinth, especially if you work carefully.
After you pasted the accessories, wipe the place with a sponge or just with your hand to smooth the seams and remove the remnants of the means.
After the angles are ready, you can start finishing the rest of the surface. This is the instruction, how to correctly install ceiling plinths in the corners.
This work will require some attentiveness from you, but in general it is nothing complicated.
Use the video with the instructions - they will help you not only to cut the plinth, but also to establish them so that there is no irregularities and gaps and did not have to redo the work in the future.


