The type of heating in which heat is generated by using electrical energy, is characterized by a simple design scheme, and its installation takes at a minimum of time. It is not necessary to be a professional to arrange a electric warm floor with your own hands, just need to be accurately follow all the points of instructions.
Depending on the heater used, the floors with electrical heating are divided into 2 categories: with a heating element as a cable and with infrared.
According to the method of production, they are divided into 4 types:
- Heating cable. It can be single-2-core including self-regulating.
- Mat heating. It is a cable on the mounting grid.
- Film Polymer flexible canvas with built-in infrared heating element.
- Rod. It consists of sequentially connected carbon rods.
Calculate the warm electric floor, based on the size of a part of the room free from the setting. Under the furniture to lay the heating elements are not recommended due to the excess of the load on the system in the specified areas. The power of the floor is chosen from considerations 0, 1 kW / m² on average. For different premises, this indicator is different.
If, in addition to the warm floor, there is no alternative heat source in the house, the area occupied by the system should be at least 70% of the area of \u200b\u200bthe room as a whole
It is important before starting work to calculate the step with which the cable will then be laid out. For this purpose, private from dividing the area scheduled for laying the heating system in m² multiplied by 100 and divided into the length of the section in M, taken from the passport.
Features of the cable heating system
The heat transfer of cable warm floor is very high, in fact all electrical energy is converted to heat. Its set includes a heater cable, coupling, adjustment and control devices. The cable is placed both in the screed and under the floor.

Electric warm floor can be heated to 60-70 degrees. Each of his appearance works on a special technology that has its own structural differences (+)
There is no heating boiler in the system, the electric cable itself gives heat. Most often, it is used as auxiliary type of heating, but if the house is well insulated, the floor heated with the cable can also serve as the main source of heat. Place the cable 3 ways: under the tie, inside it and above it.
It is necessary to have it evenly, withsting the distance from one to another heating line at least 80 mm and not allowing intersections, fesomes and voltage on turns. During installation, the cable is easy to damage, so experienced masters are recommended to wear soft shoes or cover, already mounted areas, plywood sheets.
Placing a warm floor in the screed
The installation process in the tie of electrical heat floors is characterized by consideration. The advantage of this method is that the heating element, being in the center of the screed, rather and evenly breathes the surface. The technological process consists of several stages.
First poured the first layer - it will be the basis. Pre-plate cleans. Expand with a perforator crack width more than a millimeter and fill them, as well as chips and holes, mortar. The plate is aligned horizontally, if necessary, use the composition of "bulk floors". After drying, the base is caused by liquid waterproofing, and leave for 2 hours to dried.
On the surface, the heat insulating substrate with a foil heat reflective layer is spread. If the unheated room is located below, they choose heat insulation with a height of 5 to 10 cm. Otherwise, a layer of 2-3 cm is sufficient. Sealing the seams and joints with foil scotch.
Perform the assembly of the heating circuit. In the perpendicular direction in relation to the wall selected to install the control unit, strips with latches for fixing the cable are mounted. The edges of the polymer strips should end at a distance of 50-100 mm from the walls.
If instead of the strips, mounting rails are taken, then they are removed from the walls by 200 mm. Before laying a warm floor, check the cable resistance with the tester. Indications are checked with a passport, permissible difference - 10% maximum.

The cable system "Warm" floor is suitable for the premises of all types. It is convenient in the installation and is distinguished by economical power consumption.
The starting point in the circuit of connecting the electric heating cable by the classic version is the control unit. Decalating the calculation in the form of "snake" and placed parallel to the wall. All transitions to the next turn should be beyond the limits of border regards. At the finish, the opposite wall should be an isolated end. Option when mounting starts from the end, it is also possible.
After the line is fully laid, the temperature sensor in the metal corrugated pipe is assembled between the turns. Wires are displayed towards the plinth, and then to the control unit. It is not necessary to climb the sensors to the concrete - their extract if necessary becomes very difficult.
After checking the reliability of the fixation of the laid elements, they are poured by a layer of concrete solution with a thickness of about 60 mm. The solution needs to be well seal. If emptiness remains, the thermal conductivity of the upper layer will decrease.
The role of the control unit for a warm floor is the thermostat. It is responsible for processing information coming from the thermal sensor, and shut down or turn on the system according to the settings. The thermostat can be both programmable, so without software. Connect it to the outlet 220 V. Place for installation is chosen on a plot with free access.

Connection starts from connecting the temperature sensor after this - the heating cable to separate connectors. Further to the control unit fill the line from the shield
In some cases, the cable is placed in the shizhki shizzy. The cable in the strokes are filled with tiled glue. The advantage of this method is that the level of the finish coating remains at the same level. After completing the edge of the cable, the floor is turned on only after 2 weeks.
Thermomat-based electric floor
For the production of thermomats, the cable is not thicker than 45 mm. It is fixed on a fiberglass grid with a width of 0.5 m. The cable has an external shell-protected core. For residential premises, heating mats with double living due to their significantly smaller level of electromagnetic radiation are used.

If a tile is selected, as a finish coating, instead of a concrete solution over the cable, glue for this type of material, specially intended for a warm floor
The heating mat includes 2 elements: actually thermomat with cable and corrugation. The sensor is inserted into it inside, and it protects it from moisture and aggressive effects. If the glue layer is thin so much that it cannot completely close the corrugation, you need to use a moisture resistant sensor.
The thermostat is complete with a remote temperature sensor, mounting boxes, wires acquire additionally. When choosing the first element, the maximum power consumption is taken into account. The wire section is selected, focusing on the power of the system and the material of the manufacture.

If the cable must be wrap, then cut the grid. It is impossible to cut the cable and shock. During installation, it must be at the top, to the floor fasten the grid using Scotch or bracket
The installation process is extremely simple, because The thermomat is fully prepared for the installation of the product. Here you do not need to fix the heating cable, and the label uniformity is ensured by the construction itself. It is higher than that of the floor cable, but it has a lot of advantages, which includes a faster heating of the surface.
Installation of thermal mats
Before folding the thermal mat, the floor is covered with a layer of primer. This will increase adhesion adhesion with a concrete surface. Usually, the glue is applied immediately to the mat, but if it is a wet room, then after applying and drying the thin layer of glue, it is covered with waterproofing, and then glue again. In order not to disturb the integrity of the cable and evenly apply a binder, you need to distribute the adhesive composition with a plastic comb.
The glue is placed on the glue and align it. Tile plus glue in sum should give 20 mm, although individual manufacturers recommend at least 50 mm. This is explained by the fact that with such a thickness of the layer, heat is distributed more evenly.

The photo shows the sequence of laying a warm floor from heat mats under the tile, ranging from the selection of space (1) before laying the tile (7). Installation is simplified if the room has a rectangular shape (+)
In accordance with PUE, it is necessary to establish a protective shutdown that guarantees security and the circuit breaker. If the system is mounted in the bathroom, the thermostat should be tailored to the adjacent dry room.
Features of the film floor
There are no special difficulties in the device of the system of warm film electric floor. Many laid it on their own. It is suitable for any floor coverings. The system, the work of which is based on infrared radiation, is safe even for laminate and other wooden coatings. Two types of such a film for the floor are known:
- Solid. Available in the form of a thin two-layer polyurethane film with continuous carbon spraying inside.
- Striped. Including the same 2 layers of film from Lavsana, polyheter or polyurethane with carbon or ultra-thin aluminum stripes located between them.
Thermal elements in these systems have a parallel and consistent compound. At the edges, they have bimetallic tubing tires from the silver and copper strips laid on each other. Film IR Paul do neither with pouring screed, nor in the layer of glue. Only "dry" laying is suitable.
Warm infrared floor has a number of advantages. These include:
- uncomplicated and fast installation;
- a small film thickness (0.3 cm) that does not reduce essentially the height of the room;
- the possibility of excluding such a working point as the fill of the screed;
- lack of influence on humidity in the room;
- anti-allergic effect;
- comparatively low electricity consumption - by 20% less than other types of electrical thermal systems;
- air ionization;
- easy dismantling if necessary;
- high reliability.
The standard set of materials includes a thermal film twisted into the roll, clips of contact, insulation and wiring. To this kit, add a thermostat, equipped with a temperature sensor, as well as a polyethylene film, tape, foil material. Before purchasing all this, you need to calculate the necessary method of film.

Under household appliances and furniture, the floor should not be insulated - this is unjustified costs and excessive load on the system. Split the film completely throughout the plane only in the case when the owners are used to changing the situation
The easiest way to make a sketch of the room on millimeter paper. Next, it should be noted the places where the sensors and connection points will be placed. Select the part of the room on which laying of warm infrared floor is planned, then calculate how many heating elements will be required.
Infrared laying process
If the former coating is in a normal state, then the technology of laying electrical infrared warm sex is allowed not to dismantle it. It is enough just to clean and eliminate the differences. The roll of the film floor is cut using conventional scissors.
It should be borne in mind that when the surface is generated, the band should not cross or touch with current-time tires. Typically, manufacturers indicate the place of cutting. This does not mean that the film cannot be cut in other convenient places.
The main thing, the slice should take place between the heating elements. In case the incision fell on the designated line, only collector bimetallic plates are isolated. In other cases, the ends of the strips are sickling.
First, lay a layer of waterproofing to protect the floor from the receipt of moisture from concrete overlap. The further heat insulation, which prevents the loss of heat from radiation leaving in the base. Material can be used by any, the main thing is that the metallized side is directed outward.
Place the places where the wiring will be held. After a place to install the thermal sensor. The channel under the temperature sensor is performed by a width of about 20 mm. The wiring for the sensor is placed in a corrugated tube, then placed in the prepared channel.
Further laid prepared bands according to the sketch. In order to reduce the length of the wire when laying, the strip is unfolding by the end sides to the wall, where the thermostat will be located and stop, without reaching it centimeters. The manufacturer of the system is indicated in the briefing for products.
Connect clamps to the edge of the bimetallic strip, then connect the wires - left to the left clips, and the right is right. The wiring for the thermal sensor should be hiding under the thermal film. To this end, in the heat insulation, narrow grooves of 1 cm width are cut out, and the power cable laid in them is pasted and tightened with a thermal film. It is impossible to allow the wires to rise above the heat insulation.
The insulation on the edge of the wire is removed, rolls, the wire itself is populated through the clamp, fixed with the help of pliers, then the connection point is isolated with bitumen tape. By connecting the entire chain, the resistance of the resulting structure is measured.

It is possible to use both reflective thermal insulation and not reflecting in the form of a cork canvas. Only layer thickness is regulated - from 3 to 5 mm. Fasten the strips of heat-insulating material by assembly scotch
The final stage is the installation of the finishing coating. The principle of connecting the thermostat is the same for all types of warm electric floor.
Before completing the operation of the styling of the finish coating, the system is tested. If the thermal film meets all the requirements, there will be no sparkling and overheating of the plots anywhere. When still some defects are detected, the floor is covered by another layer of polyethylene film with a thickness of at least 80 microns. It is placed by the brass with an occasion of about 20 cm.
- The film warm system must be installed at moderate humidity (maximum 60%) and the positive temperature.
- The film in the folded form cannot be connected to the network.
- Before connecting the film floor, checking the insulation of contacts in places where the flooring took place.
- In case of damage to the thermal film in a place where graphite spraying is located, the two-way isolation is imposed.
- If the flooding of the floor occurred, it is immediately disconnected from the power grid and leave for drying in natural conditions.
- It is impossible to walk on the finished floor in the shoes.
You can not clutch the thermal sensor. You need to leave the opportunity to control it and replace it. Also should not be placed on the heat of the floor carpets and other dense natural coatings. To ensure ventilation and eliminating the possibility of deformation of the finishing coating due to temperature changes, it is recommended to leave a slight gap between the wall and the coating.
Warm Pallery Type
The rod or carbon floor is a rod design that heats the room with infrared rays of the far wave. There is no electromagnetic radiation in this range. Its feature is that it is not atmosphere, but the items present in the room.

Composite material Carbon is based on a carbonic nanostructure in combination with binding components. Carbon and carbonaceous floor - one concept
It contains carbon rods connected in parallel to elastic mats with a width of 0.8 m and a length of 25 m with a power wire. Inside the "carpet" is placed heating elements. The inside of the rods consists of carbon, silver, copper, and heat highlights the first one.
In addition to the rods in the composition of such a floor there is a temperature sensor and thermostat. Such a floor has a property of self-regulation. This means that the amount of heat is directly proportional to the temperature. The disadvantage is that the installation of it is possible only with the use of a screed, therefore, there can be a speech about its dismantling.

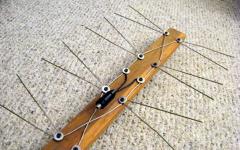
The structure of the rod warm floor is folded from the heating element (1) of the copper tire (2) of the neck (3) of isolation at the ends of the tire (4)
If the plane of the floor put any object, the heat transfer in the place occupied by it, decreases, and the rods begin to allocate a smaller amount of heat, lowering, thus temperature. Consequently, the thermostat is needed here only for power control, the overheating prevention function performs the rod floor itself.
Mounting and Connection Nuances
Although the core floor is considered an intellectual system, it can be put on his own hands. Technology is simple, but it will work, provided that all requirements are observed. The process consists of 8 consecutive steps:
- preparation of the basis;
- laying the heat transferserler;
- mounting rods;
- connections to each other;
- connections of the power cable;
- connecting the design to the thermostat;
- thermal sensor connections;
- fill the screed or installation of the finish coating of the tile type.
Before performing these works, they plan in which direction the heating mat will be laid and the amount of material is calculated. For sale, the carbon floor comes with a set, but sometimes you have to buy something from consumables. The choice of power is influenced by 2 factor: the area and type of heating. By power, rod warm floors are separated by 2 types: up to 160 W / m² and up to 220 W / m².

The most rational option is the location of heating mat - along the long wall with the orientation on the heat regulator, because In this case, when connecting to a temperature controller, you can take wires of smaller length and reduce the number of cuts (+)
The most rational option is the location of heating mat - along the long wall with the orientation on the heat regulator, because In this case, when connecting to a temperature controller, you can take wires of smaller length and reduce the number of cuts.
Mainly manufacturers produce a complete set for mounting. At a minimum, it includes a rod mat, connecting kit and end, wire, installation instructions. Everything else: thermal insulation, tape, corrugated pipe with plug, thermostat, sensor, bitumen insulation - optional.
Electric Warm Floor Installation Video
All about laying the rod gender you will learn from this video instruction:
Select the type of electric floor will be easier if you familiarize yourself with this video:
How not to spend extra when buying a warm floor system will teach the author of this video:
Heating at home with the use of electric heating floors will allow maintaining a comfortable temperature regime. The temperature difference between at the top of the room and the floor will be minimal. If you choose the right system correctly, accurately calculate and perform installation work with your own hands, then in terms of finance you can win.


