The decorative eaves gives the room a finished look and allows you to hide the irregularities of the seams at the junction of two materials, inevitably occurring during the repair. Pusting ceiling plinths is a simple process. Difficulties may occur only at such a moment: how to properly cut them and make beautiful corners.
Decorative eaves are made of lung practical materials: polystyrene foam or polyurethane. However, when sticking, you need to be careful because the details are fragile.
When choosing stucco, avoid too relief models, dust will accumulate there. Standard ceiling plinth length - 2 meters. The width depends on the height of your ceiling: the higher the ceiling, the wider the plinth. The optimal version for the ceiling 2.75 meters will be a 45 mm width cornice.
Required tools and materials
For pasting ceiling plinth, we will need:
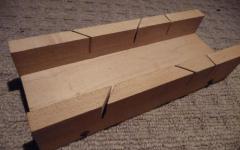
- stuslo (fixture for cutting smooth angles) and handbrake for metal;
- glue;
- decorative corners (although if there is a stub, optional);
- acrylic sealant and mounting gun (when sticking by this method);
- ladder.
For the ceiling karnis, it is advisable to use either specialized glue, or universal glue for foam plate - "moment-installation".
The process of sticking
 Poking Karnisa
There are two methods of sticking plinth on the ceiling.
- Faster option: Eaves glued after decoration of walls and ceiling on glue.
- Before decoration of walls: stucco is fixed on a putty or acrylic sealant after alignment and primer walls. This option is better because the eaves will be most close to the wall, and with the next repair it will not be necessary to handle it.
Installation on glue

For a simpler corner connection, corner parts can be used from the same material as the cornice.
Putting on putty or sealant
The process is almost the same, but additionally needs to be projected and aligned.
- Place of sticking Treat primer.
- Take the putty and a small spatula to apply it with a thin layer on the opposite side of the eaves.
- Remove spacing surplus, and slit shit. Also overpow all connections.
- After drying, put the spacure make the slots again.
Punching of the cornice with the help of acrylic sealant is much easier, but requires additional investments. For the 20 m² room there will be enough two packs of sealant. A mounting gun will also be required. Powing passes in the same way as on putty. The cracks are sealed with sealant wet hands.

After completion of the sticking, the stucco can paint paint on a water basis with the addition of a kolator under the color of your interior. Do not be lazy and protect the adjacent surface with painting scotch with painting. To highlight the relief, paint the protruding parts into a contrast color.


