The ceiling plinth performs not only a decorative function, visually separating the walls from the ceiling, but can also hide the joints of various finishing materials of the ceiling and walls. Not every interior design involves the use of ceiling plinth, but most often the general type of room seems unfinished without it. In the attachment of this element - the cartel - there is nothing complicated, almost all types of plinths are attached to glue. But the question is how to trim the ceiling plinth in the corners of the premises, can put many in a dead end. After all, even in the simplest room there are internal angles, where the slats of the ceiling plinth must accurately and beautifully docile. And in a more complex configuration of the room, it will also have to docile the plinth, performing an outer angle. In this article, we will look at various options as cutting the ceiling plinth with the help of healthy tools and without them.
To begin, it should be dealt with the question than cutting the ceiling plinth, the answer to it depends on the material from which the hallor was made. At the moment, ceiling plinths from polyvinyl chloride (PVC), polystyrene foam (foam), polyurethane and wood are sold.
PVC ceiling plinth are the cheapest. They are easily formed dents and races that cannot be eliminated, so the product has to be thrown away. Also, their disadvantage is electrostaticism - the ability to attract dust. You can cut them with a sharp construction knife or hacksaw.
Ceiling plinths from polystyrene Also relate to cheap. This material is very fragile, when processing it will easily crumble, so cutting the polystyrene foam is needed with a sharp knife or hacksaw for metal, without making too strong adequate efforts.

Ceiling plinths from extruded polystyrene foam A little more than more than polystyrene foam, it is more detrimental and harder. Nevertheless, they crumble less, so it is easier and more convenient to work with them. Cut the construction knife and hacksaw for metal.
Polyurethane ceiling plinth are the most expensive at the moment. They are strong, elastic and moisture-resistant, easily cut by a building knife and do not crumble. The disadvantage of polyurethane plinths is their dependence on temperature drops. For example, over a gas stove, polyurethane plinth will acquire residual deformations and will begin slightly crackle. If you try to treat or cut such a plinth, it can be twisted or deformed in a different way.
Wooden ceiling plinths They are dense heavy products that can be trim only with a hacksaw, preferably with small frequent cloths. You can also use the metal cloth.

Before moving to the enumeration of methods, how to properly cut the ceiling plinth, I would like to note that it is possible not to cut the plinth with particular accuracy. There are available special corner elementsIn which the edges of the plinth are inserted. In this case, the strip of the plinth is enough at an angle of 90 °, and all flaws will hide the corner element. But this method is not always used, since the size of the angular elements is somewhat more plinths themselves, so the corners indoors will be highlighted on a general background. Sometimes it can look nalyaitously. Nevertheless, if the design of the room allows the use of angular elements for ceiling plinths, it makes sense to use them. Further instructions will be useful for those who still decided to precisely trim the plinth under the specified angle.

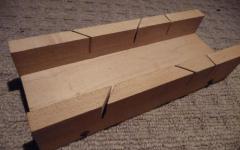
Stuslo is a simple carpentry tool that allows you to cut a blank under the necessary angle. Most often it is a tray of plastic, wood or metal with vertical cutting slots at an angle of 90 ° and 45 °. There are also more complex stusla designs - for cutting at angles of 90, 60 and 45 degrees. For more professional work, a stubble with a swivel mechanism is used, where the hacksaw can be fixed at any angle to the workpiece.

How to cut the ceiling plinth with stub - Inner angle:
- We apply the plinth to the ceiling, measure the required length.
- Then we install the plinth bar in the stouch so that the position coincides with the plinth position on the ceiling.
- The plinth bar must be pressed to the far wall of the stub.
- Hold the plinth with your left hand.
- We choose the position of the hacksaw, when the angle is 45 degrees and at the same time the handle of the hacksaw is as close as possible with the left hand.
- We cut the workpiece without making an excess pressure on the saw.
- The next step is trimming the response strip of the plinth. We also install it also to the long wall of the stouch.
- Click and hold the right hand.
- We choose this position for the hacksaw, when an angle of 45 degrees and handle of the hacksaw gets closer with his right hand.
- Cut the plinth.

Next, I connect the cropped strips of the plinth and check the accuracy of the cutting. For a more accurate orientation, they also say that it is necessary to start cutting with the front of the plinth to perform the inner corner. Wooden plinths after trimming, most likely, will have to still fit the file.
How to cut the ceiling plinth with stub - outer angle:
- In order not to be mistaken with sizes, it is better to start with the markup of the inner angle, and then cut the outer angle. Otherwise, the situation is possible when the planks may not be enough in length.
- It is necessary to attach a bar to the ceiling and outline.
- We set the ceiling plinth bar and press it to the nearest wall.
- Hold your left hand and choose the position for the hacksaw at an angle of 45 degrees when the handle comes closer with the left hand.
- Cut off the workpiece.
- We set the retaliatory bar to the nearest wall, hold the right hand.
- We install the hacksaw at an angle of 45 degrees when the handle gets closer with the right hand.
- Sut off the workpiece and joking the angle.
Trimming the workpiece with the help of the stouch is suitable only if the angle between the walls is 90 degrees. If accuracy leaves much to be desired, you will have to take advantage of other ways.
How to crop the angle of the ceiling plinth using the markup on the ceiling
Marking of the plinth on the ceiling also allows smoothly and accurately cut off the angle. The only disadvantage of this method is that it is difficult and inconvenient to keep the pilot strip on the weight in the cutting process. Otherwise, it is even more accurate than other ways. Applying the plinth to the place of installation, all the flaws of the walls and deviations in the size of the angle are immediately taken into account.
Circumcision Ceiling Plinth Circuit:
- First of all, two billets need to trim at an angle of 90 degrees.
![]()
- Then we apply one bar first, resting its end to the perpendicular wall. We carry out a line on the ceiling that outline the continuity of the plinth.

- We remove this bar and apply the response bar, also resting her end to the wall. We look at the line.

- The intersection point of the intended lines will be a mark that needs to trim the plinth.
- Again we apply alternately every bar and we mark the cutting point.
- We carry out a line from this point to the other edge of the plinth.

Cut the plinth on the outlined lines, we connect them and apply to the installation site. Please note that with the help of such a way it is more convenient to cut internal angles.

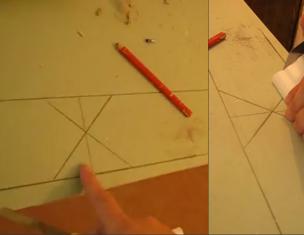
Something resembling a stubble can be made if you apply the necessary corners of the cut paper, cardboard or wood. It is necessary to draw two parallel lines, determine the center, and then postpone the necessary angles using the transport. The advantage of this method is that you can postpone any angle, including more than 90 degrees. Of course, before cutting the corners of the ceiling plinth, it is necessary to test the angle between the walls with the corner in advance and measure the transport.
The method of cutting the ceiling plinth with a drawn stouch is exactly the same as with the help of the stouch itself. The plinth bar is pressed to one of the parallel lines, then set the hacksaw under the desired angle, which is already scheduled and cut off.
Improvised tray-stood with your own hands
Make a stubble with your own hands is also not a lot of work.
Method 1.We will need three wooden planks or boards that need to be led into the P-shaped box. Then the necessary angles are scheduled on the walls of the box, and the hack is made. As a result, a wooden stub should be turned out, in which the grooves are cut.

Method 2. Combination of an improvised stouch and template with outlined lines. For convenience, cutting it is necessary to build something that it will be convenient to keep the ceiling plinth bar, as it is difficult to keep it on the weight. It is enough to lean out of two wooden planks or boards corner. On paper, you need to draw lines with corners for cutting under 45 degrees or any other. Then we apply the blocking of the plinth to the corner, press it with your hand, as described in the technology of using the stouch, with a template with a template for the edge where we are going to perform cut, and cut off. In the process of cutting, focus on the line drawn on paper.

Method 3.As an improvised stouch, you can use anything, all - that form an angle. For example, the table attached to the wall.

Important! Pay attention to the rule of measurement for trimming the ceiling plinth. To schedule an inner corner, it is necessary to measure the length directly from the corner itself. To outline an outer angle, it is necessary to navigate that the plinth will perform deep into the room at a distance equal to its width.
It is not necessary to fix the slats of ceiling plinths before cutting the retaliatory bar and the location was performed. Only after the two response planks perfectly come together in the corner, you can begin to mount them to the ceiling. Small flaws can be modified with a file or sawn in the case of wooden and polyurethane plinths. To fit foam products will have to be written with a sharp knife.
If suddenly, even after fitting the plunks, there remains a small gap, do not despair, it can be sealed with a putty. Cut the ceiling plinth is not difficult. But in order not to spoil a lot of products, it is better to pre-train on small blanks.


