At first glance, make a backlight, also in a special niche is a difficult matter, but modern materials allow you to implement it simply and quickly, even without special knowledge in the electrician. From this article, you will learn how to make a ceiling of plasterboard with backlit with your own hands.
By the method of setting the backlight, you can divide drywall ceilings into two types:
- With open backlight - lamps are installed in holes or suspended;
- With hidden illumination - lamps are installed in a pre-prepared niche in.
More popular ceiling design of plasterboard with hidden illumination. The light in them is evenly distributed, dissipated and reflected from the ceiling. It seems the impression of the construction in the air.
If you think about how to make beautiful plasterboard ceilings with backlight, first of all you need to choose a light source. This is a LED LED tape, fluorescent lamps, duralite or even light-frames with fiber for.
We will tell you about the LED tape, as it is the most popular and easy way to make backlight.
Advantages of LED backlight
- Low price, and at the same time good, uniform light. The tape pasted around the perimeter of the room will shine brighter than the incandescent lamp 200 W. However, it is not necessary to use it as the main source of light, it can only serve as decorative lighting.
- High energy efficiency and long service life.
- Simple installation. The tape is glued to the plasterboard on sticky ribbon.
- The ability to remote control, modes settings, color shift.
The market has many types of LED tapes, they differ in the following characteristics:
- View of the LED (for example, popular SMD-5050 LEDs are size 5 * 5 mm).
- The color of the glow can be both monochrome and color (RGB). For colored ribbons on one basis, 3 diodes are placed: red, green and blue.
- The density of the LEDs (the number of light bulbs per meter of the tape).
- Color temperature (from 2700K to 10000K).
- Voltage (the most popular ribbons from 12 V, but are 24 V)
- Water resistance (some tapes are protected by silicone insulation, which allows you to make the ceiling backlight in the kitchen, in the bathroom and toilet)
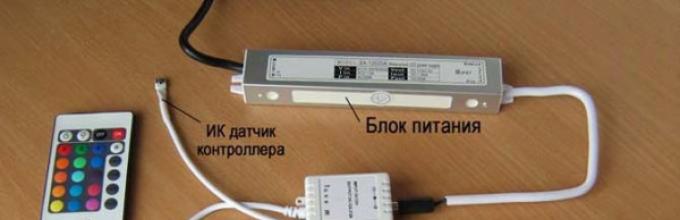
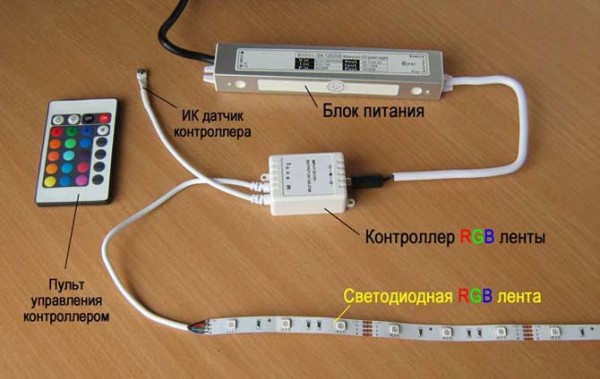
The main components are the power supply unit and the LED tape itself. In addition to RGB-tape, you can buy a controller and remote control.
Ceiling frame
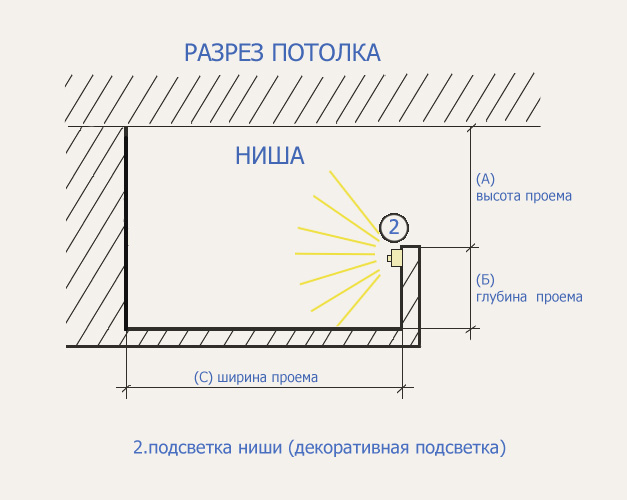
If you decide to make a niche of drywall in the ceiling for hidden backlight, then first you need to build.
The frame is mounted as follows:
Thus, the first basic level of the ceiling is ready.
Installation niche for backlight
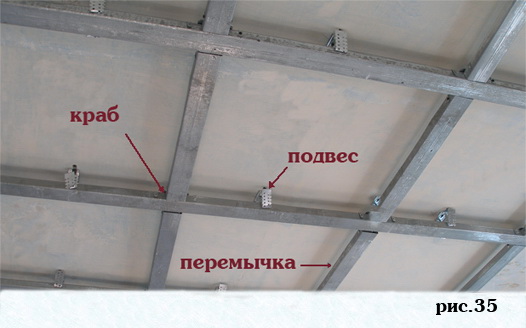
Now, to create a niche for hidden backlight, proceed to the construction of the second level: 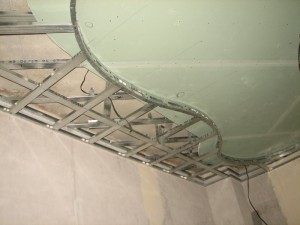 Second-level ceiling frame
- In the first level ceiling the border of the second.
- Return 4-6 cm (cornice width), and secure the starting profile (UD) to the ceiling.
- Metal scissors cut the segments of the main profile, in length equal to the second level height. Secure them with self-drawing in the starting guide, they will play the role of suspensions.
- From the bottom side, fasten another starting UD profile on the suspension.
- Insert the basic ceiling profiles and connect them into a single design.
- Display the necessary wires and crush the frame as well as the first.
- Then it is produced, hats of selflessness and the rest of the area. With the putty, the most important thing is to achieve an ideally smooth surface, otherwise the paint will show all the pits and irregularities. During grinding, dust should be removed using a vacuum cleaner. To protect seams from cracks are used. Coin should also sharpen and clean it. Only after that you can apply paint. The ceilings are usually painted in two or three layers, depending on the quality of paint. Before painting, primer is applied.
If the protruding eaves turned out to be small, it is possible to glue a narrow strip from drywall to liquid nails by its perimeter, which will hide the LED tape.
Installation and connecting backlight
When your frame is ready, you can finally fasten the backlight.
Observe these basic rules for mounting LEDs:
- Cut the tape only on specifically marked places.
- To connect several ribbons to one, you can connect them using special LED connectors for connecting and connecting power. However, it will be more reliable to fasten the ribbon to the ordinary soldering iron.
- The power supply must have a supply of 20-30% power, otherwise it is sooner or later he burns.
- Molding on metal plots should only pass on insulating material.
- In no case do not confuse the location of the voltage of 220 volts from the outlet and outlet - 12 volts. Do not work under stress.
Connection diagram is performed as follows: 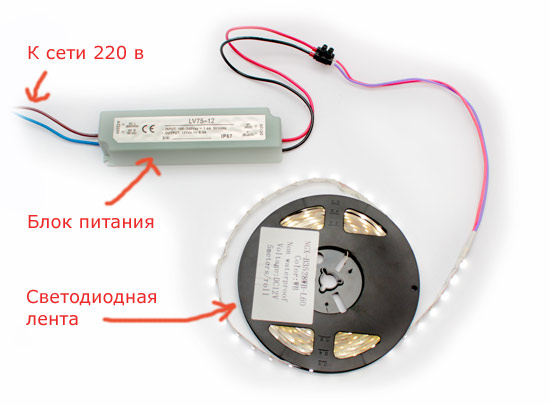
- One end from the power supply goes to the wire 220 volts, and the second in the LED ribbon.
- If you are using RGB tape, then connect it through the controller with the preservation of polarity. Red wire - plus, blue or black - minus. Cannot be changed in places.
- Connect and check the operability of LEDs. If everything is in order, you can glue it to the desired place on the self-adhesive film.
With a sequential connection of long ribbons, the voltage at its end drops, and the glow in different parts differs. It will also be safe to connect areas over 5 meters in parallel to each other using a wire with a cross section of 1.5 mm. At the same time, you need to have a power supply of high power, and if it is not - you can use two weaker. In this case, to extend the wires from the network 220V, a section of 0.75 mm is enough.
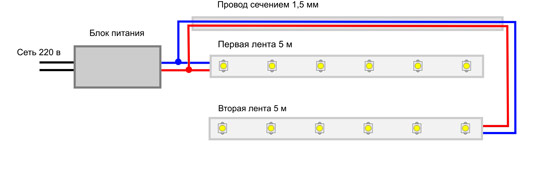 Connection diagram long ribbon with one power supply
 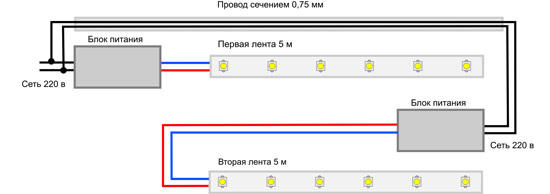 Diagram of parallel connection of multiple power supplies, if the length of the tape is required above 5 meters
The video in which is clearly explained how to connect the LED ribbon to the network:
Connecting LED tape is a fairly simple thing. The main thing is to buy an appropriate power supply and observe polarity. The ceiling LED backlight allows you to create a spectacular look, and it can be made with your own hands.


