
This article describes the algorithm for self-calculation of the details of the wardrobe and the nuances of cutting in the chipboard sheet, followed by an order for furniture production. The material presented in a simple and accessible form, will help to avoid many mistakes made by beginners.
Independent calculation of details
Calculation for the wardrobe standard size
So, you already have a wardrobe project. It remains the case for small - to calculate the details. Before proceeding to the calculation of the dimensions of the parts, it is necessary to determine from which chipboard the cabinet will be made. There are two standard sizes of chipboard thickness - 18 and 16 mm. Most furniture companies use in their production of chipboard with a thickness of 16 mm. We, too, take the 16 mm slab as a basis. This value will appear absolutely in all calculations.
Let's get started Initially, to make it easier, write down on a piece of paper the name and quantity of all the details present in the wardrobe in a column. For example:
- roof - 1 pc.
- bottom - 1 pc.
- outer side - 2 pcs., and so on
We consider the correct algorithm using the calculation example for a cabinet with dimensions of 1670x2400x650 mm.
In order not to get confused, add the thickness of a chipboard to your drawn wardrobe draft, that is, make the lines double. Thus you do not miss any thickness.

Roof - 1 pc. - 650x1670 mm
It is technically correct if the roof of the wardrobe lies on top of the side, and is not between them. Hence, its size does not change. It coincides with the dimensions of the cabinet - 650x1670 mm.
Bottom - 1 pc. - 650x1638 mm
The bottom of the cabinet is fixed between the two sides, therefore, it is necessary to take two thickness of the chipboard: 1670 - (16 + 16) \u003d 1638 mm.
Outer side - 2 pcs. - 650х2384 mm
The outer sides are covered with a cabinet roof. The calculation formula: 2400 - 16 \u003d 2384 mm.
Inner side - 1 pc. - 550х2268 mm
Master Board: The sliding door system, depending on the manufacturer, has a depth of 80-100 mm. For full opening it is necessary to reduce all internal parts by this size. That is, the sides and shelves inside the closet should be less than the overall depth of 80-100 mm.

Calculation of the inner side of the cabinet:
- depth 650 - 100 \u003d 550 mm;
- height 2400 - 16 (roof) - 16 (bottom) - 100 (base) \u003d 2268 mm.
Cap - 1 pc. - 100x1638 mm
The base is the lower plank connecting the two outer sides of the closet and supporting the bottom. The length of this bar is equal to the length of the bottom of the cabinet, height - 100 mm (you can use a different size, but not less than 50 mm).
Shelf - 1 pc. - 550x861 mm, 4 pcs. - 550x761 mm
Recall that the inner side of the cabinet is shifted to the left by 50 mm in order to comfortably work drawers. It follows that the shelves on the right side of the cabinet should be longer than those on the left. To make it easier, we first calculate the size of the shelves as if they were the same, and only then subtract 50 mm: 1670 - 32 (outer sides) - 16 (inner side) / 2 \u003d 811 mm.
- 811 - 50 \u003d 761 mm - the length of the shelves of the left side, where the drawers;
- 811 + 50 \u003d 861 mm - the length of the shelves in the right side of the wardrobe.
After calculations, be sure to check. The sum of all parts must be equal to the overall width of the cabinet: 761 + 861 + 16 + 16 + 16 \u003d 1670 mm.

Drawer facade - 2 pcs. - 150x757 mm and 2 pcs. - 250x757 mm
Drawer height - arbitrary. But the width is a technical value that must be calculated based on the internal size of the opening in which the boxes are located. In our case, it is 761 mm. For durable and efficient operation of the drawer from the internal size (if it is simpler - the length of the shelf), you need to take 4 mm to the technological gap. That is, the width of the facade: 761 - 4 \u003d 757 mm.
Master Board: calculating the width of the facade, do not forget about the edge, which will subsequently be glued around the perimeter. It also has its thickness. Therefore, do not forget to subtract the thickness of the selected edge from the actual size of the facade of the drawer.
Calculation of details for custom size cabinets
Non-standard wardrobe is a product, the dimensions of which exceed the dimensions of the chipboard sheet. The main dimensions of the chipboard: 1830х2750; 1830x2440; 2070x2800 mm.
If you are going to make a cabinet with a length of 3000 m, the beginner faces the problem that the roof and the bottom do not fit in the dimensions of the chipboard. How to get out of this situation? Everything is simple - we design a wardrobe in two parts, that is, now there will be two sides inside, not one. The roof, bottom and basement will also consist of two parts. In fact, these are two separate cabinets, tied together.

Important: the depth of the inner sides is less than 80-100 mm relative to the size of the wardrobe.
In addition to the above, it will be correct to install such a large wardrobe not just on the base, but on plastic adjustable legs, which subsequently close the removable bottom bar.
We recommend that you carefully study the scheme to avoid errors in the calculation of cabinet details. On the proposed drawing, it is clearly seen how the parts are arranged, taking into account the design of a non-standard cabinet and the thickness of a chipboard.
Nuances of cutting details in the sheet of chipboard
Writing all the details on a piece of paper, you have two options. The first one is to go straight to the company with this list, where the specialists will make the cutting and transfer it to the furniture workshop for cutting. The disadvantage of this option is that you will not be able to control how correctly the cutting of the parts is made in the chipboard sheet, which means that there is a possibility of overpayment.
The second option is more complicated, but it is much more profitable for you to decompose the parts yourself and preliminarily calculate the required number of sheets of chipboard.
Consider the structure of the plate
If you are planning to make a wardrobe of chipboard with a printed tree structure, you need to rewrite all the details in a certain pattern. For example, specifying the first size against the structure.

If the chipboard is smooth, monophonic - the dimensions of the parts can be written in any sequence.
Cutting program
The most common chipboard cutting program is Cutting. It can easily be found in open access on the Internet, it is free and is installed on a computer in two clicks. The program makes it possible not only to automatically decompose the details in the sheet, but also allows manual adjustment.

Cutting principle of operation is that you enter the dimensions of the plate and details of the closet, and it calculates the best layout. If you are not satisfied with the cutting results, you can easily move and turn parts yourself.
Master Tips:
- The overall size of the chipboard sheet must be entered 20 mm smaller. That is, if the plate is 1830x2750 mm, the program specifies 1810x2730 mm. 20 mm - technological base (swelled or chipped edges are cut off on the machine).
- In the column "cut width" enter - 4 mm - this is the width of the cutting saw.
- Do not forget about the structure of the sheet chipboard.
Having made yourself cutting the parts in a sheet of chipboard, it becomes clear how many concrete plates you will have to purchase. Often, the production department does not implement separately the details, and takes into account only the number of plates. If it turns out that most of one of the sheets is not involved, you still have to pay for it. Therefore, in a quiet home environment, think and design, for example, a small coffee table or additional shelves to match the new cabinet. Thus, you make the most of the purchased material and harmoniously equip the interior of the room.

Master Board: when taking ready parts from the shop, be sure to check the size. Do not be lazy, count and re-measure every detail.
Summing up the article, it remains to add only one thing. If you clearly followed the instructions above, were attentive and did not pass by the advice of experienced craftsmen, you can safely go with a cutting card to the sawing shop, and after getting the finished parts - assemble the wardrobe yourself.
At the planning stage of the transformation of the space of your own apartment, all the nuances are important. The program for cabinets coupe is a great solution for those who want to design a product for storage on their own. To date, these utilities weight, so everyone can choose the one that best suits the parameters and functionality.
Drawing up a drawing and project of the wardrobe in a special program
The program for the design of cabinets coupe is a very useful and important utility. Among the advantages, the following factors can be noted:
- Such software makes it possible to draw a cabinet of various shapes and sizes. Therefore, you can not limit your imagination and use a variety of ideas.
- Thanks to the profile utilities, you can see how the wardrobe will look like after assembly.
- Also, there is a great opportunity to see how the piece of furniture fits into the space of the room.
- For a cabinet drawn in a special utility, you can use different color combinations. This will help to choose the most harmonious piece of furniture for.

Calculation of the cabinet and the selection of colors
- Using programs to create cabinets coupe, it is possible to calculate how much material is necessary for the design and.
- An excellent opportunity is that at the planning stage a person will know how much money will be required to allocate a headset for an item.
- Utilities for the design of cabinets coupe will help to save on the services of specialists who design products for storage of things. Due to the fact that software is quite accessible for people to understand, even with little experience, everyone will be able to independently realize their plans in the selected software.
- Also, with the help of such a program, it is possible to make an exact calculation of the amount of necessary materials for the design of the wardrobe compartment.

The process of drawing up the drawing of the future wardrobe compartment
These are just some of the advantages that favor the use of such tools.
Who needs such programs
Utilities that help to create projects of cabinets are widely used among various versts of the population. Most often designer wardrobe use:
- professionals involved in the assembly and sale of furniture, in particular, wardrobes;
- people who, while making repairs in their own "nest", decided to pour a part of their soul into and invent such an important piece of furniture on their own;
- room designers also often use this utility;
- coupe cabinets are also designed by people who want to save their personal budget on paying for project specialists.

Online calculator interface for calculating the wardrobe
In general, such systems can be used by anyone who is faced with the question of the need to design a wardrobe compartment.
Programs for creating cabinets coupe
In the space of the Internet you can find many utilities in which projects are created for such an interior item as a wardrobe. It is worth paying attention to the following software.
Mebel pvm
This software will allow you to determine the real cost of construction and calculate the number of required materials. To obtain an accurate result, you must specify:
- How many shelves should be in the design.
- What is the height of the future piece of furniture?
- The width of the cabinet is also indicated in a special form.
- Sliding structures that will be in the product must also be considered in order to correctly indicate them in the list.
- The door structure should also be thought out.

By setting these parameters, you can understand which cabinet we will draw in imagination and how much the desired object will cost. The utility has a fairly simple interface, so everyone can easily master its functionality.
PRO 100
In this utility, you can create projects of any furniture for each of the premises of an apartment or house.
Creating a wardrobe with a PRO 100 in 3D graphic mode is very easy. The advantages of the program include the following factors:
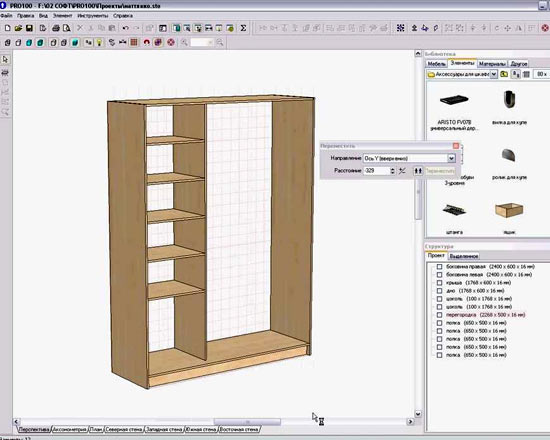
In general, the program is worthy of attention, so you should try its functionality to implement your own ideas. Video review of the rapid design of the cabinet in the PRO100.
eXponent Furniture Designer
This software is most often used in enterprises engaged in the assembly and sale of furniture. The benefits are:

Among the variety of software, everyone will be able to choose for themselves the one that will most suit the preferences. The main thing is that with the help of these utilities, the process of creating the design of the compartment cabinet is reduced to minimal actions and a person after simple processes can see what the structure will be after its assembly.
Before producing this or that type of furniture, it is necessary to design, create its image. It will help the manufacturer to detect and correct errors, shortcomings, show how the future product actually looks like, whether it meets the aesthetic standards, and whether it meets the chosen style. The Internet offers programs designed for both designers and designers, and for home craftsmen who want to design these items at home.
Design tables in the program basis
What is this software for? Some editors are designed so that they themselves perform many operations on the design of furniture. They help to create models of future products, select materials, accessories, even make estimates and estimate the cost. Therefore, using them does not require special skills and greatly facilitates the work of the developer.
There are a lot of them. In no case should one be limited to the consideration of one program. You should explore several options and adopt those that are easier to use. It is also very important that they can work on a computer with existing software. In their list you can find those that are designed for 3D modeling.
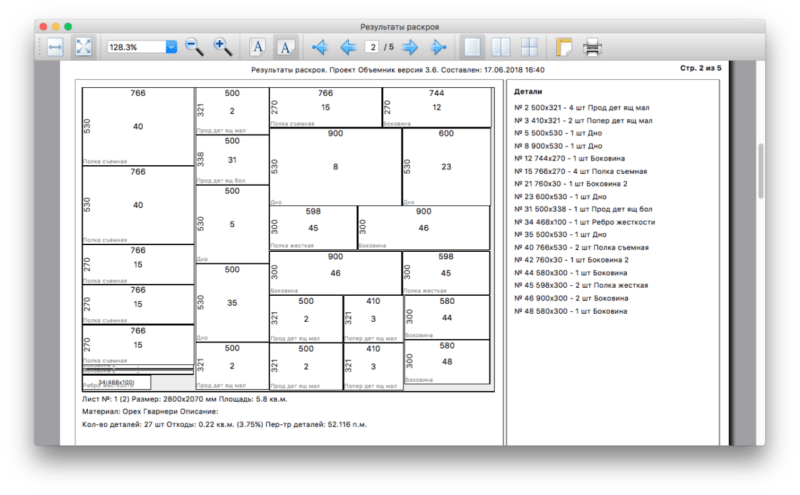
Program OBEMNIK
Many furniture companies use several utilities for designing and manufacturing furniture. Program OBEMNIK - universal, suitable for the salon or manufacturer. It replaces all possible programs for a furniture company.
Designer in OBEMNIKE will find an excellent drawing of objects with shadows and effects, created in real time. The manager will arrange the furniture very quickly and clearly with customers at the address in the cabin. The designer will display the detailing, cutting, without using any manual manipulations. The manager will be able to follow the accepted orders, their prices, the amounts of the advance and the final settlement, the purchase price of the products.
The overall process of creating a project and order:
Great practical experience helped to create convenient components:
- “Color wheel” allows you to mix texture with color. The client should not stand aside, retract it into the process, select the material and color. After the joint work, the order for the furniture is guaranteed to take place.

- Cutting module. Without waiting for design processing, find out the number of sheets spent on the manufacture of a kitchen or cabinet. Perform project optimization to reduce the number of sheets. For example, you designed a kitchen set. From the markings of plastic it is clear that one door did not fit together - discuss it with the customer. Change the facade to another or reduce the size of the headset.
- Special report forms, so-called “machine forms”, which are adapted for a specific production.

- Full automation of the application - autocompletion of the forms of contracts, work orders, acts, and other documents. During the drafting of the project you need to print the output documents, put the stamp of the organization. The form is already completely filled with the name and amount (advance, in words). This is a complete machine for receiving an order.
- Large selection of ready-made models: from classic to modern, closets, hallways. The model range is constantly updated with the use of Yandex.Disk cloud technologies.
- Create your own sketches and catalogs. Own forces on the basis of ready-made prototypes, or a professional technologist in the Library of prototypes.

PROGRAM BENEFITS
Despite the wide functionality, the utility is easy to use. She will go for beginners, employees of the trading hall. The main advantages include:
- A clear, advanced visualization that allows you to visually demonstrate the furniture to the buyer, to perform the selection of material.
- Cutting on the machine, which allows the client to calculate the exact amount of sheet materials required for the manufacture of a headset.
- The only program for furniture makers under MAC OS X. It works on Apple MacBook, iMAC, and also under Linux OS. For companies that care about the legality of their software, or do not want to use commercial distributions of the operating system
- Advanced build not only for classical architectures, but also for computers based on 64-bit processors. The utility becomes "native" for a modern PC running Windows 10, or the latest versions of MAC OS X.
- Relatively low price compared with similar products. Usually from the first order for furniture the price of the program is fully justified. No additional costs are required, no additional components are needed to work. Updates are set free.
 This is the interface of the PRO 100 program for furniture design.
 A completed project can be analyzed in a drawing, printed out on a printer or viewed in 3D. The software package is easy to use, contains a set of tools that allows three-dimensional design with the visualization of options at the stage of modeling, interior arrangement, as well as directly in the sale process. It is used to accelerate and facilitate the work of designers and designers. Contains ready-made design options for individual rooms, kitchens, bathrooms and bedrooms.
PRO 100 is different:

Using this program allows the furniture master to significantly simplify all the nuances of development. And libraries that are included in the latest version of the package significantly expand the functionality, provide an opportunity to retreat from standard projects and open up a wide scope for creative modeling.
The software facilitates the development of its own design model, without spending much time on mounting holes, regulatory allowances, fitting accessories, even to create a cutting card.
When drafting the interior elements, such as drawers, cabinets, tables are taken from the catalog. They are easy to place, rotate, move in large and small rooms, which can be viewed in seven projections.
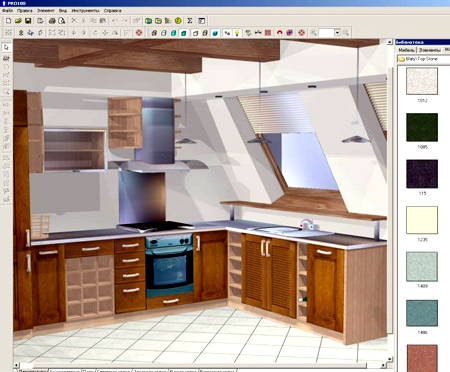 An example of modeling the interior of the kitchen in the PRO 100 program
 Each object is easy to give the name, specify its specific dimensions, material and price. In addition, the seller can clearly demonstrate the digital layout of the ordered product with the calculation of the cost in the presence of the customer, to show what he will spend his money on. According to user feedback, the PRO 100 editor is an ideal tool for customer service. And its latest version is equipped with a video capture function with saving and subsequent demonstration of the scene in 3D.
This is a system of modules that are used for the development of complex furniture. He embodied the greatest strengths of graphic editors on this topic. Its use reduces the time spent on design up to 15 times compared to manual implementation.
 Program Interface Basis Furniture Maker
 When used, the number of subjective errors in errors is significantly reduced. The initial version of the program has standard settings that can be easily changed to suit your needs. The process of creating drawings after entering the necessary data is fully automated, user intervention will be superfluous.
This article describes the algorithm for self-calculation of the details of the wardrobe and the nuances of cutting in the chipboard sheet, followed by an order for furniture production. The material presented in a simple and accessible form, will help to avoid many mistakes made by beginners.
Independent calculation of details
Calculation for the wardrobe standard size
So, you already have a wardrobe project. It remains the case for small - to calculate the details. Before proceeding to the calculation of the dimensions of the parts, it is necessary to determine from which chipboard the cabinet will be made. There are two standard sizes of chipboard thickness - 18 and 16 mm. Most furniture companies use in their production of chipboard with a thickness of 16 mm. We, too, take the 16 mm slab as a basis. This value will appear absolutely in all calculations.
Let's get started Initially, to make it easier, write down on a piece of paper the name and quantity of all the details present in the wardrobe in a column. For example:
- roof - 1 pc.
- bottom - 1 pc.
- outer side - 2 pcs., and so on
We consider the correct algorithm using the calculation example for a cabinet with dimensions of 1670x2400x650 mm.
In order not to get confused, add the thickness of a chipboard to your drawn wardrobe draft, that is, make the lines double. Thus you do not miss any thickness.
Roof - 1 pc. - 650x1670 mm
It is technically correct if the roof of the wardrobe lies on top of the side, and is not between them. Hence, its size does not change. It coincides with the dimensions of the cabinet - 650x1670 mm.
Bottom - 1 pc. - 650x1638 mm
The bottom of the cabinet is fixed between the two sides, therefore, it is necessary to take two thickness of the chipboard: 1670 - (16 + 16) \u003d 1638 mm.
Outer side - 2 pcs. - 650х2384 mm
The outer sides are covered with a cabinet roof. The calculation formula: 2400 - 16 \u003d 2384 mm.
Inner side - 1 pc. - 550х2268 mm
Master Board: The sliding door system, depending on the manufacturer, has a depth of 80-100 mm. For full opening it is necessary to reduce all internal parts by this size. That is, the sides and shelves inside the closet should be less than the overall depth of 80-100 mm.
Calculation of the inner side of the cabinet:
- depth 650 - 100 \u003d 550 mm;
- height 2400 - 16 (roof) - 16 (bottom) - 100 (base) \u003d 2268 mm.
Cap - 1 pc. - 100x1638 mm
The base is the lower plank connecting the two outer sides of the closet and supporting the bottom. The length of this bar is equal to the length of the bottom of the cabinet, height - 100 mm (you can use a different size, but not less than 50 mm).
Shelf - 1 pc. - 550x861 mm, 4 pcs. - 550x761 mm
Recall that the inner side of the cabinet is shifted to the left by 50 mm in order to comfortably work drawers. It follows that the shelves on the right side of the cabinet should be longer than those on the left. To make it easier, we first calculate the size of the shelves as if they were the same, and only then subtract 50 mm: 1670 - 32 (outer sides) - 16 (inner side) / 2 \u003d 811 mm.
- 811 - 50 \u003d 761 mm - the length of the shelves of the left side, where the drawers;
- 811 + 50 \u003d 861 mm - the length of the shelves in the right side of the wardrobe.
After calculations, be sure to check. The sum of all parts must be equal to the overall width of the cabinet: 761 + 861 + 16 + 16 + 16 \u003d 1670 mm.
Drawer facade - 2 pcs. - 150x757 mm and 2 pcs. - 250x757 mm
Drawer height - arbitrary. But the width is a technical value that must be calculated based on the internal size of the opening in which the boxes are located. In our case, it is 761 mm. For durable and efficient operation of the drawer from the internal size (if it is simpler - the length of the shelf), you need to take 4 mm to the technological gap. That is, the width of the facade: 761 - 4 \u003d 757 mm.
Master Board: calculating the width of the facade, do not forget about the edge, which will subsequently be glued around the perimeter. It also has its thickness. Therefore, do not forget to subtract the thickness of the selected edge from the actual size of the facade of the drawer.
Calculation of details for custom size cabinets
Non-standard wardrobe is a product, the dimensions of which exceed the dimensions of the chipboard sheet. The main dimensions of the chipboard: 1830х2750; 1830x2440; 2070x2800 mm.
If you are going to make a cabinet with a length of 3000 m, the beginner faces the problem that the roof and the bottom do not fit in the dimensions of the chipboard. How to get out of this situation? Everything is simple - we design a wardrobe in two parts, that is, now there will be two sides inside, not one. The roof, bottom and basement will also consist of two parts. In fact, these are two separate cabinets, tied together.
Important: the depth of the inner sides is less than 80-100 mm relative to the size of the wardrobe.
In addition to the above, it will be correct to install such a large wardrobe not just on the base, but on plastic adjustable legs, which subsequently close the removable bottom bar.
We recommend that you carefully study the scheme to avoid errors in the calculation of cabinet details. On the proposed drawing, it is clearly seen how the parts are arranged, taking into account the design of a non-standard cabinet and the thickness of a chipboard.
Nuances of cutting details in the sheet of chipboard
Writing all the details on a piece of paper, you have two options. The first one is to go straight to the company with this list, where the specialists will make the cutting and transfer it to the furniture workshop for cutting. The disadvantage of this option is that you will not be able to control how correctly the cutting of the parts is made in the chipboard sheet, which means that there is a possibility of overpayment.
The second option is more complicated, but it is much more profitable for you to decompose the parts yourself and preliminarily calculate the required number of sheets of chipboard.
Consider the structure of the plate
If you are planning to make a wardrobe of chipboard with a printed tree structure, you need to rewrite all the details in a certain pattern. For example, specifying the first size against the structure.
If the chipboard is smooth, monophonic - the dimensions of the parts can be written in any sequence.
Cutting program
The most common chipboard cutting program is Cutting. It can easily be found in open access on the Internet, it is free and is installed on a computer in two clicks. The program makes it possible not only to automatically decompose the details in the sheet, but also allows manual adjustment.
Cutting principle of operation is that you enter the dimensions of the plate and details of the closet, and it calculates the best layout. If you are not satisfied with the cutting results, you can easily move and turn parts yourself.
Master Tips:
- The overall size of the chipboard sheet must be entered 20 mm smaller. That is, if the plate is 1830x2750 mm, the program specifies 1810x2730 mm. 20 mm - technological base (swelled or chipped edges are cut off on the machine).
- In the column "cut width" enter - 4 mm - this is the width of the cutting saw.
- Do not forget about the structure of the sheet chipboard.
Having made yourself cutting the parts in a sheet of chipboard, it becomes clear how many concrete plates you will have to purchase. Often, the production department does not implement separately the details, and takes into account only the number of plates. If it turns out that most of one of the sheets is not involved, you still have to pay for it. Therefore, in a quiet home environment, think and design, for example, a small coffee table or additional shelves to match the new cabinet. Thus, you make the most of the purchased material and harmoniously equip the interior of the room.
Master Board: when taking ready parts from the shop, be sure to check the size. Do not be lazy, count and re-measure every detail.
Summing up the article, it remains to add only one thing. If you clearly followed the instructions above, were attentive and did not pass by the advice of experienced craftsmen, you can safely go with a cutting card to the sawing shop, and after getting the finished parts - assemble the wardrobe yourself.
Modern furniture, created from high-quality and environmentally friendly materials, has a high cost, so not everyone has the opportunity to buy it. Often, a unique and original interior is formed, which requires exclusive furnishings. In these cases, the owner of the premises can independently create a wardrobe as a project for which the furniture will be manufactured in the future. A project can be created independently using specialized computer programs or with an appropriate project organization.
If you figure out how to design a wardrobe, then create a project that includes drawings, diagrams, estimates and detailing, is not difficult. Initially, it is necessary to make measurements of the room in which it is planned to install the future cabinet.
Often people have to deal with the fact that the floors and walls of the room are uneven, but the furniture is created as standardly flat, so during the measurements all existing distortions and other imperfections on the surfaces are taken into account.
To make the measurements correctly, simple actions are performed:
- using the standard tape measure or laser level, the height and width of the walls are determined, and this process must be carried out from different parts of the room;
- height is measured at a minimum of three points;
- width is measured relative to the ceiling and floor, and at the depth where it is planned to install the wardrobe with your own hands;
- it is determined where on different surfaces there are protrusions, depressions, radiators, window or door openings, as well as sockets and other objects that are located near the intended place of installation of furniture;
- it is important to make sure that the installation of the object will not interfere with foreign objects, as well as it will not block sockets or other important items.
If during measurements there are significant distortions or irregularities of the wall or floor, then it is advisable to align them, as otherwise a well-made cabinet will be unstable. Based on the information received from the measurement, it is possible to create projects of future furniture, taking into account the proposed installation sites. It is advisable to take a photo of the room and draw its scheme on a sheet or in a computer program.

Correct room measurements
Creating a project
Design a cabinet is quite simple, especially with the help of modern computer programs, in which all calculations are done automatically. With the necessary skills, you can make your own drawings and diagrams. You can also use the examples from the photo, on the basis of which the parts are made, after which they are connected to each other in a single structure.
It is desirable simultaneously with the formation of the project to consider the design of future furniture.
The project itself consists of parts:
- a general view of the future cabinet, represented by a photo or a regular drawing, and it can be drawn by hand or using a computer;
- drawings, one of which must contain the entire product, as well as separate drawings are created for the important parts of the cabinet, which are the most significant and difficult to create;
- map of cutting materials presented in the form of sheets;
- if the sliding system itself will be made by hand, then profile detailing is necessarily formed;
- list of necessary fasteners and accessories.
All these documents have their own purpose, and are jointly presented by the relevant project. They should be created taking into account numerous requirements, since errors in them lead to the fact that the resulting cabinet will have distortions or other defects.

Follow the drawings very carefully carefully, because then you have to assemble the wardrobe just for them

Decide what specific things you plan on making the wardrobe. Make their measurements and plan for them a place in the closet.

A project is being drawn up in which all the elements of the wardrobe compartment are drawn
Housing
The project of a sliding wardrobe will certainly include a drawing of the case, which is the most significant element of this furniture. Photos of sample drawings can be viewed below. During the creation of the scheme, the main parameters that the cabinet should have are taken into account:
- width - it is calculated depending on what place is allocated for the installation of the structure. If it is mounted in a special niche, then when measuring it is necessary to obtain information about its width, and the cabinet should have a slightly smaller figure so that no obstacles arise when installing it in this slot. Usually 5 cm from the width of the niche is taken away for this. This allows you to get a special technological gap that simplifies the installation or disassembly of furniture;
- depth - this indicator of the hull also depends on the measurements made in the first stages of work. The optimal value is considered to be the depth ranging from 60 to 70 mm, but if there is too narrow a room, then the indicator can drop to 35 cm. This value is optimal for children's wardrobes. If the user is an adult, then for the rational use of internal space it is desirable to make wardrobes with a depth of 55 cm;
- height - the Pythagorean theorem is used for its calculation, since the cabinets are bulky structures, therefore they are usually assembled on the floor, after which they rise in finished form, so that during this process the furniture does not rest on the ceiling, it is necessary to calculate the diagonal of the side wall correctly. Also, when choosing a height, the height of the user and his preferences regarding this indicator are taken into account. It can vary from 1.5 to 2.4 m.
The above parameters are essential for the cabinet body. Thus it is necessary to decide what design will be created, as well as what materials will be applied during the work.

How to measure a niche for the closet compartment

Correct measurements for the corner wardrobe

Usually a list of parts with dimensions is enough for you to be cut.


Sliding system
To get a properly designed cabinet, a lot of attention is paid to the calculations and selection of the sliding system. There are several such systems that differ in cost, creation rules, use nuances and other parameters.
When designing such a system, its main characteristics are taken into account:
- profile strength, which depends on the material used, since wood or iron can be used for this, as well as aluminum, and the wall thickness affects the strength additionally; therefore, this parameter is calculated depending on the planned loads on the system;
- the coating available on the profile, on which it is not allowed to have any divorces, blisters or other defects, its design may be different, but it should be well suited to the color scheme of the room and the chosen design direction in the room;
- the reliability of the roller, which is the weakest point in the entire system, is considered an important parameter, so you need to buy only high-quality elements, as well as correctly calculate the places of their installation along with the guides, as distortions lead to their reduction in service life.
Most sliding systems consist of two guides on which the rollers move. The most popular systems are:
- roller - a special suspension is attached to the upper part of the door, additionally fixed with a roller slider. This mechanism can be suspended or supporting. Due to such a device, the system ensures its quiet use;
- frameless - do not have to spend a lot of money on their creation. Presented by laminated chipboard, not framed steel profiles. Rollers are attached to the top and bottom of the door. Due to constant impact, the chipboard sheet is quickly deformed, therefore the system is considered to be short-lived;
- framework - are made of steel or aluminum, and the latter option has a high cost. Aluminum constructions easily withstand high loads or other impacts;
- systems specifically designed for the radius cupboard. Presented curved profile relevant for interiors, which use non-standard and curvilinear shapes and interior items.
Photos of various sliding systems can be viewed below, and the choice of this design depends on the financial capabilities and desires of users.

Assembling the door of the wardrobe

Door options

Calculation of door panels
Filling
How to design a wardrobe, taking into account all the nuances? It is important to understand not only in the case with a sliding system, but also with the filling of the structure. There are many different storage systems that can be used for this furniture, and during design the following nuances are taken into account:
- the distance between the shelves is not less than 30 cm, but when creating the cabinet itself, the users themselves determine this parameter, which depends on what will be located on one shelf or another;
- if there is a compartment for hangers, then its depth should not be less than 55 cm;
- decides how many drawers are needed, their location, size and depth are marked on the diagram;
- various additional elements for filling the cabinet are selected, which include different sliding nets, baskets, hangers designed for ties, a pantograph or narrow compartments for shoes, as well as built-in ironing boards or other similar items.
Filling is considered an important stage in the design of the future cabinet, although it can always be slightly modified if necessary.


Creating an assembly drawing
When schemes are prepared regarding the main parts of the future cabinet, a direct assembly drawing is formed from which information can be obtained:
- dimensions, appearance and parameters of the frame itself;
- type and features of the sliding system;
- the number of shelves and other items in the cabinet;
- the materials used to produce the structure;
- estimated cost of the process.
It is desirable to develop such a project using an appropriate computer program, for which only the basic parameters of the future structure are entered and calculations are automatically made, a drawing is made. If you have experience and skills you can make a drawing or a scheme on paper with your own hands, for which you use a pencil and other stationery.


