
Thanks to modern construction materials, developers have the opportunity to build various options for one-storey baths with a veranda.

Buildings differ in:
- foundation type. For such baths, you can use screw pile, columnar, columnar with grillages and shallow-depth tape types of foundations;
 Types of building foundations
  Common foundation types
  Types of column foundation
 - construction material. Baths can be built from natural sawn, shaped, glued and rounded timber, cement foam blocks and bricks. The use of sandwich panels and frame construction is allowed;
 Log cabin
  Bath of profiled timber
  Brick bath
  Bath of blocks
  Bath from sandwich panels
- view of the roof and roofing. The roof can be dual slope, flat or single slope. Covered with all types of roofing materials - from ordinary asbestos cement to slate and metal roofing to materials based on modified bitumen;
 Roof types
- on architectural features of buildings. Separately standing, adjoining, with verandahs, with penthouses, with pools, etc.
 Bath extension from a bar
  Bathhouse with gazebo
  Bath with summer kitchen
We no longer recall the differences in furnace designs, the presence of autonomous heating, and drainage systems. In one article to consider all the features of the construction of each version of the bath, even theoretically, it is not possible, consider only one option: a bath of foam blocks.

With the drafting of the project, it is not necessary to contact specialized companies, it is very expensive. It is enough to get acquainted with numerous offers on the Internet and on the basis of the information received to choose the best option for yourself or create your own individual project. By what criteria to choose (or make) a bath project?
The number of family members. For a family of three to four people, it is enough to have a bath of size ≈ 10 ÷ 16 m2. such dimensions allow for the placement of a quite comfortable wash (≈4 m2), a steam room (≈4 m2) and a rest room (≈3 m2).
 Bath project
  Layout option
If the family is larger or you plan to wash in a bath with friends - the option of a bath with dimensions of ≈20 ÷ 30 m2 will suit. These dimensions make it possible to significantly increase the rest room (up to ≈10 m2), the size of a steam room and washing room up to 6 m2, to make a separate vestibule at the entrance doors.

It is advisable to simultaneously make a veranda (terrace). How does the veranda differ from the terrace? Veranda has glazing and can be insulated. We would not advise you to make a veranda, its role is perfectly performed by the rest room. A terrace will allow after the water to enjoy the fresh air. But we only advise, the final decision is yours.
 Glazed veranda
Luxurious bath. Here, fantasy is limited only by the capacity of the wallet. You can make pools, a separate Russian steam bath and a Finnish sauna, lounges and gyms. Such projects do not do it yourself, you should contact specialized design companies.
 Luxurious bath. Backlit steam bath
  Pool in the bath
  Chic lounge room in the bath
We will focus only on one fairly simple version. bathhouses with a veranda of foam blocks.

The technology of building a bath with a foam block porch
Of all the possible options for building structures, we choose the most simple.
- Belt shallow-foundation and drainage system.
- Double sloping roof under the bath and veranda, metal profile coating.
- Interior decoration and flooring - natural lining and planed boards.
- Oven metal homemade.
- Exterior finish - painting resistant paints.
Stages of work
First you need to make a calculation of the required materials. What do you need?
During the manufacture of concrete will require a certain brand of cement, sand and gravel. For acquaintance with recommended proportions study the offered table №1.

To calculate the number of ingredients of concrete, use the table number 2

During the manufacture of concrete, no one weighs the ingredients to the nearest kilogram, industrial enterprises use these norms to write off materials.
For our version of the bath, concrete of mark 200 is sufficient; it can withstand a load of ≈200 kg / cm2.

Calculate the volume of your foundation and the volume of the foundation under the kiln (if it has one), this will give you the opportunity to determine the number of all the constituents of concrete. The resulting value should be increased by about ten percent, which will cover possible errors and waste.

For the box you need to buy foam blocks. For laying one cubic meter of blocks, approximately 0.2 m3 of cement-sand mortar is necessary, keep this in mind. To calculate the number of blocks, you need to divide one cubic meter by the volume of one block. For example, with a block size of 200 × 300 × 600 mm, its volume is 0.036 m3, therefore, for a cubic meter of masonry, 27.8 pcs will be needed. (1: 0.036).


Using the same method, count the number of floorboards, ceiling and wall sheathing boards, plastic battens and roofing. Determine the number and length of floor and ceiling beams of 100 × 100 mm, boards for rafters 50 × 100 mm, battens for battens 20 × 50 mm. Calculations of the amount of roofing materials, insulation and waterproofing materials are no different.
Needless to say, you need to purchase nails and screws, baseboards, trim, doors and windows. All calculations have been made, the material has been purchased - you can begin construction work.
Foundation
We have already decided that we choose the tape shallow-deepened version.

| Item number | Job Description | Illustration |
|---|---|---|
| Step 1. | Site preparation. It should maximize align the platform around the perimeter of the foundation and remove the upper fertile layer. Do not be lazy to level the ground, otherwise you will have to increase the cost of materials and time for the construction of the foundation. | |
| Step 2. | Markup. A very important stage, the mistakes made are very difficult to correct, and in many cases impossible. Prepare wooden pegs, tape measure and rope. Smash pegs into the outer sides of the foundation and check the corners. All of them must have exactly 90 °. Pre-mark on the template. You need to check with the help of diagonals - the length of the two diagonals should be the same. The width of the foundation in our case is 25 centimeters. | |
| Step 3. | Trenching A depth of 60 centimeters is enough to prevent the earth from swelling on the bottom, you need to make a sand cushion 15–20 cm thick. This is much easier than digging the foundation to the depth of frost penetration, it can reach more than two meters in cold climatic regions. The sand compensates for the swelling of the frozen ground, the foundation will be stable. If the stove is breaded with a foundation - prepare the pit and under it. | |
| Step 4. | Pouring concrete into the ground. If the land on your site is dense and the trenches do not collapse, fine, you can pour concrete without formwork. If the sand - will have to do the formwork not only above the ground, but also in a trench. It is necessary to immediately provide and adjust the width of the foundation. The formwork is made of cuts, used boards, sheet plywood or moisture-proof OSB. It is very important - fix the formwork in such a way that it can then be easily dismantled. |
Concrete is ideally poured all at once, it does not work - do the filling in stages. The main thing is to lay concrete in the same thickness across the entire perimeter, otherwise the strength of the foundation will sharply deteriorate. Do not forget about tamping, you can perform it with special vibrators or homemade "tolkushkami."


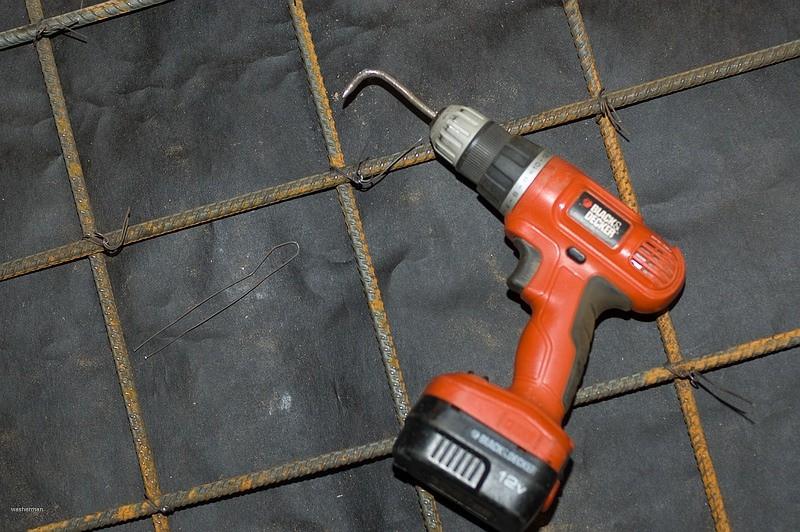
Reinforce the concrete should be building reinforcement periodic profile Ø 5 ÷ 8 mm.
 Reinforcement - scheme


It is very important: the distance of the reinforcement box between the formwork should be at least 5 centimeters, lift it from the bottom with stones. A bundle of reinforcement is made with wire.
 Armature - photo


CONCRETE AND CONCRETE STRUCTURES. BASIC PROVISIONS. SNiP 52-01-2003. Moscow 2004 Download file
Very important. Do not forget to make air vents for floor ventilation; without functional natural ventilation, the boards will rot very quickly. To do this, insert into the formwork pieces of pipe or make a wooden box. The distance between the airways in opposite walls is approximately 1.5 ÷ 2 meters. At the same time in one of the corners, leave a hole for drainage.


Manufacturing and installation of formwork
The height of the formwork should be slightly greater than the height of the foundation; formwork should be installed in a level, securely fasten all shields to the ground. Remember that fix the "convex" foundation is very difficult.

Works are performed in the same way as pouring concrete into the ground. With one difference - carefully check the horizontal position, construction standards allow horizontal deviation of no more than one centimeter per five running meters. In most cases, the surface of the tape will have to be trimmed again. Let the concrete stand for at least two weeks, then remove the formwork.

The foundation is ready, you can start laying blocks.
Masonry blocks
Step 1. Markup. Before marking lay on the foundation two layers of waterproofing. In this case, it does not so much protect the blocks from destruction (they are not afraid of high humidity) as all the wooden elements adjacent to them. Make accurate markings of doorways and joints between internal and external walls. Further, a very important point - the exposure of the corner lighthouse blocks.


In all corners of the building without a solution, we place them in a block, expose them with maximum accuracy in terms of the level, check the distance between them along the perimeter and the angles, with the help of a rope. How to check the corners we have already told above. The maximum discrepancy between the length of the diagonals and the perimeter of the building should not exceed two centimeters, this figure can be eliminated during the laying of the walls. Now you can put the lighthouse blocks on the solution.

 Laying the first row of blocks - the result
Step 2. Carefully drive nails into the lighthouse blocks and pull a rope between them. This will be the template line in height and linearity for the next row of blocks. The rows of blocks should hang over the plinth somewhat, so it will be easier later to do finishing works on the plinth. Apply a mortar with a thickness of 1.5 ÷ 2 cm to the foundation, then adjust the length of the applied area, taking into account the speed of your laying.
Keep in mind that the foam concrete blocks absorb water very quickly, all work should be done quickly. The first row fits the special care. First, this series is considered basic. Secondly, you still do not have enough experience to use instead of the level of "master accurate eye." The length of the wall is rarely a multiple of the length of the blocks, they will have to be cut, use an ordinary hacksaw for this, foam blocks are perfectly cut with such a simple tool.
Step 3. Do not forget during the laying of the first row of front walls to begin to lay out the first row of interior walls with snapping.

Step 4. At the corners of the bath and in the place where the walls are joined, carefully place 3 ÷ 4 rows of blocks, check their position several times. Further in the joints of each row you will fix the rope and continue laying along it. In the future, all operations must be repeated: again, lay a few rows in the corners, stretch the rope and build the walls.


Step 5. Window openings. When the height of the walls is equal to the height of the windows or doors, make a marking of their width, continue laying, taking into account the height of the windows. As a jumper, you can use a metal corner 50 ÷ 50 mm or more or metal reinforcement with a diameter of 10 mm or more, or make a concrete jumper. The ends of the jumpers should go approximately 25 ÷ 30 cm on the walls on each side of the window or doorway.


Step 6. The last two rows need to be reinforced with construction fittings Ø 10 mm, lay the rods in two or three rows at equal distance. Without reaching one row before the end of the laying, lay the ceiling beams 50 ÷ 100 mm. Due to the fact that the attic space will not be used, 50 × 100 mm boards can be used for the ceiling, the ends of the boards resting on the wall should be insulated with roofing material. The distance between beams is 1 ÷ 1.5 meters. Put the last top row of blocks. On this box is almost ready, gables will be bricked up after the construction of the roof. In the pediments will need to make windows.


Now you can start building the roof. She will have a double slope with a departure for the veranda.
Video - Laying the lag floor
Video - Draft overlap
Video - Construction of foam blocks
Roof
The bath has small dimensions, we choose one of the simplest variants of the truss system - hanging.
 Hanging rafters - calculations
Do not forget that the roof will be with the flight, before installing it you need to fix the vertical supports for the veranda. Measure exactly their length and fix it to the foundation with metal corners, check the height again and adjust if necessary. Horizontal checks with rope or hydro level.


An example of the construction of a veranda - a pillar of timber
In order for work to be carried out quickly and safely, you need to lay a temporary (draft) coating on the existing ceiling beams. Use any boards for this, anyway, then they will need to be removed to insulate the ceiling of the bath. But do not be too "fussy", you will have to walk on this temporary ceiling during the construction of the roof.
Installing a power plate
The rafters will rest on it, for a mauerlat use a bar of 100 × 100 mm. The beam is laid under the rope along the entire length of the bath and the veranda; for waterproofing, use roofing felt. Be careful with waterproofing, the fact is that all materials based on cement tend to absorb atmospheric moisture. And high humidity has a negative effect on wooden structures.
Step 1. Check the position of the upper masonry belt, if necessary, trim it.
Step 2. Measure the length of the opposite walls and the distance to the extreme vertical support column, using this data, prepare a timber.
Step 3. Put two layers of roofing material on the wall and a timber on it, do all the work on the stretched rope, the power plate should be in the middle of the blocks.


Very important! The distance between the opposite plates should be exactly the same.
Step 4. Securely attach the power plate to the wall. For this you can use trim rebar lengths 30 ÷ 40 centimeters. Before laying the power plates, it is advisable to drill holes in them under the metal pins, the distance between the holes is about one meter. Drill through the existing holes, hammer in metal dowels. Mauerlat need to be fastened firmly, correctly perform all construction operations.
Mauerlaty need to do for the vertical supports of the veranda. We strongly recommend that one beam overlaps the supports and be tied to the bath box - the stability of the structure will increase.

Step 5. Calculate the size of the rafters, make one piece of boards. It is inexpedient to use for vertical stops of the headstock, it is enough just to connect the rafter legs with each other with the upper tie.


For fastening use nails or screws of appropriate length, metal corners and plates. This will speed up and simplify the process of building a truss system. For our rafters, the board will fit 50 × 100 mm, the distance between the rafters is 1.2 ÷ 1.4 meters, the number of rafters should be more than needed to overlap the box - this roof will also close the veranda. The slope of the slopes in the range of 20 ÷ 30 °. Do not forget that the rafters should be thirty inches beyond the walls to divert rain and melt water.

How to make a template? Take boards that are suitable for the length of 20 ÷ 25 mm thick, lift them to the roof of the bath. One nail overlap at the top, the boards should rotate. Beforehand “on the eye”, set the angle of inclination, hammer in the second nail at the top, thus fixing the angle of inclination of the rafter legs. Attach the template to the mauerlat, mark the place of the docking, cut the stubborn "heels" in these places, check the position of the rafter legs again. Walk with the template along the entire length of the bath, do a rafter inspection. If everything is fine, you can lower the template to the ground. Using this template, make all the rafters, lift ready-made structures to the roof. Further, the truss legs can be mounted on the power plate.


Step 6. Install rafters along the edges of the roof, including their departure over the veranda.


Check the position, everything is fine - temporarily fix them from below with any boards or slats of the appropriate length. Stretch the rope along the ridge and you can install all the other truss legs.


Step 7. Nail the crate. In our variant, metal profile (professional sheet) is chosen for the roof covering. The distance between the crate is approximately 40 centimeters, this is enough to secure the sheets. For crates, you can use slats or inexpensive boards. The second is preferable - less chance of missing the screw in the rail.

Step 8. There is a desire - install a hydro-barrier, no desire - do not install. Properly covered roof and so will not have leaks. In addition, our attic space is not in use, roof insulation is not necessary.

Step 9. Carefully mark the position of the first row of profiled sheets, the length of the slab should be at least 10 centimeters. It is advisable to lay the first row without fixing and check everything.
Step 10. Secure the sheets one by one using special screws with a rubber gasket, the length of screws is at least 25 mm. On the skate you need to install a special metal curved bar. You can buy it in the store or make it yourself. Attach snegozaderzhateli.


Step 11. Wind up the rafters protruding above the wall.


Step 12. Install a drain system. The brackets need to be fixed to the wind boards, make a small angle of inclination towards the water receiver. Vertical pipes put after the sheathing of the external walls.


 In the photo - mounting gutter
Now it is possible to wall up the gables in blocks, provide windows in them. On this with all the roof. You can begin to install floors and ceilings.


Vido - Gable Masonry
Setting the floor in the steam room
The floors will be laid directly along the floor beams, the distance between the beams is one meter, to cover, use an ordinary edged planed board with a thickness of about 25 mm. Before starting to install the floor, determine the location of the water flow, prepare the receiver and make a conclusion beyond the perimeter of the bath.
For a better flow of water, we will make a small slope of the floor, 2 ÷ 3 ° is enough. to one of the walls, the grille can be bought from the factory or made independently of a piece of aluminum sheet.
Step 1. Mark and install floor beams of 100 × 100 mm timber. The ends must be wrapped with ruberoid. Fix the beams in the wall blocks; to do this, continue in the holes 10 cm deep. Insert the beams in them, cover the gaps with mortar. Do not forget to make a small bias. In other rooms, the bath beams are installed in a similar way only without a slope. To install the floors you will need to focus to tighten them or buy in the store ready. This stop is attached to the beam, a wooden wedge is driven in between it and the floorboards to attract.


Step 2. Pin the boards alternately, in the steam room you can leave small cracks, in other rooms the floor should be dense.
Step 3. Nail the baseboards, in the corners the baseboards connect at an angle of 45 °, make the sawn as accurate as possible.


While it is not necessary to grind the floorboards, these works will be done at the end of the work after upholstering the walls and installing windows and doors. In other rooms, the floor is installed according to the described algorithm without a slope.
Ceiling installation
For the ceiling, you need to take edged boards with a thickness of 20 mm, the top of the ceiling can be covered with second-hand material. We advise you to make insulation foam. The fact is that mineral wool is very afraid of high humidity, in such conditions its heat-saving characteristics deteriorate significantly. And to use various steam and hydro-barriers is expensive. Yes, and they do not give a 100% guarantee of protection.

Bottom to the ceiling beams, nail the boards, watch the size, do not allow distortions. If necessary - leave the hole in the attic. Lay foam sheets of at least five centimeters thick on the beaten boards, cover them with boards. If you already know the specific installation location of the furnace and the exit of the chimney - leave holes. It is better, of course, to upholster the ceiling with natural clapboard, but this is quite expensive. If there are financial opportunities - use the wall paneling.

Windows and doors
You will not be able to make these constructions on your own, the optimal solution is to order plastic options in size, but to install them yourself. For the price, durability and quality of plastic windows and doors satisfy the majority of developers, and we chose this option. We will tell you how to install a plastic window, the doors are inserted in the same way.
| Step, №№ | Action description |
|---|---|
| Step 1. | Clean the perimeter of the window opening from dust. |
| Step 2. | If the window is large and heavy, then it is better to remove the double-glazed windows, if the weight of the structure does not frighten you, then you can not disassemble the window. |
| Step 3. | Insert the box into the window opening, fix it to the wall with special dowels. For buildings of foam blocks should increase the number of places of fixation, the blocks do not have high physical strength. If it is enough to install two dowels on each side of the box in wood or brick, then foam blocks require at least four. Before fixing you need to set the box strictly on the level. Use various linings and wedges during this process. Immediately replace the window sills inside and out. |
| Step 4. | Seal up the gaps with foam. Very important: foam should be given only on well moistened surfaces of the blocks. On dry surfaces, the adhesion coefficient is very low. Unfortunately, the majority of companies involved in the installation of windows, this operation misses - for them the main time, not quality. |
| Step 5. | The next day, you need to cut off the excess foam. Noticed skips - fill them with a solution, level the surface. |

That's all, all further work will be done during the cladding of the external and internal walls.
Exterior wall cladding
Pay attention to the comparative characteristics of materials on thermal conductivity, we believe that for the bath additional insulation is not required. If you think otherwise - not a problem, warm bath. Tip - warm the outer walls, it is much easier and cheaper, and the effect is the same. Calculate the total surface area excluding door and window openings. Buy materials: special glue for foam plastic, dowels and large caps, plastic reinforcing mesh, paint or decorative plaster. For insulation, use foam thickness of five centimeters. How to do it?

Step 1. Thoroughly clean the walls of foam blocks of sand and dust.
Step 2. Installation of beacons. Lighthouses are used during many construction works, do not hesitate to use them. With their help, not only the work is accelerated, but their quality is significantly improved. As beacons, you need to install foam plates at the ends of the bath; glue is used for installation. Stretch a rope between them and check the distance from it to the wall. Sheets and glue should enter this distance, if there are discrepancies - align the wall in problem areas or change the position of the beacons. The concrete decision needs to be made independently taking into account size and the location of roughnesses.

Step 3. Stick rope to the rows of foam plastic, constantly check the level of their spatial position in all directions and sides. If you have experience with tiles - you can not use the ropes, control the position of the sheets with a long, even rail. In the window and door openings, the foam plastic is cut off, the places of the cuts are closed with additional elements: special platbands and slats.


Step 4. Practice shows that expensive glue can be saved without deterioration. Apply it in the corners and center only for pre-installation of the foam plate, the final fixation is performed with special dowels after the glue hardens, as a rule, the next day. That dowel will keep insulation.

Step 5. If the surfaces are very uneven - gradually align the rows, the gaps between the plates can be filled.
Step 6. Fix the plates with dowels. One dowel should hold one corner of the foam plate, another dowel should be installed in the center of the plate. A total of five dowels on the stove. Some builders are trying to save and hold all the corners of four adjacent adjacent foam sheets with one dowel. This method of saving is risky, decide for yourself, use it or do everything according to the rules.

Step 7. Reinforcement with plastic mesh. Note that the thickness of the adhesive must be at least 5 millimeters, otherwise you will not be able to completely hide the grid. To hide the grid should be painted with fade resistant paints (facade). If further decorative plaster is planned, there is no need to embed the mesh.
Interior wall cladding
Before covering it is necessary to make electrical wiring, electrical cables should be protected with metal sleeves. The cross section of the conductive wires is selected taking into account the maximum load and power reserve. Stock always make at least 3-4 kW, this will allow you to safely use additional electrical appliances or heaters.
For the steam room, be sure to use natural lining; all other rooms can be finished with any building materials. Let's consider the most difficult option of finishing of walls - natural lining.
Step 1. Mark the wall, determine the places where you fix the vertical slats. The dimensions of the rails are 20–50 mm, the distance between them is approximately 50 centimeters.
It is important - special dowels are produced for foam blocks, do not use the usual ones!

Step 2. Reiki should be installed on the level, if the wall has irregularities of large sizes - they need to be removed. Small irregularities can be eliminated by various supports for slats.

Step 3. Fasten the two outer rails, stretch the thread between them and install all the others on it.
Step 4. Check the corners of the distance from the floor to the ceiling. If there is a difference, then saw off the first lining at the right angle to level out the horizontal position. Better to do it at the bottom of the wall, there is less conspicuous.
Step 5. With the help of small studs fasten the paneling, hammer the studs into the groove at an angle. Keep all nails in the rail. The length of the nails is about 2 cm.

Step 6. Spread around the perimeter of the entire room, fasten a special wooden corner in the corners to align the cuts. Fasten baseboards and baguettes (on the floor and ceiling).

You can finish some rooms with sheet plywood, OSB or gypsum boards. Before the start of upholstery work, you need to perform the same complex of preparatory work and fastening of the supporting frame, as for the wall paneling.
Install rainwater discharge pipes. This is where the largest and most labor-intensive construction work is completed. You can start installing the oven, steam room shelves, various shelves and benches for bath equipment. And then to paint or plaster facade walls with decorative plaster.
Video - One-story VIP bath project with a large terrace and barbecue area
A bath with a terrace and a place for barbecue is an indispensable addition for a comfortable rest, health improvement and preparing delicious food outdoors at any time of the year. Projects can consist only in the form of furnished and equipped with a stove, an extension of an open type or have side panels that protect against weathering. In the second case, the terrace can be enjoyed year-round.
The terrace is an extension of an open or closed type, which is erected directly at one of the walls of the bath (as a rule, at the entrance). It has a foundation and roof structure shared with the bath. The indisputable advantages of having a terrace are:
- the possibility of complete relaxation, without leaving the structure and the simultaneous preparation of delicious food;
- giving the functionality of the bath - an additional room in the warm season can be used for sleeping outdoors;
- the barbecue stove will be one of the most effective elements of the bath, will emphasize the status of the owners and will provide additional heating of the adjacent room.
The extension is made of various materials: it can be wooden, block or brick. Everything will depend on the building materials of the main building. Accommodation also depends on the wishes of the customer. The terrace (veranda) fits perfectly into the projects not only rectangular, but also an angular bath and is located along one of the walls, the facade or becomes a carbon construction. How it looks in the photo below.


Bath terrace zoning projects
If you equip the terrace in the corner, the chimney is easily removed through the roof and eliminates the smoke room. A sliding removable woven, plastic or glass screen will ensure the use of the veranda, despite the changing weather. The main thing: the right heat - and waterproofing.


Budget buildings can be considered frame-shield. They can be either single or double decker. The second option is a multi-level extension, where you can not only cook food, but also have a comfortable rest at any time. Photo project bath with a terrace and barbecue further.


The barbecue area, with proper placement, does not require special insulation, a chimney with a good load will perfectly ensure the complete discharge of combustion products without their falling into the terrace space. In addition, for convenience, the veranda can have several entrances.


As an ergonomic option of placing a terrace with a barbecue - the area between the house and the bath, which is used in the form of a gazebo and the transition from one building to another.
Oven-barbecue plan independently or with the involvement of specialists. The simplest option is a small grill. But a multifunctional stove is suitable for a brick bath, in which, in addition to kebabs, you can make smoked meals and hot dishes over an open fire.


For small terraces or if they don’t want, they will become too sophisticated in cooking, a small brick oven grill is being built. In the presence of a very limited budget, a stationary stove can be replaced with an assembly brazier, simply by equipping a place for it (fire insulation and extractor hood). It will be quite enough for preparation of the easiest “after the bath”.
It is interesting and useful, you can use the space under the terrace, if you make it multi-level. In this case, the porch gradually turns into a balcony and further into an arbor with a stove or barbecue.

Materials for construction
The most expensive will cost the terrace of the timber. A bath without a loft, a terrace and a barbecue will cost 750-900 thousand rubles. A two-story building with the presence of all these elements of the building has already started from 1.2 million rubles, if you order the work "turnkey". Economy offers for a small standard bath, supplemented by a veranda with a barbecue - from 550 thousand rubles.

The minimum size of the terraces with a bath is 6-9 m 2, but if the family is large or a large number of guests is expected, it is better to immediately lay a minimum of 12 m 2 in the project. When using the bath only during the warm period, the size of the terrace can be significantly increased by saving on the rest room.
The extension must be designed at the stage of the construction of the bath. In the future, such changes will require large expenditures (for the restructuring of the foundation and roof), so it is better to think of everything in advance.
It is also important to determine the materials, if the bath is a log building, then it is better to build a terrace using wood, etc. The fact is that the difference in building materials can negatively affect the foundation, and as a result, the whole structure. The interior decoration of the terrace does not need to be done in sharp contrast to the overall interior of the building. And not only for aesthetic reasons.
Each type of material requires a certain thermal and waterproofing, protection from damaging biological factors, has a different weight, heat capacity, the ability to resist chemical and atmospheric exposure from the outside.
Wooden, brick or stone columns, on which the roof rests, are used as a fence, and side elements of protection against wind, rain, sunlight, etc. are fixed. Today, the leading position in this is polycarbonate. It is easy to mount and take off according to the seasons. It retains its original appearance for a long time, is not deformed, it is easy to clean.

The materials for the barbecue oven must be heat-resistant, moisture-proof, inert to temperature extremes, and the oven itself must work on several types of fuel (coal, wood).
Baths with gazebos under the same roof are comfortable and functional. A small extension serves a decorating role, allowing the rest room to be taken out of bounds. And if you also plan a barbecue, then a place for taking bath procedures can be retrained in a full-fledged place to relax.
Let's see what in this plan offer modern projects of baths with gazebos, they are presented in the photo below.
Typical solution with a gazebo 9x6 meters
Rounded or oshkurennoe log, gable roof and a small veranda in front of the entrance.

Indoors do not abound in the presence of rooms for various purposes, but for bath procedures there is everything you need: a relaxation room, a shower room and a steam room. 

This project contains more interior space, although the terrace also has good dimensions. Large lounge, vestibule and corridor. Convenient arrangement of the furnace. Entrance to it from the terrace.

All rooms in this project have proportional dimensions.
Chic project bath with a gazebo and barbecue.


Project of a bath with an arbor and barbecue of open type

Above are three projects of baths with a gazebo and barbecue. In each performance, different variations of the ratio of rooms. In general, barbecue in the bath and a gazebo under the roof is a convenient combination of utility procedures and comfort.
The designers in all three layouts made different slopes in terms of room delimitation. In one, under a gazebo and barbecue, more space is allocated than under the washing compartment, in others, on the contrary, more bias is used to increase the size of the main rooms.


This project successfully combines an aesthetic appearance: a covered veranda and a convenient location of the interior.
Japanese style.


Oriental motifs allow you to imagine the location of the premises. Large comfortable gazebo, sauna and washing rooms.
Another interesting solution. 
Another original project. Bathhouse with a gazebo built in several transitions. In its own way convenient and original. From the main premises after the adoption of procedures, you can go to the gazebo with a barbecue, and then there is another resting place with benches and tables.
For many centuries, the bath was a place of purification of the body and soul. Over the years, the mentality of people has changed, and now the bath is increasingly being used more for relaxation, combining bathing procedures with pleasant communication or eating. That is why more and more often baths are built spacious with large lounges, and among the popular layouts, baths with a terrace and barbecue are more and more offered.
Where to start - we determine the type of bath
By type of construction distinguish the following types of baths:
- Built-in - it is a combined bath with a house, when inside the house there are rooms for the steam room and the washing room. In this case, the living room serves as a rest room;
- Detached - a full-fledged bath, built in the form of a separate building with all the necessary facilities (steam room, washing room, dressing room and / or recreation room). Recreation area can be placed on the terrace, attic, or in the gazebo with barbecue.
- An extension is a small-sized sauna attached to one of the walls of the house.
- Economical option - small baths with a large terrace or without, mainly performing only the functions of a steam room.
- Bath-tent - a type of mobile bath, ideal for outdoor activities.

Bath-tent inside
Where to build a bath - competent selection of the location
Any construction on the household plot should be coordinated with the relevant authorities by local and district authorities. When placing the building on the building plan, consider the distance from the bath to the rest of the buildings around, in accordance with sanitary standards and rules for building homestead plots and planning residential buildings. For example, SNiP 30-02-97 establishes the rules for the construction of personal plots, in SP 11-106-97 they specify the distances from the objects, and also contain an algorithm for the design and coordination of the location of buildings on the development plan.
Here are some excerpts from them:
- the distance from the bath to the fence should be at least 3 m;
- if there is a well at the site, the distance from it to the bath should be at least 12 m to prevent contamination of well water;
- the distance from the sauna to the house must be at least 8 m.
For practical reasons, it is best to place a bath in the backyard on a hill in order to facilitate the removal of water from the washing room and the steam room.

The distances between the objects in the garden plots: 1.2 - residential building, 3 - bath, 4 - gazebo, 5 - toilet, 6 - well, 7 - tall tree, 8 - low tree, 9 - shrub, 10 - green zone border, 11 - road, 12 - fence
The choice of materials for the construction of baths and terraces
The traditional option in the construction of baths, of course, is a tree, but recently the baths are also built from foam blocks and bricks. Each of the material has its own advantages.
Rounded wood or timber
Natural, environmentally friendly material creates comfort and coziness inside the bath, gives the house a majestic look. From the outside, it does not require finishing with facing materials, since the rounded or even forms of the tree themselves already give a complete look to a beautiful wooden house.
Inside, if desired, the walls are lined with clapboard, using a hardwood plank. Pine or spruce is used for finishing rest rooms and a waiting room, as using them in the steam room is undesirable, because at high air temperatures the tree emits volatile compounds of resins.

Foam blocks
Foam blocks are breathable material, like wood, but inferior to the latter for insulating properties. Therefore, the bath of the blocks must be further warmed, at least from the inside. Foam blocks are cheaper and lighter in weight, and hence in installation. Finishing inside the bath is made of wood cladding materials in order to maximize the atmosphere and feel of the wooden structure. It is possible to revet the walls outside in any of the following ways: sheathe an imitation of a timber or siding, plaster or finish with a clinker tile.

Foam block bath with terrace and barbecue area
Brick
Brick is practically not used in the construction of baths, as it is an expensive material. Plus, this deficiency still adds increased hygroscopicity, which requires careful waterproofing of the walls inside the bath.
Hygroscopicity - the ability of a material to absorb water or water vapor from the air.
From the positive qualities of bricks, one can distinguish high refractory properties, excellent heat and sound insulation characteristics.
Tile terrace
When a bath is built with a terrace of bricks or blocks, the base of the terrace can be laid out with tiles that will harmoniously look with the overall lining of the building.

Brick bath with a terrace of tiles
Bathhouse with a terrace on a pile foundation
Projects of a bathhouse with a rest room and a terrace on a pile foundation are common, as the weight of a wooden structure is much lighter than monolithic or brick, so there is no point in pouring over an expensive monolithic foundation. Another plus of the pile foundation is that it greatly facilitates the drainage of water from the bath to the sewage system.

Bath from a bar with a terrace on the pile foundation
On our site you can find contacts of construction companies that offer. Directly you can talk with representatives by visiting the exhibition of houses "Low-Rise Country".
Variants of bath planning
The main rooms in the bathhouse are the steam room, the washing room and the dressing room. Depending on the size of the bath in the internal planning of the building, you can add a bathroom, rest rooms, bedrooms and even a pool. Also, projects of baths with a terrace under one roof, provide for an attic, balcony and gazebo. There are no exceptions and bath projects with a rest room of a closed type.
Video description
Turning to the building organization, you can choose the bath projects you like with a rest room and a terrace from the catalog or even view 3D models, for example, as in the video:
There are a lot of options, but it is conditionally possible to distinguish among them three, based on the number of floors of the building and its dimensions: one-story baths; double-decker or bath with an attic; bath cottages.
One-storeyed baths
In fact, they represent both small houses with a minimum set of rooms (steam room and washing room), providing comfortable pastime, as well as large one-story houses with an expanded set of rooms, including bathrooms and rest rooms. In addition, the recreation area can be placed outside the bath on the terrace or veranda. Choosing a project of a large one-story bath with a barbecue area you can not worry about where to accommodate guests, as the recreation area is divided into two parts - a room inside the bath and a terrace.

One-story bath with a minimum set of rooms
Two-storeyed baths
Baths with a full second floor are extremely rare - most often they are called baths with a loft. In any case, thanks to the presence of an additional floor, the usable building area and rest rooms can be made already two: one on the first floor, the second on the second. Thanks to the additional space, the bath can accommodate more people, which is an excellent option for a large company to rest. The inexpensive project of a two-storeyed bath with a terrace assumes the presence of two rest rooms and a terrace.

Bathhouse with attic and terrace. Plan of the 1st and 2nd floors
Sauna Cottages
These are large bath complexes with outdoor seating areas, several indoor lounges, bedrooms, a pool and a kitchen. This is a place to relax not only the body, but also the soul. Most often, such a complex is built for subsequent rental. Maintenance of such a building is costly, which is unprofitable for private use.

Bath complex of 250 m²
Bath projects with a terrace and barbecue: photos of different options
A ready-made bath with a veranda or terrace can look completely different:

Single-storey foam bath with a large terrace and barbecue

Bath from the rounded tree with the attached barbecue gazebo
A closed porch to the bath, the photo below will allow you to spend your holidays in comfort and in winter:

Bath from a bar with a veranda and barbecue

A small sauna with a terrace and barbecue under one roof

Bath with terrace and gazebo with barbecue

Little bath with barbecue area

Example of finishing the terrace with a barbecue


The project of the bath complex with an additional outdoor seating area, barbecue and swimming pool

Cozy sauna with an unusual roof, a large seating area and a barbecue
Video description
And a few more projects on video:
Conclusion
When building a bath on the plot, you must first determine the construction site, then choose a bath project that takes into account all wishes.
You can contact the construction company, whose employees will offer typical projects for selection, among which, most likely, you will already find a suitable one. If this does not happen, you can order a separate project, according to individual wishes.
When planning the size of the bath, you must take into account the number of people simultaneously resting in it. If the bath is built only for personal use, you can stay on the economy version with a terrace, or a small lounge inside. If more than 2-3 people are supposed to have a rest, it is better to make a bath with an attic, on the second floor having equipped sleeping places, and use the bath as a guest house.
A sauna with a terrace, a separate lounge and a barbecue area is a functional area for complete relaxation. It can have a different size, to be built of timber or brick. Your attention - various projects of such buildings with photos.
Features of the zone 4 in 1: bath, terrace, lounge and barbecue
If you are going to equip a place for rest on your backyard plot, many owners dream of making it not only comfortable, but also versatile. After all, it should be to the liking of all family members. And after all, guests also need to please, fully providing them with entertainment, and full relaxation in the fresh air. The project of a bath with a terrace and a barbecue, as well as a lounge room is a good option for such an occasion. It allows you to translate various ideas and combine them into your own summer mini-complex.

Bath plan with a terrace
The advantages of such a 4-in-1 project are quite a few:
- Saving territory. No need to spend space not only under the buildings themselves, but also on the paths connecting one building with another.
- Reduced construction costs. For example, a bath wall can also be a terrace wall. In addition, much less cost one roof, and not a few.
- Organization of complex rest. You can relax in the bath, and then cook dinner using a barbecue - everything is close by.
- Uniform style. Often during the construction of individual buildings, the owners forget that all the buildings should be in harmony with each other. In a combined project, this design issue is solved very simply.
Types of bath projects with a seating area
In many ways, the choice of the project due to the size of the land. For example, the classic version of the bath with a terrace of 6 x 9 m in size is suitable for owners of a large area. It will house not only the whole family, but also a large group of friends. In this case, a common foundation is provided for the bath and terrace. If you make a two-story building, then you can arrange a steam room and a barbecue downstairs, and on the second floor to arrange a guest lounge.
If you want to attach a bath to the house, use the project 6 x 6. Thanks to its proportions, it fits perfectly into the design of any site. Thus, you will significantly expand the area of the house and get a cozy open space for recreation. It is ideal for enjoying the fresh air right from the cottage in any weather.

Bathhouse with a veranda
Compact outside, but roomy inside - this is a corner bath with a terrace. Often such a project is used in cases where you need to place a recreation area in the immediate vicinity of the house. The terrace adjoining the cottage can be in the form of a square or a rectangle. However, the photo of ready-made baths confirms that it is the corner platform that allows you to give the whole structure a complete look, as well as effectively manage the territory of the backyard plot. Everything can be placed on the first floor.
Council Two-storey buildings are optimal if you want to correctly plan the area of your land and are going to continue construction. For example, add over time another guest room.
Whole sauna cottages with various annexes are also popular now - the same terrace. On it you can equip a gazebo, a playground for children, a place for barbecue or dancing. It is convenient to receive and accommodate guests, organize holidays and just live in the fresh air. And so that mosquitoes do not annoy in the summer, hang nets or decorative curtains.
Construction planning: timber or brick. What foundation is better
In order to realize the project of a bath with a terrace and a barbecue that you like, you need to think carefully about what material to build. Perhaps one of the best is a bar. Its advantages are obvious:
- keeps warm well, so additional warming is not required;
- creates an inimitable "bath" atmosphere, because people have long steamed in wooden buildings;
- regulates humidity in the room. This is possible due to the fact that the tree "breathes";
- allows to implement non-standard architectural solutions;
- environmental friendliness. It is proved that the tree enhances the health effect of the bath.

Restroom
Among the shortcomings, it is worth noting the susceptibility of mold and its low reliability in terms of fire safety.
Attention! Glued laminated timber and log are different construction materials. The first is cheaper. Logs can be rounded, planed, etc.
Brick baths are less fire hazardous, but they warm up longer, consuming a large amount of fuel. In addition, in such buildings is required high-quality ventilation. Without it, condensate is collected inside, which can cause mold and mildew. Speaking about the benefits of brick, it should be noted its environmental friendliness, long service life and the ability to build a building of almost any shape, as evidenced by the photos of already erected buildings. It is important that the cost of brick baths is lower than wooden ones, and they do not require exterior decoration.
Council For the construction of the bath, you can take other materials, such as gas silicate blocks. Popular and frame houses, which are inexpensive and erected quickly.
Depending on the project and building material for its implementation, the base of the bath is planned - the foundation. He might be:
- Screw For it, special piles are used, on which the structure will stand. Suitable for almost all types of soil. Does not require preparatory earthworks. It is built quickly (1-3 days) and at any time of the year.
- Columnar. This is the simplest of all types of foundations, and is also the most economical. It can be used for the construction of a small area bath with a terrace.
- Tape. Works on its construction are considered quite time-consuming, therefore it is advisable to resort to this option in such cases:
- if your site is complex soil - for example, clay or sandy;
- it is planned to build a two-story bath.
Attention! Since the bath is heavier than the terrace, under them usually lay different foundations.
Tips for designing a recreation area with sauna, barbecue and terrace
- When planning construction, consider the main direction of the winds. Bath should cover the terrace from drafts. This is also necessary in order to properly arrange a barbecue - it is not very convenient when the smoke flies towards the rest.
- Decide what you need a terrace for. If in order to hide in a hot day from the sun's rays, do not choose the south. If you are going to sunbathe - design the location of the terrace on the sunny side.

Bath with grill
- The terrace in its classic presentation does not have a roof, but for convenience and protection from bad weather it can be covered, for example, with transparent polycarbonate.
- Regardless of what area will have a finished bath, you need to provide for the location in it of 3 separate rooms: changing rooms, shower and steam rooms.
- For the construction of a barbecue should use fireproof bricks. In addition, for better fire safety, you can lay out the area around it with ceramic or stone tiles. It is also necessary to make a separate chimney for barbecue.
- If you plan to use the bath with a terrace throughout the year, take care of heating.
Sauna with barbecue: video
Bath with relaxation area: photo


