
Good day. Today we are starting to upload articles on the topic of wood crafts with their own hands. In this first article I want to show you what simple crafts can be made of wood - both for children and adults. Many ideas will do. for school classes - for boys. Some ideas will do. for school competition crafts from natural material. Some wooden crafts can become decoration of your cottage or yard. Here you will find a storehouse of inspiration and joy from the anticipation of such an interesting and simple work. In this article I will prove - what to do beautiful wood crafts can everyone. Because here you will find simple and feasible tasks. Even a fragile woman with a manicure can make half the craft from this article. So - let's fall in love with wooden art.
Let's start with simple magic.
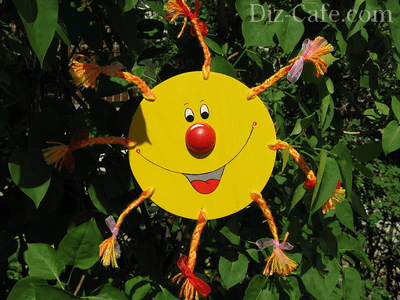
Tree + sun
Crafts that shine with love.
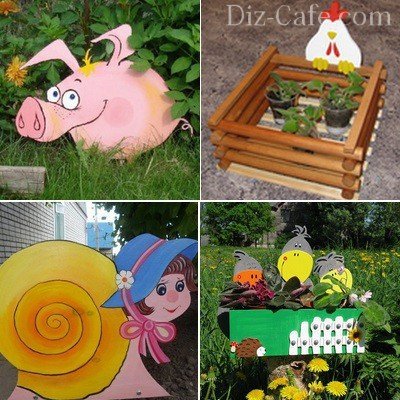
Here are the most simple and cute country crafts from wood. For crafts, you need a log cut (ask when you grind firewood with a grinder to make several thin saws). Or you can without a saw cut - just take a board of any size.
In the tree, we drill holes of such thickness that the glass pebbles purchased in the store enter it. Such sets of multicolored decorative glass stones are sold - in the gifts department, and in the department where there are candles, vases and everything for holiday décor.

You can drill these holes with glass just in the board - and hang it on the apple tree. You can drill such holes in the fence - if the sun shines at it at a low angle at least once a day.
That's very beautiful. Magically. Like in the land of fairies. Your children will be delighted with such wooden crafts.

Simple wooden crafts
from saw cuts logs.
If you are sawing logs for firewood in your yard - you are lucky. You can get an invaluable craft material for free. Ask the men to cut you flat cuts, from both small logs and large ones. Lovingly fold them away from a pile of firewood and begin to invent future wood crafts. For example, let it be wooden owls. It is done simply and looks beautiful. Cuts can be nailed to each other with nails. You can plant them on liquid nails (like glue).

The surface of the saw cuts can be rough, non-skewed (like bunnies in the photo with crafts). And you can sand with sandpaper and even varnish this handmade material. Or paint the color you want.

From large cuts you can make large summer crafts from wood. And small log houses (from thinner boughs and logs) are suitable for miniature handicrafts, for example, such birds. You can cut boughs of such thickness with a hacksaw - manually, without a chainsaw.

Cuts from a log can become a canvas for art installations. Such wooden crafts-paintings can be made from any natural material. Go to the river and find the smooth flat pebbles. They will be a source of interesting crafts. Stones are easily painted with felt-tip pens, office fat markers or just gouache (after work, fix gouache with hairspray or nail polish).

And here is another way to make beautiful AIR crafts from wooden cuts. Openwork through sawing with an electric jigsaw (photo with a hand-made maple leaf) looks simply magical.

Here is a small master class, from which you can see how the process of cutting openwork patterns on a thick sawn wood occurs.
First, draw a pencil stencil. Then drill a drill holes in the key nodes of the picture. And then with a jigsaw go from one holey node to another.

You can come up with a device themselves that helps you to cut wood products with a conventional drill.Do the electric jigsaw with your own hands. Holding the comfortable handles with your hands you simply move the device - following the lines of your design. The thinner the drill, the more minor details of the pattern you can cut them. Well thought out.

Or you can buy jigsaw - It costs an average of $ 100. You can also find that in 50 years we are not working on an industrial scale, therefore, it is not necessarily a very powerful and expensive instrument to buy.
Crafts Mosaics
From cuts thick branches.
If you have a dacha wall of a shed directly at you in your dacha yard. So you need to make it not boring. Zapoztivim shed using crafts from the tree. Will do mosaic application from wood saws of the small size. Such cuts are obtained if sawed with a hacksaw (or chainsaw) thick branches or thin logs.
Basis for such a wooden craft we cut out plywood sheet. First, draw on it the silhouette of future crafts. We cut out the plywood base with a manual jigsaw or a special power tool. And we glue wooden rounds on it - on liquid nails, on carpenter's glue or on hot glue from a pistol.


And even at home you can make cuts decorative frame for wooden round mirror mirrors(master class in the photo below).
- Also buy a round mirror. Put it on a sheet of plywood - circle it with a pencil.
- A few centimeters (around the width you want for the frame) to retreat around the circle you received. And with this indent draw a second circle.
- Cut a large circle out of plywood. And glue the outer ring with wood cuts. It turns out a beautiful wooden crafts frame - it remains to paste on the liquid nails in the middle of the mirror.

Puff DIY
from wood.
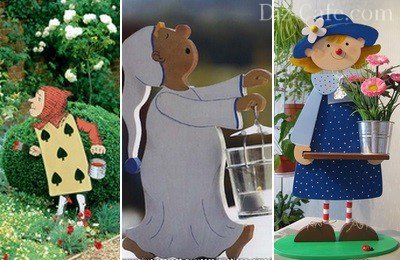
This is probably my favorite kind of wood crafts. Here, whitened shields fall on each other creating a puff of crafts.
Here is an odd cow from three layers of wooden shield. The first layer is the body, the second is the head, the third is the fringe and nose.

You can paint all the layers of your crafts in one color (like an odd job polar bear from a tree) or in different colors (as an odd job mouse on the moon - photo below).

Or you can leave the textured wood pattern (as on the crafts with the photo below).
Wood fox It has a two-layer construction - the back layer, and the head and tail are laid on it.
Craft duck has 5 layers - the central layer with the head, and two layers on both sides (tummy + wing).

More layers you will overlay each other, the bulkier and bulging will be your hand-made article. Here is an example of the crafts "Lions of wood" shows how the beast is moving forward, thanks to the four layers of thick wooden boards.

If you paint your crafts. Do the mimicry, add small details - folds, stains and more. You can get very realistic and expensive wood crafts. Your little hobby can be your business. Such work can be safely put up for sale.

You can invent your own characters. Draw on a sheet of paper their layers. Increase the craft first in the paper template - transfer the contours to a wooden board and cut out. Or find pictures in the children's coloring - and redraw them in an enlarged size.

Wooden craft
For school
At the lesson of labor.
Such puff wood crafts can be cut not from thick boards, but from thin plywood sheet. And then such work can be carried out in the classroom for labor in the school program. On the topic "cutting out with a jigsaw on plywood."
Here's an idea for you - how of 3 plywood boards make a two-color hack puppy. The first most back layer FROM WHITE Plywood looks only with the tips of the ears, tail and one back foot. The second layer will be covered with stain (so that it darkens). Eyes, spout and lines can be drawn with a marker, or burned with a special wood burning device.

In the same technique of shields with different shades of color, you can make a lot of voluminous wooden crafts in the classroom work at school or in a circle of wooden art.

Wood crafts
in the form of APPLICATION.
In a very similar technique, you can make an application of wood. Here, too, wooden solid wood plank (that is, not a glued shield, but a solid board). Because we will grind it, and the glued shield from polishing can exfoliate and glue seams will be visible.

- On paper all future artwork is drawn. Divides lines into parts. Every detail is numbered. And it is photographed (in order to check the location of each element by photo).
- Next, the picture is cut along the lines into elements. Each element we draw on the board with a pencil. Cut out from a flat board element. All elements are flat on top, rough at the edges of the cut and with sharp edges of the cut.
- Now our task smooth all edges of each part. We cut down the sharp edges of cuts with a chisel. And grind on a grinding machine (if you have one) or do manual grinding with an emery cloth of varying degrees of rigidity and roughness.
- After grinding all parts painted in tinting stain (sold in hardware stores). Depending on how many times you wipe the part with a stain, you will get a lighter or darker tone. Very light parts can be wiped off with just vegetable oil. You can check in advance shades of color on wood scraps, remaining after sawing crafts.

You can also paint woodwork details in watercolor or gouache(using not a brush, but a foam sponge). After painting, so that the part does not smudge your hands, you can sprinkle it with hairspray or soak the craft with another wood coating composition (just check what color the cuttings are on).

It only seemsthat the cow (pictured is a woodwork above) behind the moon. In fact, all the details are in the same plane. On a sheet of paper. But thanks to the streamlined edges of the parts - everything looks voluminous, soft and, as it were, HIPPED into each other. In fact, nothing is pressed - everything just lies next to each other.
Ideas for such flat wooden appliqués can be taken inside the children's books-decorations. There just pictures with large details. Children's picture-coloring can be found in Google - enlarge and print. Or redraw directly from the monitor screen, putting a sheet of paper on the glowing screen.

Methods for grinding parts
for crafts made of wood
(instructions to help).
To make it easier to sand smooth edges of parts, without rubbing calluses on my hands, I want to give some useful tips.
You can hold the emery sanding tape in a special vice, also made of wood. Here is how it is made on the left photo below. Or come up with your own version of the device.

Here on the left photo - sandpaper wrapped around a thick plank with a semicircular edge. And the edges of the emery paper are wrapped in a groove and clamped with a bolt twisted through a round cylindrical piece of wood.

There are also grinding nozzles on the drill. And then you can do the shaving of parts using the rotational force of the drill and the magic power of electricity.
Here we see below grinding nozzles on the drill - plate and drum form.

There are grinding tools for the drill, where you yourself can change sandpaper - to remove the old worn grinding-skin and refill a new one.

By the way, on Aliexpress you can buy wholesale grinding drums for a drill for 3-4 dollars per lot of 100 pieces. If you can look and find cheaper.

And so that the drill does not spin in your hand while working, you can create a special MOUNTING STRUCTURE, which will fix your homemade grinding machine is in one place, and all you have to do is to bring the parts to the grinding drum.

The design of the mounting tray can be different, with a wooden clip (photo above), or with a lock in the form of a metal bracket (as in the photo below).

With such an assistant, making wood crafts with your own hands is a pleasure. Quickly nice and immediately beautiful result. Such work can be put on stream - and establish a whole production of beautiful wooden (smooth and safe) toys for children, gift wooden paintings.
You can become a successful master. Completely unexpected for myself. Just like that, looking at this article and falling in love with the idea.

The fantasy of wooden handicrafts is unlimited. Remember the success formula - you can do everything from wood. The main thing is to start ... then continue ... and finish.
Here, for example, toys-knockers. Beautiful fun for children and for decorating the cottage. Such a hammer or woodpecker can knock on your door, telling about the guests on the porch. Like in a fairy tale - pull the rope, and the door will be opened for you.

You can make decorations for the children's room with your own hands. In essence, reincarnate and become a designer of interesting interior handicrafts made of wood. Any boy will be happy if his nursery will play with motifs from the jungle.

You know ... I probably will continue the theme of wooden crafts for the design of the children's room in one of the following articles. I want to see what ideas lie here. And falling in love with someone is a good thing.
And perhaps you should create an article with wooden toys for children - handmade. Also need to write. And then it will work here. link.
For now let's continue ...
Crafts from wood
and cast material.
Where do future crafts live? ... Old half-rotten boards. For example from the grandmother's fence. Which usually go to the wood or taken out of the yard as extra garbage. Stop. Let's not throw them away. We dig in this pile and create something wonderful - with our own hands from wood.
A wooden brush mop, if cut in half, turns into the mouth of a vicious dog. A little imagination and work. And now the service dog bristled and grins at you.
Elegant craftsmanship. Wood and waste material.

Any waste material (glands, plastmaski) and old wood can populate your home with fabulous characters. They are alive. They have a soul and their own history.


Wood crafts
Imperishable beauty.
Exfoliated veneer , from old furniture panels, quietly damp in your shed - can also become a source for handicraft applications made of wood.
This thin wood material You can cut out future crafts with scissors and stick them on hot glue with a pistol (or carpenter glue).


And instead of veneer, you can use thin birch bark. And also make interesting flat wood crafts.

Wood crafts
(logs, firewood and bark)
Normal firewood from your woodpile can be a source of inspiration for wooden crafts to the country.
If you cut a round log diagonally, then you get a figure with your face turned to you. It remains only to draw this face, add to it the elements of the eyes, ears, nose.

You can from the logs and round chumps lay down the body of the animal. Chumps will be legs and logs back. The head can be made from a round saw cut of a small log. Or to cut with an ax face to the desired shape of the same log as the body of your four-legged crafts made of wood.

Show imagination, do not stop before a difficult task. A squirrel made of wood or a snail made of logs is no big deal. We include the head and sense of humor - it will tell the most ridiculous, but effective ways to convey the gentle image of the animal using coarse wood and other natural material.

YOU can work as a chainsaw or an ax - sawing or cutting off your wooden craft's face. Here you can make such cute pigs with your own hands as a fun wooden crafts to the cottage.

And in the bushes in the bush you can put a beautiful proud deer - also a simple and quick hack of wood and branches.

Wooden crafts
from chips from a log.
It happens that when you chop wood, large chipped chips break away from logs. This cleavage often has a bizarre shape - already similar to something (bird, panther, face profile). You need such a gift of fate carefully put aside, then to return to it and complete the craft, started by nature. Something to cut with a knife, something to highlight paint, something to glue as an additional detail. And it will turn out handicraft made of wood - beautiful and original.


These are the ideas that I managed to find for the masters of wooden art.
Now you too can make beautiful wood crafts with your own hands. Especially since this article is only the first of the series on the topic of wooden craftswhich is understandable and easy to do at home. You must have already fallen in love with some ideas and are determined to implement them - I hold my fists for you - let everything work out in the best possible way. And your woodwork will please your entire Family Heap.
Before you begin to make your own hands out of plywood for the garden, you first need to decide on the type of plywood. The durability and attractiveness of the garden figurine depends on the choice of one or another type of plywood sheet.
What plywood to choose?
Today the construction market offers a huge number of different types of plywood. For garden figures best suited BS, FS and FSF. These brands have high moisture resistance and frost resistance.
A cheaper version of FC. The moisture resistance index of such a brand is lower than that of the above types, therefore, before painting it (FC sheet) it should be treated with water-repellent compositions.
The brand of the FBA is better not to use for garden crafts, as this type does not tolerate atmospheric phenomena. An outdoor figure will last a maximum of one season. But if you are going to, once a year, update the figure n, then the FBA plywood, pre-saturated with linseed oil, will do.
As for the number of layers, both single-layer and multi-layer plywood sheets are suitable for the garden.
An important point! If you are going to make an outbuilding, then a thin sheet will do. For ground figures it is better to use plywood, about thirty millimeters thick.
Blueprints
The selected figure can be printed on the printer or create a template. As a rule, beginners choose the second option, as using a template it will be easier to reproduce the figure on a sheet of plywood.
In the picture and on the plywood they draw a grid of the same scale / size. Then all the contours are transferred from the paper onto the plywood sheet.
What is needed for work?
To work will require:
- stencil, pencil;
- plywood sheet;
- jigsaw;
- screwdriver and screws;
- "Sandpaper", acrylic paint and brushes.
An important point! If you are going to install a figure that does not lean on anything, then in this case you will need to build pegs on which the figure will “sit” in the future.
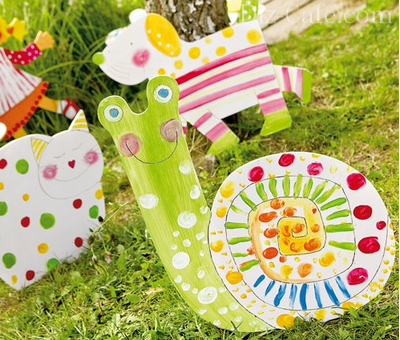
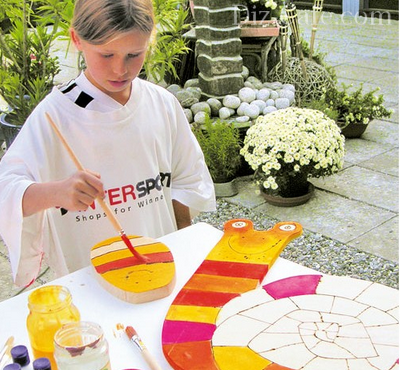
DIY garden snail made of plywood
The snail will be a wonderful decoration of any garden plot.
Manufacturing process:
- On paper draw a snail. Then transfer it with copy paper to plywood.
- Using an electric jigsaw cut out the constituent elements of crafts.
- With the help of acrylic paints decorate the figure. It is possible to select all contours with the help of burning.
Stork their plywood do it yourself
The stork will not only decorate the garden plot, but will also bring happiness and joy to the house. You can install it, for example, near the pond, fountain or in the center of the site.
Manufacturing process:
- For work you need a plywood sheet with a thickness of six millimeters. A stork is cut out of it, its size is 0.85x, 58 m.
- For the stand (stork legs) use plywood about twelve millimeters thick.
- All cut elements are cleaned with sandpaper.
- In the end "legs" make a hole. It will be necessary to insert the body of the stork. The depth of the hole should be about five centimeters.
- Using self-tapping screws, the legs are attached to the body. In order for the product to last a long time, you must first make holes under the screws.
- Ground the product.
- Paint the figure.
If they are attached to the pediment, then in this case, thin plywood will come down for the “leg”. If desired, you can create one, but two storks and a nest. After staining, the products are attached to the facade with screws.
DIY poultry feeder
Manufacturing process:
- For the base, you will need four rails (two long and two slightly shorter). From them create a rectangle.
- Cut out the bottom of the sheet and the roof for the feeder (must fit the size of the rails).
- In the corners make the rack.
- The resulting product is decorated with acrylic paints. It is also possible to make an interesting pattern on the roof of the feeder with the help of burning.
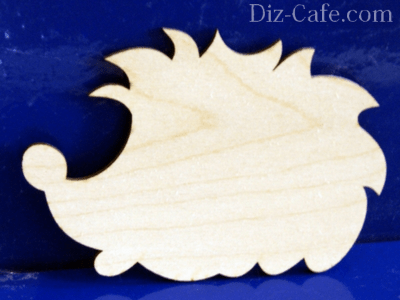
Hedgehog made of plywood do it yourself
Manufacturing process:
- Draw up on paper drawings figures. Then cut a hedgehog out of paper.
- Apply the template to the plywood sheet and trace the outlines of the figure with a pencil.
- Then, using a jigsaw, cut a hedgehog out of plywood.
- All edges of the crafts are ground with fine-grained sandpaper.
- Coloring products.
DIY plywood butterfly
Their plywood can be made not only large figures, but also small ones, for example, various insects, butterflies and various bugs. Such figures can be attached, for example, to a garden house, a nesting box or a gate.
Manufacturing process:
- Butterfly can be painted immediately on plywood. If you do not have the ability to draw, then in this case you should create a template. Apply the stencil to the plywood and encircle it with a pencil.
- Using a simple jigsaw, carefully cut out the product.
- In order to cut the patterns inside the wing should be drilled holes within its area.
- Then insert the web into the holes and fix it.
- Cut the product along the contour.
In addition to the above garden figures, you can also install on the site a unique, green frog, cat, fox, bear and many other fairy-tale characters.
All owners of suburban areas love to walk in their possessions while enjoying their harvest and fresh air. It is worth saying that today it is very fashionable to decorate your own summer cottage. And many owners of such real estate design the garden plot are thought out to the smallest detail, making it unique and memorable. For the decoration of the suburban area you can use completely different items. But interesting in the design of the garden will look cute figures from plywood, which will help your garden area to transform. In order to create such figures it is enough to have your imagination. In addition, you will have to make some effort for this work. And if you want to know about what crafts to make out of plywood for the garden, this publication is created especially for you. And all because here you can find the most interesting options for crafts.
Some information
Today you can make completely different crafts out of a piece of plywood. Here everything will depend on your preference. For example, you can build:
- mailboxes
- flower containers
- bird feeders
- cute-decorative fences.
And for your crafts to delight you with their beauty for a long time, you should choose a high-quality sheet of plywood, which was not spoiled by excessive moisture and other factors.
While working, you will need not only plywood, but also acrylic paints, felt-tip pens and jigsaw.
How to make bright and funny figures of plywood to decorate the suburban area.
So, to create such funny bunnies or such a curious figure you need:
As you can see, everything is simple. And if you already want to do something original, then we will offer you interesting ideas that you can easily put into your life.
But such a funny and bright cat will be able to decorate the fence of your summer cottage.
And to create this cat you need some decorations. For example, it is necessary to find a wire and a bow. If we talk about the progress of work, then everything is done very simply. The finished figurine of the cat is decorated, and then when it dries it is decorated with decorative elements.
Original flower bed of plywood.
A practical decoration for the garden is such a functional flowerbed. However, for such a bed you need high-strength plywood, which you first need to process and paint in brown or another color. In such a piece of plywood is to cut holes and then insert pots with petunias or other flowers into them.
And you can also make such beds. For this purpose, you will need figures and empty pots.
Here are some more ideas for crafts:
Finally
Here you were able to see crafts made from plywood for the garden and backyard, which you can easily do with your own hands. You should see only the photo-ideas of such handicrafts in order to recharge yourself with an interesting thought.
In general, choose for yourself. Create funny figures that can decorate your garden and garden and make it attractive.
Plywood figurines are an original and budget decoration for a garden. How wonderful to stroll through the cozy shady garden, enjoying the fresh air, the scent of flowers, the singing of birds. I want to decorate my own garden, to give it individuality, so that every guest will understand that the garden has a soul. Today, there is a large number of garden figures made of polymeric materials. However, they are quite expensive. We offer you a few ideas. plywood figuresthat you can do with your own hands.
DIY plywood crafts
Funny figures;
Unusual pots for flowers;
Bird feeders;
Fences.
It is very easy to make plywood figurines, even a teenager can cope with this, of course, under the guidance of adults, and children will be happy to help in the design of works with colors.
Summer resident of plywood
Plywood - it is sheets of thin wood veneer, interconnected with different adhesives. The thickness of the sheets can vary from 3 to 30 mm, so it is possible to choose the right texture of the material. It depends on the wood from which the veneer is made.
Considering what is produced, plywood from natural material, precipitation and low temperatures do not pass without a trace. When choosing a material you should pay attention to moisture resistance. For exterior use, look for plywood with FKM and FSF markings.
Cheerful plywood dog
Grinding. Plywood sheets are divided into ground on one side (G1), as well as on both sides (G2) and unpolished (NS). For decorating your masterpieces, oil or acrylic paints are suitable. They are not afraid of exposure to ultraviolet radiation for at least several years.
Step-by-step master class, how to make figures from plywood
Now you can start making your own plywood figures. To work, you may need:
Pencil;
Plywood 20 them thick, moisture resistant;
Stencil;
Sandpaper;
Electric screwdriver and screws;
Glossy varnish for wood.
Firebird plywood do it yourself
DIY plywood snail
Garden plywood snail
Scarecrow made of plywood for the dacha
Many of us spend a lot of time in the garden. At the same time, we want to be surrounded by comfort, convenience and beauty. Hand-made plywood crafts are a wonderful way of self-realization and decoration of the garden.
Nice to play the guitar after a piece of sausage. If the mice are not caught, it will be bad.
Work with plywood is easy and pleasant. Material is available at a price. In the simplest form, crafts will additionally require paints and some self-tapping screws. The tools will need a little, the maximum list, see below.
You can make out of plywood decorative crafts for garden beds and fences, heroes of fairy tales and cartoons for the playground, birdhouses, bird feeders, flowerpots and so on. Asking what can be made of plywood with our own hands, we conditionally divided all the figures into two groups: simple ones, which are made of one piece of plywood, and more complex ones, which are assembled from several parts.
"Cartoons" for children and adults
Plywood flat figures
Almost all the examples presented above are cut from a single piece of plywood.
For the manufacture of crafts with their own hands is better to use a sheet of a thickness of at least 10mm. In this case, the image will not warp and will last longer. At the same time in the garden and garden, it is preferable to use moisture-resistant plywood.
There is no argument about tastes - the choice of a favorite option is yours
The procedure for making figurines from plywood is as follows:
- The outline of the drawing is applied to the sheet of plywood with a pencil.
- The craft is cut with a jigsaw around the perimeter.
- The contours and the flat surface of the workpiece are treated with emery cloth.
- On the detail with a pencil paint the boundaries of color in different colors.
- The craft is consistently painted with all colors. The adjacent paint layers must be completely dry before applying the next color.
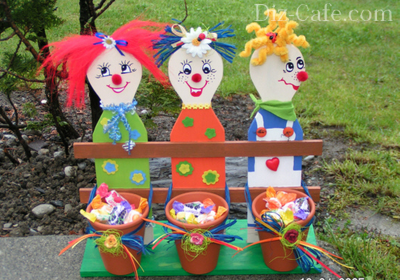
The guys from our yard
The finished product is convenient to fix the screws to the fence or wall. Look at the photo: you can “screw” hair, buttons, shoes, wire tails and so on.
It is important that these elements keep safe, serve for a long time under the sun and rain, and do not pose a danger to people.
Animals, as always, benefit: a deer holds a flowerpot
With your own hands you can make a variety of jewelry for the garden of one piece of plywood. We have selected some interesting options for you.
Why does a dog need a hare if it has a bone?
These birds are clearly not friends.
Storks, swans, chickens: no one will fly away from you!
Grandma solves an important problem: what would she have for her grandfather and granddaughter to prepare?
Grandfather understands that there will be no dinner without firewood
The granddaughter loses no time and decides to milk the goat
Volumetric crafts for the garden
It is wrong to say that voluminous crafts made of plywood for the garden are much more difficult. Of course, you will have to cut out a few details with your own hands. But some of them should be painted in one color, which simplifies the work.
The donkey is hard to understand how you can sleep for so long, he is a donkey!
All parts are prepared according to the above scheme, and then fastened with screws. Of course, the volumetric figure looks more interesting. The photo clearly shows that it is necessary to use a material thickness of 15-20mm. Every detail has its own shape and size. They can be placed optimally on a sheet of material and use plywood sparingly.
The dog guards, the cat helps: in general, all in the business
It is especially nice when the self-made craftwork not only decorates the yard, but also performs a useful function. In the photo you see just some examples.
The observer is looking for birds - or a hedgehog?
Patterns and schemes are not problems.
Patterns are best done by yourself. Firstly, it is not difficult, and secondly, you will be able to make templates for your own and new design when you get tired of repeating other people's ideas. Note that there is a huge number of children's applications for handicrafts made from colored paper, which are quite easy to cut out from plywood.
The easiest option is to apply the drawing directly on the plywood. Moreover, if you had five drawing schools at school, it is not at all necessary to copy what has already been done.
Otherwise, you should put a grid on the drawing you like. Then on the sheet of material is performed in pencil the same grid. All elements of the picture are transferred to the plywood "on the squares". Conveniently, the small squares in the drawing and the blank can have different sizes, that is, the drawing can be transferred at any scale.
The most convenient and modern to do the work with the use of a computer, which we did. Almost everyone has a Microsoft Power Point program, where you should copy your favorite picture. Previously, the program sets the size of the sheet for printing on a printer 29.7 x21 cm.
We have a piece of plywood size 57x77 cm, and we set the size of the picture, based on the availability of material. It should be understood that the program takes into account the size of the entire image.
Then it is necessary to print fragments of the image on the printer, sequentially shifting it relative to the sheet for printing. For convenience of printing, you should apply a grid of sheets for printing on the drawing and group it with an image.
Now the sheets should be glued together in a single image and cut along the contour after the glue dries. A paper template is laid on a sheet of plywood and outlined with a pencil. Subsequently, separate parts of the pattern are successively cut off from the template and are also transferred to the workpiece with a pencil. You can cut!
How to save your work and longer
It will be very annoying if the self-made handicraft does not peel and warp from the first rain. So it is better to take a number of measures to preserve your own work.
First, it is better to use moisture-proof material. Secondly, it is necessary to impregnate it from moisture, for example, "pinoteksom." Paints can be used acrylic and oil. It is important that they are for external use. If you wish to leave the natural color of the wood, the craftwork should be covered with a transparent yacht varnish.
Prepare for the fact that the figure will have to repaint every two to three years. If the plywood begins to exfoliate, it must be plastered before painting, for example, with a “silicryl” sealant. It is very effective to hide the work from the weather for the winter period.
Let the video will help you in your work. It remains to wish you good luck!
- Creating figures
- Plywood selection
- Picture
- Carving figures
- Stork on the roof
- Plywood butterflies
Perhaps, everybody knows the figures of traffic police officers with patrol cars, installed on the verges and designed to discipline road users. If, over time, they cease to frighten drivers, they still enliven the boring roadside landscape. Despite the rather realistic appearance of these handicrafts, they are made using a very simple technology. If you own an artistic brush, you can easily create for your site the same silent guards, the benefit of cutting them out of plywood is not difficult. Nevertheless, in the country or in the garden it is better to establish the figures of animals that will create a more relaxed atmosphere than the models of law enforcement officers.
Plywood figures will help to diversify the site’s boring natural landscape.
Creating figures
In order to get animal figures from plywood, it is not necessary to have professional skills of an artist.. Of course, they will help to create complex compositions “in the style of realism”, but simpler installations can also please the eye. It is quite good if a children's hand is attached to their coloring.
You can install the figures in any place you like, but still it is desirable that they do not look ridiculous there. The fox figure is hardly appropriate, for example, in the water of a pond, and a frog should not be fixed at all on a vineyard. And the rest is simple enough.
Doing various crafts with your own hands is not only a wonderful but also a very useful exercise. This pastime provides an excellent opportunity to relax, relax and spend your free time with benefit. In addition, the creation of things that will serve the benefit of comfort and convenience, ennobles a person spiritually. If you live in your home or you have a cottage, hand-made crafts will allow you to feel the aura of beauty and goodness in the area adjacent to your home.
Material for making crafts
Make your own hands interesting and possible out of simple plywood. Each of us is familiar with this sheet of wood, which is commonly used in the construction industry. But few people realize how diverse and interesting crafts can be made from plywood.
What is this material? Plywood consists of several layers of veneer. At its production certain technology is observed. Veneer, which is a thin layer of wood, is glued together in layers in a certain way. The first sheet is located along the fibers of the tree, and the next is put across. This scheme is repeated further. A sheet of plywood may consist of a different number of layers. There may be two or several dozen of them. In this case, the gluing method, when the layers are arranged alternately up and down, makes it possible to impart special strength to the material.
In childhood, many of us made crafts out of plywood with a jigsaw during labor lessons. This material is convenient in processing, malleable, can maintain its shape for decades.
What can be done
If you have skillful hands and rich imagination, then a great many can be made of plywood products. In this case, in order to create an interesting thing, special skills are not required. The most important condition is creativity and desire.
Plywood crafts can be very diverse. This pliable material is used to make stands for lamps, photo frames and paintings, vegetable and meat chopping boards, vases, window sills, cashes, and racks for hangers. Plywood can be made furniture or any large parts of the interior. Plywood is a noble material. Working with him is a real pleasure. The finished products are extraordinary and last long enough.
Garden crafts
The appearance of the site can change the most simple, even if only small details. Such items will serve crafts from plywood for the garden. They will decorate the site and highlight the design features. In addition, the manufacture of handicrafts will allow you to have a great time and realize your creative potential.

Plywood makes beautiful sculptures. The material is given a pre-selected shape (frogs, storks, mills, etc.), and then it is painted. A special highlight of the site will provide made of plywood figures of animals, dwarfs, mushrooms, as well as other characters of your favorite. They can be placed near a tree, under a bush or near a flower bed.
Sheets of plywood can also be used for the manufacture of containers for plants. Finished crafts are decorated with shells, twigs or just painted. And if in the garden to hang out the feeders made of plywood or a birdhouse, then you will have the opportunity to observe the feathered guests who will fly to the treat.
Crafts for home
You can make a beautiful thing of small size out of plywood. For example, a wonderful magnet on your fridge. Make it simple enough. It is necessary to cut out any figure from plywood sheet, process it with sandpaper, paint it and glue a magnet to the back.

Original and beautiful will look crafts made from laminated material. If the plywood has a thickness of five to ten centimeters, then it will make an interesting sea shell. From the material should be sawed off all unnecessary, give the workpiece a rounded shape, pierce from the edges to the center of uniform dents. The resulting figure is sanded and varnished. The original sink can be used as an accessory for a desk.
Christmas tree decorations
Making crafts out of plywood with your own hands is not so difficult. In addition, they can act as interesting pendants to decorate the Christmas tree. Original looks made of plywood figure of a snowman. Before proceeding to its manufacture, it is necessary to prepare certain materials and tools. At hand should be a piece of plywood, scissors, jigsaw. You will need acrylic paint, a brush, a piece of ribbon, wire or thread, glue and a pencil.

Before making crafts out of plywood, the scheme of the figure of the selected figures should be applied to paper. Then they are transferred to a pig.
In order to make it necessary to have a head with a hat, two legs, shod in felt boots, a torso consisting of two circles, and also mittens. After transferring all parts to plywood, they should be carefully cut.
In the resulting blanks drilled holes for fastening parts. Then all parts of the snowman are covered with acrylic paint. At the same time for the torso and legs it is necessary to take white, for mittens - green. Eyes, mouths, and carrots are drawn on the face with a pencil. You can colorize all the details and at your discretion, as your imagination will tell you.

At the next stage, the prepared parts of the snowman are connected using wire or thread. It should be borne in mind that mittens close to the body should not be tied. Distance is necessary to create the effect of the presence of hands. In the hole, located in the top of the cap, a thread loop is tied, by which the figurine will be hung from the Christmas tree. A pre-prepared ribbon is tied around the neck of a snowman. She will play the role of scarf.
Interior details
Plywood is a material that bends easily. This property also often finds its use. Crafts made of plywood, which will decorate your interior, can be made in the form of arcuate shelves for a small number of books or for disks.
Before you start making original things, you need to prepare the necessary materials. You will need plywood and jigsaw. To give color and gloss, you can take acrylic paint and varnish.
Having outlined the width and length of the future shelf, a main piece is cut out of plywood, as well as four small squares with a side length equal to the width of the board. Two side walls are attached to the curved workpiece, and along its length there are two partitions. This is necessary in order to keep things on the shelf.
Figures on the playground
Plywood crafts may have different themes. Funny figures on a site will surely please your child.

Crafts made from plywood for children must be bright and colorful. What they will be depends on your imagination. On the playground you can put the figures of funny kittens and heroes of favorite fairy tales, funny animals and birds. The technology of their manufacture is simple. The selected silhouette is cut out of plywood, which is then painted with acrylic paint and coated with varnish.
In the event that when cutting out the crafts the upper part of the plywood is stratified, the work should be stopped. To continue the work, the material is hardened with a solution prepared from water and white glue. The procedure is repeated at least two or three times. After drying, the plywood will be of better quality.
All sorts of crafts made of plywood and wood, made by skilled craftsmen, are highly valued all over the world, causing universal admiration. Undoubtedly, carving is creativity and art, but you will certainly be able to master it, making efforts, and constantly honing your skills. This is an optimal hobby associated with wood and plywood, it will require from you not too much free time and equipment, not very expensive. Of course, it means plywood carving with jigsaws!
Openwork carving
It is rapidly gaining its popularity: who does not want to personally make a great decoration item, decorating the home, furniture, creating an artistic surroundings! Carved products of different thickness are optimally integrated into many existing styles of decor, and we get, for example, frames for photo cards with ornamentation, words, individual letters, figured shelves, made with jigsaw thread on plywood. In addition, such creativity is an action that is available to everyone who is interested in the process, even a beginner. You just need to get an idea of \u200b\u200b"how it works." And you can start creating!

Manual jigsaw work quite simple
Video where to start:
Choose this material from a tree for such reasons:
- moisture resistant;
- temperature drops do not have a negative impact;
- fairly low cost;
- ease of learning sawing with a jigsaw;
- small weight of products.
It is also necessary for crafts to choose plywood of the 1st and 2nd grades. The rest for creativity is not suitable: on the surfaces there are cracks with knots and chips (unless, can be used for internal substrates). Most suitable for cutting birch plywood (3-10 mm thick).
At the present time, this material is divided into a fairly large number of subspecies - each for specific purposes.
- Experts and craftsmen advise to use a sheet produced with the help of urea-formaldehyde composition. Such material is marked "FC". This kind of plywood can be bought "clean" or - covered with, for example, varnish. On the raw sheets of plywood is most convenient to transfer the drawing for cutting with a jigsaw.
- Plywood, labeled "FOF", is intended for the production of furniture, and often produces more than 12 millimeters in thickness.
- The “FB” brand was originally developed as a boat material, and therefore its cost is high (but if it is possible to use it, it is suitable for cutting with a jigsaw).
- But the "FSF" masters do not recommend to purchase. Having an attractive appearance purely outwardly, it has toxicity, as it is made with the participation of the composition of phenolic resins.

Produced varieties of working material
Types of plywood carving
It is divided into:
- Openwork,
- Patterned, on the painted sheet of plywood,
- Sawing,
- combined method.
What additional materials and tools will be needed
- Stencils and drawings with drawings for work. You can create them yourself or copy them online.
- A carbon copy to translate patterns and lines according to the drawing;
- Glass paper and emery, a set of files - for grinding parts;
- Joiner's (as an option, casein) composition to glue parts;
- Clear lacquer - to cover;
- To make holes inside the material for threading the blade - a drill as well as an awl.
- Before starting work on cutting with a jigsaw, carefully polish the material with glass paper, and only after you transfer the patterns according to the drawing.
- The elongated shapes of the drawings, having narrow elements, translate into plywood so that they are located along the fibers of the "face" of the material.
Art sawing with a jigsaw: drawing, stencil and work
Get to know the devices
Jigsaw - toolkit that is designed to work on different contours. The device includes a blade equipped with teeth, small enough to make a cut of the working material, practically without forming burrs and chips.
Manual
The "founder" of the family, of course, is a manual jigsaw. Everything ingenious is simple: a metal U-shaped arc, and between the ends a working blade is tightened, which is fastened with clips. They keep the saws at work, with the help of them also its tension is regulated. Handle for easy operation is on one side of the frame. The tool clamps can be rotated, thereby creating a different plane for work, providing opportunities for plywood carving with a jigsaw of increased complexity.
- When creating with the help of a hand-held device, it is necessary to observe maximum accuracy: the design is rather fragile, and with intensive pressure the blade sometimes breaks and needs to be replaced. Each novice master should stock up on additional working files.
- When working with a jigsaw, it is convenient to use an auxiliary plank: it protects the table and solves problems in the convenient location of the plywood blank.
Jigsaw
This device works by electricity. Represents the body where the mechanism is located, the control handle is located in the same place. The sawing element is located at the bottom of the device in front. The blade is protected, and it allows you to cut along the contour very smoothly, without deviations. Professional models of equipment have many nozzles that greatly facilitate the process of work, for example, leveling the edge of the material. Jigsaw blades may also have teeth that differ in shape and size. It is necessary to select them in accordance with the material for the file, so as not to damage the plywood sheets during operation.
- Household electric jigsaws for non-production purposes, as a rule, of low power (from 350 to 500 W). For beginners - this is the most common of the options when you are just learning to cut crafts and figures from plywood (as a rule, of small thickness). To work with such a device is quite safe, especially when it is equipped with protection.
- Professional jigsaw is designed for industrial purposes, has a capacity of more than 700 W, high speed and precision cutting. It can cut sheets with a thickness of more than 10 cm, aluminum, and thin steel.
Video: simple jigsaw:
Frezer
Sometimes this device is used for threading. It is a type of special tool manual, with the assistance of which in the living conditions you can perform different types of work on wood and plywood. However, to work with him requires a certain skill; but the masters, deftly controlled with this equipment, can create the most highly artistic masterpieces of folk art.
Cooking stencil
Drawings for creative works come in different sizes, depending on the scale of the manufactured products. For example, for schemes of a shelf or a piece of furniture, for a voluminous toy you should take a sheet of drawing paper of A1 format;
On the surface of the paper with a marker or pencil apply the contours of the future object, adhering to the specified dimensions. Templates are presented in open access in a wide range, choose the appropriate one (for beginners, as a rule, not too complicated). And you can come up with your own options for cutting with a jigsaw and then transfer them to a paper base.
Then we carry out the transfer of images to the surface of the working material (plywood, boards). To do this, we cut a figure out of paper, apply it to plywood and gently draw a pencil around the contour. Lines must be accurate and even. If necessary, correct, wiping the eraser.
Contours are applied “from the rear” of the material so that there are no noticeable remnants of the drawing on the already prepared form. Internal areas can also be shaded so as not to cut off an extra piece, thus denoting an inviolable fragment.
Drawing Examples


Snowflake


How to thread on plywood
Working with the device will not be difficult if properly prepared for the process of creativity.
- A place to work should have good lighting;
- The working plane must be protected from damage. You can, for example, lay a plywood sheet or cover it with a film;
- All necessary tools as well as spare blades should be prepared in advance. And you can start.
The first step should begin with drawing the inner contour of the drawing or drawing. To do this, make slots in which the blades of the device will be inserted. Usually, when cutting large contours, the problem does not arise, but in small remnants the work with a jigsaw from the inside can cause spalling, burrs or cuts. It should act very carefully.
Work as an electric jigsaw

How to cut a manual jigsaw
- Fix a piece of plywood with one hand, with the other hold the cutting device by the handle.
- Begin to move along the contours, wielding a jigsaw up / down. This should be done around the perimeter of the picture.

Work as a manual jigsaw
As we see, there is nothing supercomplex in this work. And you will get the most real creative hobby, learning to manage these devices.

How to cut plywood jigsaw
Cutting out with an electric or hand saw for plywood is undoubtedly a creative process. And you can personally create decorative items of a different direction: from fairytale characters from cartoons for children to decorations for furniture and home.
Photo gallery of examples of works

How nice to stroll through your own garden, enjoying the enchanting nature and stunning fresh air. Thinking through the design of the suburban area, each owner tries to make it special, adding color and creating a positive mood. Garden figurines made of plywood are able to successfully complement vegetable compositions and surprisingly transform the site, making it a nice and cozy area, conducive to a pleasant rest. Anyone can make such funny plywood figurines. To create such a decoration it is not at all necessary to have the skills of an artist, it is enough just to show imagination and make a minimum of effort.
Such figures are designed to emphasize certain places on the site, making them more elegant and attractive. Thanks to the natural naturalness, wood and plywood decorations most harmoniously fit into the landscape design.
Cut out of plywood figures on the garden plots look extraordinary
Plywood can make a lot of interesting functional decorations for the garden. It can be:
- Funny figures;
- Containers for flowers;
- Bird feeders;
- Decorative fences.
There are a lot of variants of plywood figures, and each of them is distinguished by originality and expressiveness.
Miniature toy houses, animal figurines, fancy fairy sculptures and cartoon characters decorate many of the country sites today.
Plywood is one of the easiest and most convenient for creating crafts material. It is so easy to use that the figures are made from it rather quickly, and that the main thing is interesting.
Plywood is a sheet of wood veneer, bonded to each other in several layers using glue or synthetic composition. The strength and thickness of the material is directly dependent on the number of these layers. The thickness range of plywood sheets ranges from 3 to 30 mm. The material may have a completely different texture, which can affect the color and structure of the finished crafts. For example: thanks to the beautiful structure and warm shades, birch plywood looks very aesthetically pleasing, while coniferous plywood is more suitable for dyeing.
For the creation of garden decorations, sheets of plywood perfectly resemble; the materials for their manufacture were: poplar, alder, aspen, pine, birch, and spruce.
The main advantages of plywood:
- Environmental friendliness;
- Durability and durability;
- Water resistant;
- Good flexibility;
- Compatibility with other materials;
- Ease of processing.
But since plywood is still a tree, which by its nature is influenced by the environment, the choice of material should take into account a number of points:
- Moisture resistance. For the design of outdoor spaces and decorate the backyard territory, you can use plywood sheets marked with FCM and FSF. In their manufacture are used melamine and phenolic resins, which have a water-repellent effect.
- Ground processing. On sale you can find sheets, ground on one side (G1), processed on both sides (G2) and unpolished at all (NSH). This moment is very important only in the case when you do not have time for additional processing.
Oil and acrylic paints are ideal for creating expressive and colorful garden decorations. They fit perfectly on a wooden surface, creating rich color combinations. Paints are resistant to UV rays, while maintaining attractiveness for several years.
When choosing materials for making jewelry, it is important not only to competently pay attention to the quality characteristics of plywood. The moment of choosing colors for decoration that will preserve the saturation of color for several seasons is also important.
Create figures with your own hands
Most often, cottages are decorated with flat figures cut from moisture-proof plywood sheets. To create the original jewelry we need:
- Moisture-resistant plywood 2 cm thick;
- Stencil;
- Jigsaw;
- A simple pencil;
- Fine sandpaper;
- Screwdriver and screws;
- Acrylic paints, brushes and varnish.
If you plan to install a figure without leaning it on any support in the garden, you must also provide for the manufacture of pegs for its foundation. Their size depends on the size of the figure itself. But, in any case, count on the fact that the pegs should go deeper into the ground by at least 50 cm.
We offer you to remember the forgotten type of creativity - cutting out with a jigsaw, making an unusual decoration for the garden with your own hands
You can decorate any corner in the garden with a plywood figurine by hanging it with a rope, fixing it with nails and fixing it on stands
Stencil for the manufacture of figures can be done independently. To do this, it is necessary to draw the drawing you like on a piece of paper, drawing it up in the form of a drawing or a silhouette, and then just cut it out.
Master class # 1 - a curious snail
A pretty plywood figurine is so easy to make that anyone can make it. Little helpers will be happy to respond to an offer from adults to participate in an exciting process.
The charming snail will surely enjoy not only the little restless, but adult guests of the site, becoming a smart decoration for the playground and a favorite character of exciting games.
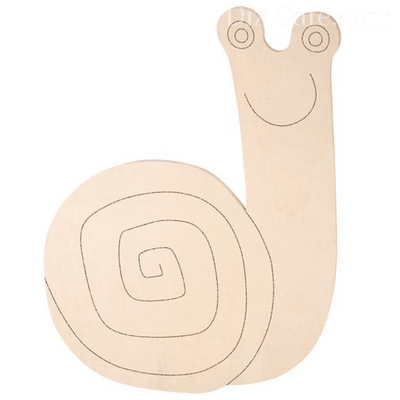
On a piece of paper we make a sketch of the future figure, the image of which is later transferred to the plywood base.
If you are confident in your abilities, you can do without a paper template, drawing a snail immediately on a sheet of plywood. Jigsaw cut shapes for security reasons, you have to do it yourself. But here the drawing of the contours and the coloring of the snail can be safely entrusted to impatient little helpers.
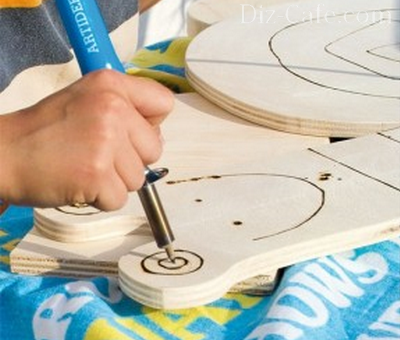
With the help of a felt-tip pen or a burner, we draw the contours of the cochlea so that even after coating with paint they remain bright and expressive.
We paint the blank with acrylic paints, choosing spectacular contrasting combinations. To get saturated colors, it is better to apply acrylic paints in 2 layers.
The snail is ready. Give a little dry paint, and you can safely plant a cute character at any place you like in the garden.
It will also be useful material on how to make garden figures to give your own hands:
Master Class # 2 - Charming Scarecrow
Having allocated only a couple of hours of free time to make the Scarecrow, you can personally make a funny figure that will bring a touch of warmth and warmth to the site.
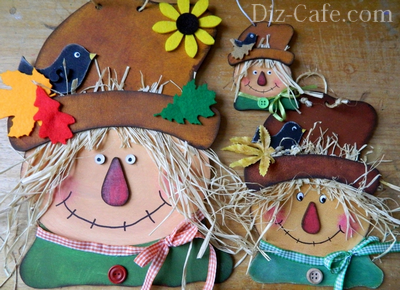
Such an incredibly cute and charming fairy-tale character the Scarecrow from the fairy tale "The Wizard of the Emerald City" can also live on your site
We will make the figures in several stages. First we take a sheet of plywood, on which we use the stencil to draw the outline of the future character. The finished drawing can be transferred to plywood using ordinary tracing paper.
If we make a shape that will rest on the pegs, we immediately attach them. To do this, in the body of the figure, we drill through the pair of holes, the diameter of which corresponds to the size of the pegs.
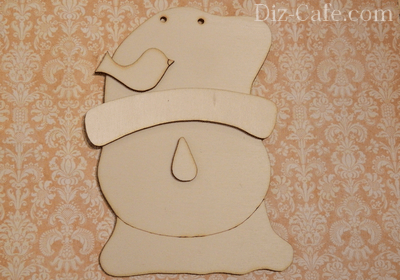
On the outlined contour with a jigsaw cut out the figure. Its edges are carefully polished with sandpaper, giving them smoothness
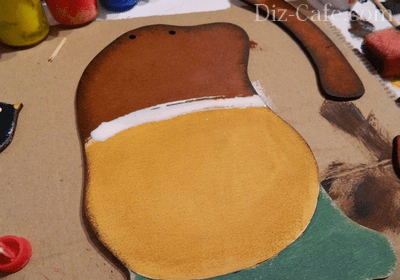
We shape the figure: on the blank with a simple pencil we draw the elements of the character and paint them with acrylic paints
Having painted the frontal part of the blank, decorate the end faces. When the paint is dry, cover the figure with varnish.
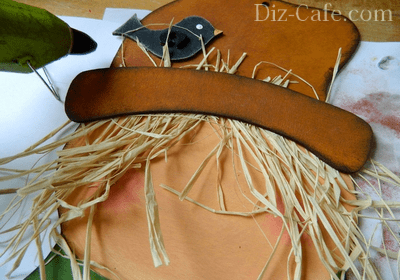
To decorate the figure, we used dried grass, which decorated scarecrow hair, a button and satin ribbon, from which the character's collar was laid out
Our cute fairy character is ready. It remains only to stretch the wire through the holes in the hat and fasten it to a tree branch or fence.
A little secret: if in the process of cutting with a jigsaw a sheet of plywood begins to exfoliate, it is necessary to saturate it with a solution made of PVA glue and water, taken in a 1: 1 ratio. Plywood is soaked 2 to 3 times, applying each subsequent layer after the previous one is completely dry.
Since such crafts are fairly light, finished products should be securely fixed, partially buried in the ground, covered with sand or glued to the base.
By the same principle, themed plywood constructions can be made, for example: a miniature fairy-tale forest lost in a flower garden with fancy trees or a nice clearing near a pond filled with funny animal figures. Hand-made plywood designs will decorate your site, making it attractive and unique.


