The range of lamps in the shops of your city may be limitless or, conversely, not to suit you completely. However, if you are sure that a truly original thing can be done only with your own hands, you will always miss the “raisins” in factory-made products, isn't it ?!


If you (in principle) would be ready to go in search of interesting items in stores, but are not yet ready for this step financially, you probably will not refuse to update the lamps that are already in your house.
In both cases, you probably want to learn how to do it quickly and get the original result.
3 table lamp lampshade update manuals:
Table lamp suits you, but the view of another lamp - not very? Technologies from these manuals can be used for any other lamp having a lamp shade, for example, for a suspended ceiling or for a wall sconce.
No. 1: use colored ribbons
1.
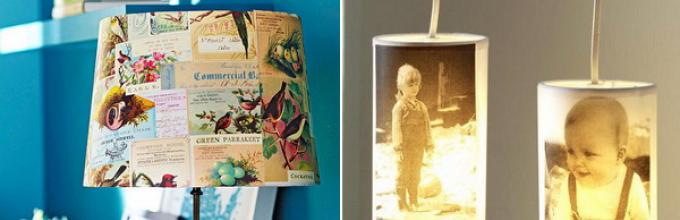
Remove the lampshade and measure it on the outside. In accordance with this, cut multicolored ribbons of 2-3 harmonious tones to each other. Using glue in a tube suitable for fabric, coat each tape with them and glue, starting from the bottom.
If, in general, the look and color of the lampshade suits you, stick the tapes at a distance from each other. If you want to completely change the look of the lampshade (and are ready for the fact that “intimate light” will turn out), tape it completely.
2.
3.
4.
5.
6.
7.
No. 2: patchwork of decoupage napkins
8.
Cut the napkins into small pieces. Try on how it will look on the lampshade, so that different drawings alternate and look beautiful. Separating the front side of the napkin from the substrate, glue them, smearing the shade surface with a brush with glue, so as not to damage the napkin.
On the top and bottom of the updated lampshade, glue a silk ribbon that matches the tone, better - a pastel shade, since the look of your lamp will surely turn out to be “vintage”.
In this technique, you can make a patchwork of cloth, tape debris or colored paper.
9.
10.
11.
No.3: Origami lamp for gift wrapping
12.
Designers around the world are inspired by the technique of folding paper figures, and you can try yourself in a similar role by decorating the glass lamp shade of a factory table lamp, for example, from IKEA.
If you have ever practiced origami, you will surely easily collect star figurines from strips of wrapping paper, cut into 10 cm wide. The first photo is what should happen, the second is a pattern of white tracing paper that repeats the size of the lampshade. on the lamp shade to close the glass), the last two photos are the steps of folding the stars. After everyone is ready, stick them on the tracing paper covering your lampshade.
If you are not sure of your origami skills, look for ready-made stars in the stores to decorate gifts from matte or silky (but not shiny!) Ribbons, and then glue them on the same principle (with tracing paper).
13.
14.
15.
16.
patchwork:
Remnants of fabric, colored paper or original labels - any of these materials is suitable for patchwork technology that can turn a trivial lamp into an inimitable vintage thing.
17.
18.
19.
from tapes:
Even if there are no remnants of ribbons in the house, you can always go to the accessories store for sewing and find stunning “trophies” there - ribbons for your interior (style and color palette). Minimum cost - maximum effect
20.
21.
22.
from paper:
Look around: what is “paper” in a house suitable for a lampshade decor? Napkins for serving, confetti or origami figurines that someone from the household likes to put together - all this and much more will surely push you to an amazing idea.
23.
24.
25.
application "to the light":
This method is suitable in the case when the lampshade (or its part) is made of white material or glass, i.e. It will be good to “highlight” a photo pasted on such a surface. It looks very unusual, but it is very easy to make: it is enough to find a suitable photo and transparent glue that does not leave marks.
26.
27.
28.
from fabric:
In the home of most needlewomen is always full of remnants of cloth. Before you - another way to "attach them to the case." Choose what you like best! Completely change the lampshade, pulling the new fabric on the old frame? Make an application on the same lampshade? Or sew a romantic “skirt” for him?
29.
30.
31.
stickers:
Another extremely simple way with instant results. Vinyl stickers will be required for a glass shade, for fabric, respectively, adhesive stickers made of fabric (sold in sewing accessories stores and “for needlewomen” shops).
32.
33.
34.
bulk:
And here you almost completely change the type of lamp, most likely, households will be sure that you bought a new one. But you know the secret: to look for three-dimensional elements that you attach to the old lampshade. Silk rosettes, small polyurethane vignettes (those used for ceilings) or even a cover made from an old sweater are just a few ideas, the rest will come to your mind quickly enough.
35.
36.
37.
different:
And a few more interesting solutions. Geographical maps, lampshade - a display for photographs, imitation of watercolor technique on glass, playing cards, a rope made of exotic materials, jewelry remnants.
And the most interesting thing in this work is that, having begun, you will not be able to stop! After the first successful result, you will look critically at any “standard” lamp, anticipating different ways to change its appearance! Anyway, maybe this is for the better? ...
38.
39.
40.
41.
42.
43.
So, having figured out how to do it, we undertake its basic lighting and at the same time decorative elements: a lamp shade and a ceiling. Reflectors are technologically simpler; their manufacture and fastening to the supporting structure of the chandelier does not cause any difficulties.
About fixing lamp shades
The Internet is full of pictures with really very beautiful homemade lamps. However, considering them ask yourself a question: how to replace a light bulb? The answer is not always located in the primary sources. Methods for fixing lighting elements in luminaires that allow for lamp replacement without the use of tools will be discussed in, but the technological methods described later in this method are designed so that the lamp shade in this case either moves up, or is removed downwards, or you can simply climb into it.
Materials
In order of increasing complexity (and durability), lampshades and plafonds can be made at home from paper, plastics, threads, various kinds of finished tubes, twine or yarn, frame with a fabric cover and stained glass. The last 2 are quite complex, but with a skillful approach to work on lighting and decorative qualities can exceed the expensive purchased ones.
Paper
It is easiest to make a paper shade: from materials other than paper, you will need PVA glue and threads, and from a tool you will need a sewing needle, scissors, and perhaps a sharp assembly knife. However, paper shades are fragile and therefore suitable mainly for chandeliers. But the spoiled shade of paper is easy to replace with a new one.
To make the lamp out of paper a little stronger can be a variety of ways. The simplest thing is to collect the balloon from paper strips, gluing them together at the poles and between each other, pos. 1 in fig. However, the design in this case is uniform: sufficient strength of the product is ensured only and only by its spherical shape.

Another way is to harden the paper itself. It will require some additional material: copper enamelled magnet wire with a diameter of 0.25-0.4 mm or threads. In the first case, the lamp shade will fit without additional hardening and for the floor lamp, while in the second case, for the overhead decorative elements, you need a solid support base, for example. from a plastic bottle. Hardened paper for shade wire as follows:
- On a sheet with a density of 90-140 g / sq. see outlines the details.
- A finely sharpened pencil, or mechanical with a rod of 0.6 mm, suggests stiffness grid lines. If the lamp shade is glued together from several solid or slightly cut sheets, the grid lines should form a seamless pattern.
- Brush PVA glue with a thin layer.
- When the glue dries to tack-free, they impose a vein on the mesh - stiffeners - from wire.
- Lubricate the same PVA sheet density of 35-60 g / sq. cm, impose on the first and gently smooth fingers.
- After a day, the details are cut with scissors, glued together and painted. This way you can even make imitations of the wings of rare species of butterflies, pos. 2; in this case, the Maakha Mahaona.
When using threads, both sheets take a density of up to 60 g / sq. see. Then, as has been said, a carrier base will be needed, but it is possible to imitate even the texture of rose petals, pos. 3
Note: paper shade, durable "almost like a real" can be made of papier-mâché. The technology, sufficiently labor-intensive, is described further, see about lampshades for the kitchen.
Plastics
It is elementary to make a lampshade for a chandelier from disposable plastic cups fastened with a stapler, see fig. Its lighting qualities are very good, but the view is frankly utilitarian. Therefore, it makes sense to use such lampshades in rooms with rather high requirements to the quality of lighting, but not ceremonial ones. The radiation pattern (DN) of the lampshade of the cups forms a cardioid.

Shade plastic cups

A fan DN with a wide aperture, a very soft light in the central spot and even illumination in the side zone allows the luminaire with a shade-cone (or pineapple?) To be made from the bitten plastic spoons on the base in the form of a PET bottle with a cropped bottom, see fig. Effective softening of light is achieved by the fact that spoons work like translucent bowl-shaped reflectors. They are glued to the bottle and glued together with a glue silicone, mounting or glue gun. Cyanoacrylate glue is also suitable, but it must be taken thick. Cheap “superglue” is very fluid, the drips will blur everywhere and spoil the glossy surfaces of the spoons.
Of the bottles alone, you can also make good lampshades. For example, a sphere from their bottoms fastened with a stapler, like stopari cups (see the mini-master class in the figure) will give a cardioid DN; however, compared with the "stale" noticeably distorted. But in the country or in the outbuildings a chandelier from the bottoms is quite useful.

Bottle bottom lampshade

Romantic soft light, somewhat spotted, but within the limits of permissible, will give the bowl-balloon from bottle “hedgehogs”; however, they are more like the blooming sea anemones - sea anemones, see the photo on the right. It’s easy to make the hedgehogs themselves: the bottoms are cut off from the bottles, the side walls to the scar are cut into the neck before narrowing, the strips are wrapped around the neck, glued with glue droplets and fixed with threads or scotch tape for reliability. However, to assemble the “hedgehogs” into the plafond you will need a transparent spherical base. It is obtained similarly to a lampshade from the threads (see below), only the threads take white nylon or propylene ones not thicker than the 20th number, and instead of the PVA, a colorless acrylic water-based lacquer.
A very uniform illumination makes it possible to achieve, and highly decorative, a lampshade from leaves, cut from bottles, see fig. It is assembled on a temporary spherical frame, see below.

Step-by-step master class in this case is also simple, but it requires patience, accuracy, some additional tools and, possibly, material:
- We prepare a soldering iron with a bronze nickel-plated tip (for dry soldering) at 40 W or with ordinary copper at 25 W;
- If the sting is copper, you will need another Teflon (fluoroplastic) tape 0.06 mm wide 60-80 mm;
- Cut the leaves out of the bottle. From the point of view of lighting, pale green or light brown would be better;
- The tip of the soldering iron (copper — through the film) slightly melts the edges of the leaves, otherwise it will not look natural;
- With the tip of the sting (copper also through the film) “draw” the veins;
- With the plane of the sting between the veins, lightly touch the surface with a light touch, so that, like a real leaf, it is not completely smooth;
- Again, with the tip of the stinger deeper, but not piercing, we derive the central vein. It is convenient to do this on a soft heat-resistant coating (coarse calico or felt will be in several layers);
- We put the thread into the central vein and seal it by “wrapping” the side roller on the hollow;
- Complex leaves, if required, form, tying the strings of leaflets;
- Having laid the leaves on the film (now any), we pipette the threads with acrylic varnish. After it dries, the foliage is ready for assembly.
Yarn
The procedure for making Christmas decorations and lamps from threads is described in RuNet many times. For example - video:
Video: Twine / DIY lamp shade
Here you can only note that, firstly, a medium-sized lampshade will need at least 100 m. Secondly, it makes no sense to use balloons as mandrels: after 10-20 turns under the pressure of strained threads, the ball sticks out where it is not necessary, and in the end it turns out something unthinkable. Thirdly, it is also not necessary to soak the threads in flour paste in advance: the product will be fragile and not waterproof.
It is best to use a tightly inflated chamber from a sports ball or a durable silicone beach ball from a pump through a nipple as a mandrel in making a lampshade made of threads. The mandrel is lubricated several times with petroleum jelly (lanolin), carefully rubbing it with your hands. The ball does not hurt it; on the contrary, it will prolong his life.

Next, the thread on the mandrel is wound, continuously pulling through the simplest device, see fig. This mini-impregnation bath, so that it does not accidentally crawl, overturn, or pour glue over something, is fixed with scotch tape on the table; convenient two-way. First, a glass is pierced with a needle with a thread, then it is poured with PVA or acrylic lacquer and is wound, tightening it as necessary. Usually the thread goes through the bath itself, because glue until dry - good lubrication.
When winding, do not forget to leave the window under the cable and cartridge insert - the strength of the cut yarn ball drops sharply! After a day after its completion, air is released from the mandrel and pulled out through the same window. It is “seared” to the threads, it is glued very rarely and loosely: you can tear it off by slightly pulling or pressing it with your finger, while the product remains intact.
Note: jute, sisal or propylene twine can be used instead of yarn, but he can find better use in the lampshade, see below.
And where is all this?
Ceiling balloons, see. Fig., Fit into the nursery, because form an even soft light. The one on the left, from paper cupcake wrappers, is based on a yarn ball. Threads - propylene or thin nylon colorless; Binder - acrylic lacquer. White in the coil, after impregnation with varnish such threads become almost transparent. The lampshade-ball from the cups (right) is not so interesting, because the plates are all the same, but it is also harder to tear them apart.

A shade-hemisphere from the same cups is more suitable in the hallway, see fig. on right. He with a small lamp power (or rather, its luminous flux) will give a bright spot at the bottom and an acceptable illumination of the rest of the room, so you can use a little heated incandescent lamps for 15-30 watts. The fact is that the resource of house-lamp and LED lamps sharply decreases with frequent on / off. A low-power incandescent lamp, especially in the hallway, where the light is constantly off, the cost of electricity does not significantly increase.

A special case is the kitchen. Requirements for coverage in it are set out in the previous article. But the lampshade in the kitchen quickly gets dirty, and soot eats tightly. Recall: a bright light contributes to the condensation and bituminization of vapors of organic compounds. This is the deposition of soot; the lamp shade is lit most brightly.
The simplest way out is a disposable paper shade. "Cone", as in pos. 1 pic below, will give just the right in the kitchen nature of lighting, but it will have to be done anew quite often. It is better to shape on a suitable mandrel lampshade of papier-mâché, pos. 2. After varnishing with acrylic varnish, you can gently wash it with a cloth with dishwashing detergent, and painted with blacksmith patina, it will look like hand-forged work and certainly not like any old newspapers.

But the lampshade on pos. 3 - straws glued to the bottle for juice - an example of an unsuccessful solution. The light of such a lamp shade will give an ideal kitchen (straws work partly and as light guides), but it gets dirty quickly, you can't clean it properly, and the product is laborious. It is better to make plastic reflectors of kitchen lamps for local lighting from reusable plastic dishes, pos. 4, it is quite sturdy, inexpensive and easy to clean. Cups with handles and saucers, of course, is a matter of design decision, but bowls without a pattern are what you need.
How to make papier-mache?
Papier-mâché material is useful for many purposes, so we recall the technology of its preparation and use:
- Older newspapers, or, better, the cheapest non-glued writing paper, are torn to shreds about the thumbnail. Papers will need a lot!
- Scraps to the top fill the appropriate dishes; let's say a liter glass jar.
- In boiling water dilute 1 / 3-1 / 5 by volume of PVA.
- While the solution is cold, pour it into the pulp.
- Stir until the paper completely spreads onto the fibers.
- After cooling, papier-mâché is poured into consumables or immediately put into action. Paper paste can be stored for up to 6 months. in the refrigerator in a tightly sealed container.
- Prepare in the same way the next batch.
- If the paper paste immediately goes into the business, you can add the next one, while the previous one is still wet and rumpled with fingers. If to finish dry, the product, having dried, can break up into "flat cakes".
- By varnishing, painting, etc., the blank is ready after a week-long drying at a temperature not lower than 22 degrees. The air temperature around the workpiece must be the same on all sides! It is impossible to dry on the battery, convector, under direct sunlight or an infrared emitter!
Tubules
Lampshades and ceiling lamps are made of tube sections most often for night lamps and lamps in the bedroom: due to the circular cross section there is always a significant refraction of light, which can be very intimate and romantic, but in most cases it is undesirable for permanent and working lighting. Pretty spotted light is given and lampshades made of translucent tubes, see figure; if, however, to use sections of thin transparent PVC hose, the play of light will turn out to be very beautiful, but it is not necessary to look at it for a long time, let alone read or sew in this light.

Paper and other fibrous materials refract light a little, but the tubes of them are themselves fragile. For example, a newspaper tube lamp shade is best done on a frame, see below: just because they are crumpled easily, thin paper tubes are an excellent material for weaving. As for the lighting properties, the paper, especially clean, they are excellent.
Lampshade on the frame
Now we will proceed to the lampshades, which are suitable anywhere, incl. and for a table lamp, which elbow can push on the floor. In addition, we set the condition that the lampshade trim can be washed, cleaned, changed as desired. Therefore, we do not touch glass or solid rigid plastic lamp shades; they also cannot be made at home. Ie, let us work on the shades on the frame with soft lining.
About fabrics for lampshade
The decorative-light cover of the lamp shade is preferably sewn from a fabric with fleecy threads, i.e. natural. Due to diffraction on smooth filaments of synthetics, the light penetrating through such a lamp shade may be harsh. It is easy to choose fabric for an eye-shade: through a sample, turning it gently, look at some compact bright light source; LED is desirable, because it gives the most coherent, i.e. orderly, light. The selection criterion is simple: the less observed from different angles of view of the moire stripes, the better the fabric.
About restoring a lampshade
The frame of the lampshade is quite laborious and technologically complex, so first you need to look around at the farm: was there a lampshade from an old lamp somewhere? Straighten it, repair and update the lampshade with a new case will be easier than making a frame from scratch.

The discovered “basket” can turn out to be a very elaborate form, and to build patterns (see below) you need to accurately measure its diameters in several places. In this case, a home-made caliper of 3 wooden slats and a pair of drawing squares will help out. Of course, he will not give the accuracy of the factory barbell, but it is sufficiently achievable (+/– 1 mm) for cutting-sewing work. An idea of the capabilities of such a tool gives rice.
The measurement procedure is 2-step: on the jaws where they touch the object, make a mark with a pencil, and then measure the size between the marks with a tape measure. To move the movable sponge more smoothly, and, accordingly, the measurement was more accurate, under the gum holding it you need to put a fluoroplastic film. To measure small diameters, the sponges are turned upside down with squares.
Building patterns
Now we remove the required diameters: the lower and upper hoops (D1 and D11 in position 1 in the figure), the largest and smallest on the belts (D2, D6, D10), in the places of bends, i.e. where the curvature of the generator changes the sign (D4, D8) and at the kinks (D5). Others take more or less evenly between the required.

The widths of the pattern of 6 wedges will be, taking into account the tightening of the fabric, equal to half of the measured diameters (pos. 2). If the wedges of the finished sleeves are assumed to be more or less, then proportionally change the diameter fraction in the corresponding cross-section of the pattern. But it is too early to cut and sew.
There on poses. 2 that the seam allowance is geometrically not completely similar to the pattern. In knot I (kink inward), this is still half the problem: you can sew up a sleeve-rocker and tighten the seam with a cord. If the decor of the lampshade implies ruffles, frills, festoons, etc., then perhaps it is necessary: fine folds will come to the place, and the cord will not be visible in the contour break.
However, on the contour shelf (node II), whatever one may say, but it is impossible to give an allowance so that the seam does not “leave”. In higher geometry, it proves why, but we don’t need to go into this jungle: we simply cut a paper template according to “capricious” diameters at the breaks and shelves (pos. 3).
Sewing a cover
Now, how to sew a lamp shade according to our patterns? First sew the individual parts of the sleeve; in this case, the bottom, middle and top. Then to the widest belt (bottom) sew the largest width of the adjacent part (here - the middle). Further, in the same way sew 2 following widths, etc. The bottom line is that the shortest cross seam (we have Seam 2) was sewn last. In this sample, after stitching the bottom with the middle, the top is sewn to them. The tailoring of the cover is completed by trimming the excess allowances, except for the lower and upper gateways. Edge necessarily hemmed.
Curtain frame
The next stage - landing cover on the frame. Here you can send the machine to the closet: the work is exclusively manual. Step by step weighting the frame of the lampshade cover is made as follows:
- The cover is turned out (that it was sewn from the inside out, probably, and so it is understandable) and put on the frame;
- Wrap inside and stitch the upper cuff;
- Tighten and trim the fabric to the first bend (here - D8). If there was no hoop in the original sample, it must be pre-set, see below;
- They sweep up the fabric to the ribs of the frame from top to bottom alternately, and to the hoop on the bend;
- Repeat paragraphs. 3 and 4 until the next bend (now D5), and so on until the lower hoop;
- Wrap and stitch the lower cuff.
Frame
How does the simplest frame lampshade table lamp or floor lamp, can be seen in pos. 1 pic Suspended for a chandelier is different in that the ring will be at the top, stretch marks from it will go to the upper hoop, and then additional holes are needed in the ring for fixing the hanger.

The ring is cut out of a well-soldered and fairly strong sheet metal (bronze, brass, galvanized steel with a thickness of 0.4-2 mm) or strong plastic from 1 mm. A computer disk will do; under the chuck of E10 it will only be necessary to drill holes for bracing and fastening. The main dimensions of the ring chambered for E27 with fastening cap shaped nuts (pos. 3) are given for pos. 2. But making a ring under the mount in the gap between the body and the collar of the cartridge with a skirt (pos. 4) is unacceptable! Such cartridges are mounted only with a threaded nipple in the cover!
How attached to the ring stretch, shown in pos. 5: their blanks are crooked not fully, inserted into the mounting holes and neatly pressed with pliers. Then, if the ring is metal, they are soldered (see below). If plastic - fix drops of superglue or silicone.
Soldering
The frame parts are made of plastic steel wire with a diameter of 1.5-2 mm or bicycle spokes. The latter are much stronger, do not rust and do not require painting, but they must be bent carefully and they are worse soldered. To solder the frame you will need:
- Soldering iron not less than 65 W (preferably 100-150 W).
- 6% solution of phosphoric acid. Sold, for soldering, in radio shops and construction. Orthophosphoric acid is also available as a food additive E338 in the form of acicular colorless hygroscopic crystals.
- Flux paste (soldering gel), always with borax.
- Thin, 0.15-0.35 mm, bare copper wire. You can take the veins from the electric wire.
- Solder POS-30 or POS-40. They are refractory (therefore, a powerful soldering iron is needed), but much stronger than POS-61 and other low-melting ones.
Note: orthophosphoric acid of medium strength, highly toxic and / or caustic vapors does not emit. But all the same, when working with it, you need to take precautions - wear safety glasses and gloves (household latex will go).
The key procedures for assembling the frame on soldering are shown in Fig.

The brazed steel frame is being assembled as follows:
- The ends of the linear blanks are held for 3-4 minutes in acid (pos. 1), and then rinsed in water (pos. 2). Water needs at least 1 liter, and after 4-5 washes it needs to be changed.
- If the soldering is in the middle or the part is bent, clean white rags are soaked in acid and wrap the soldering spot with it. They hold it for about half a minute, then the cloth is rinsed with acid, again the place of soldering is wrapped with it, and so until the total time of exposure of the acid to the metal reaches the same 3-4 minutes. After acid treatment, the part is then washed under running water for 1-2 minutes.
- Without touching the treated places with bare fingers, the frame is completely assembled without soldering: the butt-ration places are tight, but not tight, i.e. with intervals between turns of 1.5-2 mm, wrapped with copper wire, pos. 3 and 4, and 2-3 drops of flux paste are applied to each joint. The places of the rations at the intersections of parts are wound with 2-3 turns of copper wire crosswise and fluxed with 1-2 drops.
- Moisture, i.e. without a hanging drop of solder, with a soldering iron tip, the rations are heated until the flux spreads over all the lye, pos. 5. Warm up to boiling flux and the appearance of vapor is not necessary. Also, the end result will be better if you heat the flux with a separate soldering iron with a dry bronze nickel-plated tip.
- They collect a drop of solder, put it on the place of soldering (pos. 6) and heat it until it flows all over, like the flux used to be. The surplus of solder which has hung down below accurately remove a soldering iron sting. Impose unmelted solder in the form of a flexible wire can not, but refractory solders and are produced mainly with rods.
Cloth or twine?
Good lighting properties have propylene packaging twine and paper tubes. If the lamp shade is woven from twine or newspaper tubes, it will give an even soft light, and complex cutting and sewing work will be dropped. But in the frame for a woven lampshade there must be, firstly, no less than 10-12 edges evenly spaced around the circumference.
Note: if the frame is of a simple form, then only 3-4 ribs can be carriers (steel) in it. The rest let them be from straw, they are glued to the upper and lower hoops.
Secondly, to get the headbands at the top and bottom, respectively. teach them either to make them double in height, with a gap of 2-3 cm, or attach strips of thin metal or hard plastic of the same width to them. Headbands are needed for decorative reasons: a solid wrapped with twine or a tube, and if the rim is double, weaving can be started up by a figure eight. The entire side surface is braided like a basket.
Lampshade stained glass
Stained glass lampshades form the luminous flux mainly by refraction, therefore they are more suitable for the living room.

stained glass lampshades and shades
Fragments of stained glass are made from rhinestones, faceted or cabochons. A stained glass lampshade is assembled on a heat-resistant mandrel (for example, a steel bucket). But compared to stained glass for a window or a door here, since the connections of the elements are not solid, but point-like, there are significant differences:
- Solder is used only strong refractory, the same as for the frame of the lamp shade, as well as flux with borax.
- Framing the rhinestones before soldering is made only from special copper foil - foil - 3-15 mm wide, depending on the width of the rim of the crystal.
- The protective foil film is removed immediately before applying it to the crystal; it is impossible to touch the outer (soldered) surface of the folia with your bare hands!
- Also it is impossible to postpone until tomorrow the soldering of foil-wrapped rhinestones: copper will have time to oxidize, and the compounds will be fragile.
- Upon completion of the soldering and thorough washing of the flux residues (with rags with alcohol; then with distilled water), soldering is copper-coated, applying a thick blue solution of copper sulphate with a brush.
- Remnants of vitriol wash off under running water. Rubbing with a brush or even cotton can not be, because The copper film on the solder is very thin.
A little surprise about the New Year chandeliers and lampshades
Soon the New Year, it's time to do. And - New Year's chandelier. Chandelier? Yes. Remember how the festive mood falls, if in the room with a Christmas tree turn on the upper light. Oh, no, but New Year's lighting should be consistent with the spirit of the holiday. Lighting technology will be postponed until the days of serious, for a few evenings nothing from the festive light will happen to us. Business, it is time, but also fun an hour.

Usually a New Year's chandelier - a Christmas wreath attached to a chandelier in the living room with lamps woven into it. But to engage in electrical work at a height in the pre-holiday bustle would not be necessary, and an experienced electrician. And what if the tree is in the nursery, where is the paper chandelier? Then you can at least buy cheap plastic blanks for Christmas balls, a garland with colorless light bulbs, put them into balls, and hang such a pile (on the left in the figure) where it is more convenient.
If the design of the “everyday” chandelier is suitable, you can screw in the candle lamps and decorate it with the same balls or, for example, colored cones, to the right there. And you can try a little and do it yourself New Year's chandelier, jasmine, as in the video below. New Year is New Year, whatever you say.
Video: lampshade-jasmine on the ceiling with their own hands
If a person likes creative experiments and wishes to spend the day off with benefits, you can make a new beautiful lamp shade.
This craft will decorate your home. And only at first glance it seems that making lamp shades for table lamps with your own hands is too expensive. There are already ready proven size schemes. You just need a little wire, fabric and thread (or glue for fabric). This is done easily, and simple hand-made materials will be suitable for crafts. Such an element of the interior as a lamp shade will add a new motif to the familiar interior of the room or will be a wonderful gift for friends and acquaintances.
How to make a lampshade for a desk lamp with your own hands?
What is the living room without a beautiful lampshade? Handmade art masters have a lot of advice in their arsenal on how to create a beautiful lamp shade for an old lamp from the time of grandmother's youth. The most practical option is to make a round frame lampshade for a table lamp made of wire. And on the wire to stretch the fabric and fasten.
There are already ready proven size schemes. Performing everything according to the instructions, the beginner will avoid many mistakes. Let us give an example of the most common classical scheme of the lampshade frame. The pattern for the fabric is also made in these sizes, but with an allowance.
The best fabric for a lamp shade is felt or cotton. Felt allows you to make a multi-layer unusual crafts. And on solid cotton before fixing the fabric on the frame, you can apply a pattern with an iron. To properly and evenly secure the fabric, it is convenient to use a transparent textile glue. It can easily be found in the shop for decoupage. The result is an excellent lamp.

How is the drawing applied? In this, too, there is no particular trick. Need to find a special paper for thermal transfer photos. It prints a suitable picture, and then you need to take a preheated iron and iron every millimeter of paper well. Nothing more needs to be done. When the design cools down, the fabric is firmly fixed to the frame. Just do not forget to make a small gap when cutting out fabric patches, so that the edges (above and below) can be bent and neatly glued from the inside. Or use for this purpose the usual color tape.
Frame options
Lampshades for table lamps, made by hand, in any case, nicer than the factory bought. Everything is possible that the author’s fantasies lack. But for a round shape, the easiest way is to choose a pattern that is glued to the fabric.
If you do not want to mess around with the drawings, it is enough to take the usual monochromatic calico fabric and make patterns that are suitable for the shape of the wire frame. The main elements of handicrafts are imagination and the ability to work with hands. Therefore, the wire frame lampshade table lamp with his own hands is any.
Unusual lamps for the new interior
When a new room has been renovated and you want to add an exclusive detail to the image of the living room, you can put one lamp with an unusual design on a small coffee table. Or on the pier in the bedroom. It will be an excellent solution. After all, even when the cost of decoration is minimal, creative taste is always appreciated.
Find unusual ideas for the lamp, and, in particular, a new lampshade, you can at exhibitions of handicrafts, or simply using the maximum imagination. Nowadays, various shapes of rice paper shades are popular. Many people like colored things and decorate the frame with decorative colored beads.

The main thing in creative experiments is to choose the right shade of small decorative elements. When you choose the right style, colors and shape, even the simplest things will look elegant in your room.
Stylish cardboard shade
You can make a lampshade for a desk lamp with your own hands from cardboard. It will be completely different from others. Material for crafts you need to choose durable, but thin. The advantage of this option is that it is an incredibly easy way to create a lampshade from scratch.
The sequence of actions is as follows:
- 4 identical frames are cut out of the cardboard. The same framework, which put photos.
- A piece of fabric is glued to the back of each frame.
- To the side, carefully make several holes with a gypsy needle and sew the frames with laces. It is necessary to get a small flashlight. Pre-glued cardboard. Stitched in order to look beautiful hack.
The advantage of this option is that it is a completely simple way to create a lampshade from scratch. In addition, this “flashlight” is a very light object. And it can be repainted in any color, but preferably in tune to the selected fabric. It looks unusual and is suitable in style for elegant interiors.
Lampshades for table lamps, handmade for children
An interesting lamp in the nursery will be very useful. Make a better lamp shade for your child. Trust his personal taste. After all, for the child the main process, and not the result. You can use more dense materials that poorly transmit light, for example, plastic, covered with paper. With a lampshade-plastic cap, the lamp poorly illuminates the room, it acts as a night lamp.
Maybe the child will want to see his favorite cartoon character on such a night light. Using the cotton print idea, this can be done.
Shade for a cozy bedroom
But for the women's bedroom more suitable lampshade with a knitted pattern. Some stores sell simple knitted napkins as decorations on tables or shelves. These napkins are great. If a woman knows how to crochet, she can make such a napkin herself.

When the napkins need to be shaped like a ball, you need to put a few pieces on the children's ball, smear it completely with glue and let it dry a little. Unnecessary details to remove in advance. Then the fabric is removed and hung up on the prepared circle of the wire lampshade.
The napkin connected independently is already in advance of the necessary size, it does not need to be customized to the dimensions of the frame. The napkin is sewn to the edge of the frame with ordinary threads. Lampshade do it yourself for a table lamp with a hook to make it easy.
Ball of thread as a lamp shade
A very popular method is a glued ball of thin threads. All you need is a skein of thread, PVA glue and a balloon. Threads can be taken and thick.

What to do?
- The balloon is inflated, smeared with glue.
- On a fresh glue on the ball layer by layer, shake the threads in any order.
- A place is left below so that the light bulb can then be turned on.
- When the ball comes out, a layer of PVA is smeared on top of the thread chaos.
- This ball is left to dry for 12 hours.
After that the balloon is pierced with a needle and pulled out. Now the lampshade is ready for installation on the lamp. Lamps for table lamps with their own hands, made in this technique, do not have to be round. Instead of a ball, it is convenient to take a plastic 5-liter bottle or other square-shaped object, and apply the same “scheme”. It will turn out a wonderful lamp shade if you take an inverted plastic flower pot instead of a form.
New life of the old lampshade
What to do when there are lamps with lampshade, but the old glass ceiling crashed? How to repair lampshade table lamp with your own hands? Sometimes you do not want to say goodbye to old favorite things, even though they age and fade with time. What to do so that they serve and continue? They can be ennobled, return them a beautiful stylish look. But how to update the lampshade desk lamp with your own hands?
Of course, the old frame needs to be re-painted, repaired, if it cracked somewhere. Now many types of glue for the restoration of such things are sold.

Then think about what basis you choose for your crafts. If you are new to the hand, ask advice from those who are more familiar with the details of this hobby. But nevertheless the classical fabric will be the best basis for the lamp shade.
The lampshade of a desk lamp, a chandelier or a floor lamp was created to muffle the light of the lamp. However, this accessory may eventually wear out, losing the aesthetic appearance. In this regard, many owners have a dilemma, throw a working lamp or try to restore the lampshade using the old frame. There are many ways to remedy the situation by showing a little imagination.

Lampshade decor with flowers

Original lampshade decor

The idea of decorating the lampshade

Handmade products today are very popular. You can create a new lampshade for a chandelier or a floor lamp from any available material or purchase some items in a handicraft shop. The most simple and affordable materials for creativity - paper, plastic, thread or fabric. You can also create an original decoration for the lamp from old discs, natural materials - grapevine, seashells, stones or broken glass. Fabric shades made of jeans, burlap, linen tape also look original. As additional elements of decor, you can use beads, buttons, satin or rep ribbons. This article contains interesting and unusual workshops on self-design lamps from different materials.
Below is a table showing some types of handmade chandeliers, and what materials are needed for their manufacture.
|
Type of lamp |
Basic materials |
Short description |
Degree of difficulty |
|
Tetra chandelier |
Empty tetra packages |
From the empty Tetra Pak packages, stripes of 21 mm and 19 mm are cut out, from which hexagons and pentagons are made. The lamp is assembled using origami technique. |
|
|
Wire Chandeliers |
Stainless Knitting Steel and copper wire |
The easiest way is to wire a spiral lampshade template. It can be a bucket or a flower pot. |
|
|
Ceiling lamp made of plastic |
Empty plastic bottle of 5 liters Disposable plastic spoons Heat gun |
The bottom of the bottle is cut off. Spoons break off the cuttings, and the main parts are glued to the bottle, imitating fish scales. For this, a thermogun is used. If desired, spoons can be painted with acrylic or spray paint. |
|
|
Disc lamp |
Laser discs Wooden round base with a diameter slightly larger than the disk 3 metal racks Long fluorescent lamp |
In a wooden base, a hole for the starter with a switch is drilled and a lamp is mounted. It is also necessary to install metal racks on which the discs will be strung. The discs are drilled holes for the rack, and then strung on them. |
|
|
Chandelier hangers |
Wooden hangers 2 metal round bases of different diameter |
The smaller base will serve as the top of the chandelier. Hangers are attached to both bases in different angles vertically, forming a trapezoidal shape of the lampshade. |

Making lampshade ribbons and beads

Lampshade decor with flowers

Original lampshade decor

The idea of decorating the lampshade

Decoration lampshade accessories
Ideas and their implementation
To create a paper shade is the easiest and most affordable way. The disadvantage of it is the fragility of the material. For a longer life of such a chandelier you can use cardboard. Below are a few examples of creating a lampshade using paper.
Ceiling light
For the manufacture of such decor will need the following materials:
- PVA glue;
- Scissors;
- Thread (it is better to use a nylon thread, it is much stronger than usual);
- Beads;
- Color paper;
- Plastic or wooden round base (diameter is selected individually).
The essence of creating a lampshade consists of stringing various decorative elements on a thread and fixing it to the base. To do this, from colored paper to cut out various parts. They can be in the shape of a butterfly, hearts, birds, animals, ballerinas. Such parts are attached to the thread with glue, and between them are strung several beads of different diameters. To create a volume element, such as a heart, you need to take 3 identical blanks and glue them together.

Making lampshade ribbons and beads

Lampshade decor with flowers

Original lampshade decor

The idea of decorating the lampshade

Decoration lampshade accessories
Butterfly chandelier
Materials required for work:
- Scissors or office knife;
- Monophonic cardboard;
- Glue gun;
- Wire;
- Fishing line or thin twine.
If you do not have a thermogun, you can use silicone rods for it. You can melt them over a regular candle.
The wire is needed to create the ceiling of the chandelier. To do this, take a piece of wire and roll it into a circle, securing the ends with pliers or round pliers. The line will be a suspended element. It should be cut into 3 identical pieces, the length of which depends on the desired height of the fixture fixture. The line must be attached to the wire base at the same distance from each other.

Making lampshade ribbons and beads

Lampshade decor with flowers

Original lampshade decor

The idea of decorating the lampshade

Decoration lampshade accessories
Next on a piece of cardboard you need to draw and carefully cut butterflies of various sizes. The lower part of the ceiling can be processed curly scissors. The cardboard itself is rolled up into a cone-shaped form, and the joint is glued or fastened with a stapler. Its upper part is attached to the frame. Those butterflies that have been cut can be strung on additional pieces of fishing line, alternating them with different beads, and fixed inside the ceiling. After turning on such a lamp, images of fluttering butterflies will appear on the walls.
Another simple idea is the creation of a chandelier made of a thick thread or yarn. From the materials for such a handmade need:
- Ball with thread;
- A balloon;
- Baby cream;
- PVA glue.

Making lampshade ribbons and beads

Lampshade decor with flowers

Original lampshade decor

The idea of decorating the lampshade

Decoration lampshade accessories
Initially, you need to inflate the ball to the maximum round shape and lubricate it with a thin layer of baby cream. This is done so that the threads do not stick to the rubber surface of the ball. Next, the thread is wetted in glue and wrapped around the ball. The winding is made over the entire surface of the balloon, leaving a small part in order to later put it on the base with the lamp. After the thread is completely dry, you can blow off or burst the ball, and you will have in your hands the original round lampshade of threads.
A more detailed and visual execution of the lampshade for the chandelier can be viewed in the master class video.
Video: DIY lampshade decor
The interior of the room should reign unconditional harmony, so when you make it necessary to take into account every detail, even seemingly trivial at first. An important role in the design is always played and lighting, which can often be even a central element of the overall design. However, it is not always possible to purchase the desired option - for the banal reason for the lack of the necessary design solutions in the proposed range.
In such cases, some homeowners have a desire to make their own efforts in interior design. And especially such a decision suggests itself in those situations when beautiful grounds remained from old chandeliers, floor lamps or table lamps. Therefore, this publication will address the question of how to make a lampshade with your own hands for different types of lighting fixtures. Perhaps one of the proposed solutions will save some money from the family budget and at the same time acquire an exclusive subject of general decoration of the room, which will surely become another reason for the master's personal pride.
There are a number of advantages of hand-made lampshade for any type of lamps. And these circumstances should be considered when the question arises about whether to buy this element of interior decor, or make it yourself.

- There is an opportunity to get an exclusive model of the lighting device.
- The master has a much wider choice of decorative design of the lighting fixture corresponding to the general design direction of the interior.
- Very significant cash savings are achieved.
- It is quite possible to use things for work that have accumulated in household pantries, which take up quite a lot of space, but it’s a pity to throw them away for one reason or another. So, in many houses there are quite functional and interesting in their forms lamps, but long gone out of fashion. To create a new product fit any of them.
- You should never discount the "psychological component" - the ability to demonstrate all of your own creative ambitions, and then you deserve to be proud of the manufactured product.
- It is possible and even necessary to attract a child to the joint production of a lampshade - this is a great opportunity to instill in him a desire to create useful things with his own hands. In addition, the time spent together, and creative communication "on an equal footing" will certainly benefit both parents and children.
Hopefully, the arguments are quite convincing. Therefore, you can move closer to the practical part.
Security of selected materials
Here the principle is simple - a homemade lampshade should not be a danger. This, of course, is primarily about fire safety, since any lighting device during operation generates a certain amount of heat.
In the production of lighting products on an industrial scale, technologists of responsible companies make calculations of the safe distance from the lamp to the lampshade material. This distance is determined depending on the power of the lamps, which are recommended for installation in a particular lamp, and on the degree of thermal resistance of the material used to create the lampshade.

- Homemade luminaires use only certain types of lamps that do not heat up to high temperatures. So, it is necessary to completely exclude incandescent lamps, in which the lion's share of electricity consumed is converted into a banal heat, and often to very high temperatures. The fact that such an expenditure of energy is extremely uneconomical is half the trouble. But the "neighborhood" of the lampshade material with a source of strong heat is extremely unsafe!
Today in the assortment of stores there is no shortage of other light sources - these are LED or compact fluorescent energy-saving models. At the same time, all of them should have reliable plinths made of ceramic or metal. The cost of such lamps is certainly much higher than that of incandescent lamps, but on the other hand, the heating here does not reach critically high temperatures. Plus, add a long service life and a calm, smooth, but powerful enough luminous flux.
- Flammable materials - synthetic or cotton fabric, plastic threads, wooden parts, as well as paper or cardboard, from which the lampshade can be made, must be at least 50 ÷ 70 mm from the lamp.
- Making a lamp shade and installing it on the lamp, it is recommended to observe the intensity of heating its walls. If you feel the heating of the material, which can be characterized more than warm, then you should change the light bulb to a less powerful one (meaning the power consumption, and not the conditional criterion for assessing the brightness of the glow).
What is very important to know about the characteristics of lamps and lighting?
Before choosing, manufacturing, installing lighting devices, it is strongly recommended to get some theoretical knowledge in this matter. In detail about the different, about the methodology for calculating the illumination of the room is described in a special publication of our portal.
Varieties of lampshades according to the principle of construction and material production
A few words must be said about the types of lamps, which can be made at home. They can be divided according to the principle of design and material production.
Frame and frameless designs
By design, such products can be divided into frame and frameless.

- Frame shades have a rigid base on which one of the selected materials is fixed. Frameworks can have a different shape - its choice depends on the preferences and imagination of the master, as well as on the availability of the necessary material for manufacturing. The advantage of this type of lampshade is that the frame immediately determines the distance between the exterior trim material and the lamp, and then keeps it for the entire life of the lamp. In addition, the product acquires rigidity, due to which its shape is preserved, which was originally specified.

- Frameless lampshade. In this embodiment, the role of the frame is performed by the material itself, from which the product is made. In order for the lampshade to acquire the desired shape, a pattern is made as a temporary base on which the selected material is fixed with glue. The base is removed after the glue has completely dried.
When choosing this method, it is necessary to immediately calculate at what level a light bulb will be located inside the lampshade, given that a certain distance should be maintained between it and the canopy.
The advantage of such a product can be called its low weight. The disadvantage is that the factor that, with a random deformation of the shape of the lampshade, its walls can dangerously approach the lamp, which will lead to overheating of the material, which is fraught with fusing and fire. This is especially true of lampshades made for table lamps and floor lamps, the shape of which can be damaged by accidental mechanical action.
What materials are used for the exterior of the lampshade
For the manufacture of homemade lampshades successfully used a very wide variety of materials. Some of them do not even have to buy - they will be found in the household, and sometimes they lie under their feet, and, practically in the literal sense of the word.
| Illustration | Description of the material, its advantages and disadvantages |
|---|---|
 | The cloth.
She sheathed only frame versions of lampshades. It is not recommended to use synthetic materials, as they do not withstand heat, can shrink, melt and fade. Cotton or linen is perfect for trimming. It would be better if the fabric is treated with a special water-repellent impregnation, due to which the lamp shade also becomes less attracting dust. |
 | Yarn or yarn.
This version of the material is most often used to create a frameless lampshade, but sometimes it is also used for wrapping the frame. For the formation of the ceiling of the threads using their different options with a thickness of 1 to 5 mm. |
 | Rope.
Used for the manufacture and rope of different thickness. She wrapped the finished frame in different variations, and also assembled frameless models of lampshades. It is best to use twine made from natural materials - they are particularly well suited for lamps made in ecostyle. |
 | Tapes different widths are suitable for the formation of weaving on the frame, and for frameless versions of decorative lampshades. |
 | Hand weave lace
from cotton thread is used for fastening on the frame and forming a frameless lampshade. Instead of lace, you can apply fragments cut from tulle, having a suitable pattern. |
 | Hand knitted fabrics
, having different designs can also be an excellent decoration for the frame of the ceiling light. They can be tied specifically for a particular product, or you can use ready-made garments for this purpose, which are completely out of fashion or simply disliked. |
 | Wooden details
- branches, planks, slats, etc. also often used for the manufacture of lampshades. Thin, peeled and specially processed branches are used for weaving lamp shades, thicker ones are set in palisade or cut into small pieces and randomly assemble them into the chosen shape. Thin planks themselves are able to form a frame, at the same time performing a decorative function. Some craftsmen prepare plywood parts with through-thread, which when turned on the lamp gives a beautiful shadow on the walls. |
 | Plastic fittings
which are sold in clothing stores and used to decorate clothes, are also used to create lampshades or lamp shades. Beads or buttons of various sizes and shapes can be added to this category of materials. |
 | Origami
- This is a technique of working with paper and cardboard, from which various decorative parts are made, including lampshades for lighting devices. The advantage of such decorative products can be called the speed of manufacture (if there is a certain experience, of course) and the ability to change them depending on the mood or the need to decorate the room for a particular holiday. The disadvantage is the fragility of lampshades made of paper and cardboard. |
In addition to the above materials, the most unexpected creative elements can be used to create home-made masterpieces - rings from metal cans, vases, ordinary kitchen graters, gears from watches and much more. Just turn on the fantasy ...
Manufacturing frame lampshade
How and what can a frame be made of?
If for manufacturing a frame version of the lampshade is chosen, then a natural question immediately arises - where to get or from what and how to make the frame yourself. This stage of work can be called first when creating a product.
If you plan to update the lampshade on the old floor lamp, chandelier or table lamp, in which the frame remained in its entirety, then it is quite possible to use it by decorating it with new material. From the base removed the old trim. Then the frame is carefully inspected, if necessary, cleaned of rust, and then painted.
If the lighting device is created anew, or in the case when the frame is missing or unsuitable, you can purchase an old lamp shade, for example, in a “flea market”, and do the manipulations described above with it.
Well, if this option does not triple or is impossible - you have to do it yourself.
The frame of the basket for office waste
One of those options that do not make a great effort to create a frame - this is the purchase of a metal basket for office waste.

On sale you can find metal and plastic baskets, but for a lampshade it is recommended to choose the first option. If the size and shape of the product is suitable, the problem with the frame will be solved. At the bottom of the basket, a neat hole is cut to install the cartridge under the lamp, which should be firmly fixed to the mesh surface. By the way, the bottom of many baskets is a solid metal plate, that is, it is even easier to fix the cartridge.

Sometimes for a designed lamp shade, it is sufficient to carefully paint the mesh surfaces in the desired color and decorate the top or bottom line with a cloth, braid, etc. You can veneer the frame completely one of the above materials. Design options are unlimited.
Wire frame
The most common material for the manufacture of the frame is a thick wire. If steel wire is taken, joints during frame assembly can be made using spot welding. However, this technology is not widely available, and, as a rule, most home craftsmen fasten individual parts using the twist method.
Steel wire has considerable stiffness and elasticity, and it is quite difficult to twist parts with a thickness of, say, even 3 mm. Therefore, some nodes are made using a thinner wire, which are fixed connection of the main elements of the frame.

If the twist method is chosen for the joint, aluminum wire is often used. It is easy to work with her, but it is too plastic and easily deformed. When the frame is sheathed with decorative lining, it will, of course, acquire greater rigidity. But in its manufacture it is necessary to take into account the properties of the wire and act very carefully.

The advantages of aluminum wire can be attributed to the same plasticity, as when creating a frame in it, you can easily make adjustments.
For the work will require some tools, which certainly will be in any home workshop:
- pliers for bending and straightening wire;
- round nose pliers will help to bend the ends of the wire for further twisting;
- wire cutters for cutting the wire;
- The hammer will also help straighten individual sections;
- sandpaper for cleaning the surface of steel wire before painting;
- thin copper wire for winding the connecting nodes of parts;
- a soldering iron for connecting copper wire;
- enamel paint and thin brush;
- electrical tape for additional fixation of parts among themselves;
- a wide wooden bar, on which it will be convenient to straighten the wire and perform soldering.

Works on making the frame are performed in the following order:
- The shape of the future lampshade is chosen and the product is drawn according to its size.
- Further, if necessary, straighten the prepared wire.
- Then, according to the dimensions put on the drawing, the pieces of wire are cut. Here, the overlapping of the wire ends against each other should be taken into account when forming the upper and lower circles, at least 150 ÷ 200 mm. For height-determining vertical elements, the segments must be longer than about 40 mm from the drawing. This is necessary to secure them to the circumference of the frame.

Traditional for the lampshade frame consists of two large circles - upper and lower, a small ring to hold the cartridge, 4 ÷ 6 vertical holders and 3 ÷ 4 horizontal bridges that will hold the ring for the cartridge inside the structure.
Naturally, there are much more complex forms of lampshades. In any case, each of the options is made according to the drawing. However, choosing an overly intricate design, you should not forget that it will also be difficult to carve out and sew a case for it.
- The cut steel wire pieces, if necessary, are cleaned of rust with an emery cloth.

- Further, the circles are made of the required diameter. The ends of the wire must be wound with copper wire, and this resulting clamp is better to immediately disappear. Another fixation option is an insulating tape.
- Then the frame posts are made, which will connect the upper and lower circles and thereby define the structures of the truncated cone shape. At their ends, peculiar loops are bent with the help of round pliers. With their help, these racks are put on first on the top and then on the bottom ring of the frame. Details must be distributed in circles so that between them is the same distance.
- After that, the rings on the ends of the racks are clamped with pliers. Finally, you can fix the connections of the parts with copper wire with its subsequent soldering, or it is easier to proceed - wrap with insulating tape.

- If the tape is chosen for fixing, the parts are painted before they are assembled into a single structure. It should be fairly noted that the appearance of the frame, fastened in a similar way, is not distinguished by high aesthetics. Therefore, this option should be used only for lampshades, a decorative covering in which stands dense opaque material.

- These manufacturing methods are not the only possible ones. For example, a metal strip 10–12 mm wide can be used in combination with wire. It is convenient in that you can drill holes in it, through which you can then fasten the parts together with screws and nuts, and also fix the cartridge to the threaded coupling.
By the way, the connecting nodes, if the frame is made of thick copper wire or even a tube, can be done simply by soldering - you just need a fairly powerful soldering iron. Yes, and aluminum amenable to soldering - however, this requires some experience and a certain set of chemicals.
Other options for frame materials
Perhaps, for someone, other recommendations on the material for the manufacture of a frame for a lamp shade will also be useful. Moreover, all the examples of "raw materials" listed below can be found in almost every home or purchased for "pennies".
| Illustration | A brief description of the use of materials to create a frame under the lampshade |
|---|---|
 | If there is no steel or aluminum wire, then to create the base, you can use wire hangers for clothes. The hangers need to unwind in smooth segments, which are straightened with pliers. Then the frame parts are formed from them. Their connection with each other is carried out according to the principle described above, and fixing - for example, using electrical tape. For the manufacture of the frame of such a wire requires less effort, but the base of them turns out less rigid and durable. |
 | In the building stores you can find metal mesh, intended for the reinforcement of surfaces under the plaster. They may have different cell sizes. For a lampshade, a version with cells 15 × 15 or 20 × 20 mm is suitable. A carcass is formed from the cut-out fragment of the mesh, and to join the edges, they overlap one or two cells and are connected with a wire twist. However, it is possible to make a framework from this material only in the form of a cylinder or a truncated cone. If this form does not contradict the general design solution of the room and suits the master, then this option of creating a frame can be called the optimal solution. |
 | It can be used to make a lampshade and a grill from an old fan, especially since it already has a certain shape of a kind of spherical segment. If necessary, the frame can be made deeper by fixing an additional tier of wire of the same thickness on the lower part of the grill, or lengthen the edges of the lampshade with facing material. |
 | Another proposed by some masters version of the material for the frame - a five-liter plastic bottles. You can use them as a whole by removing the bottom part or you can cut the walls of the container into strips of the same width. Then from the strips the desired shape of the ceiling is created, and its underside is fixed on the wire circle, which will give the structure rigidity. A clear disadvantage of this material is its deformation when overheated, as well as the fact that only a small lampshade can be made from a bottle. |
 | The frame can be made of embroidery hoops, and, of different shapes and sizes. It can be a traditional lampshade, round or semi-circular. It is easy to work with this material, from it the easy and reliable design turns out. When making a classic lampshade, hoops of different diameters are selected, the upper and lower circles are fastened together with wooden slats. Aluminum wire can be used to form the inner part of the structure intended for mounting the cartridge. |
Several options for decorating the lampshade frame
So, as mentioned above, different materials can be used for the cladding of the frame. The most popular of the options and will be presented in this section.
Fabric cover
In order to sew a traditional fabric shade, having the shape of a truncated cone or cylinder, you will need a prepared frame, decorative fabric, white cotton or PVC film, threads, glue, scissors, iron, a gun for silicone glue, clothespins, and a pattern. The amount of decorative fabric will depend on how you plan to sheathe the frame, whether it will be stretched evenly or folds will be formed on it.
The work on decorating the frame is as follows:
- Making the pattern. In order not to spoil the prepared fabric, it is recommended that the first step is to make a paper pattern. Make it a snap. If the frame has a cylindrical shape, then its diameter and the height of the lampshade are measured. With height, everything is clear, and the length is calculated using the formula for the circumference:
L =π× D
L - the circumference of the frame;
π - a constant that can be taken round equal to 3.14;
D - diameter of the cylinder.
As a result, the pattern will be a flat strip of fabric. To its calculated length is added 20 mm per seam, and to the measured width - 40 mm per bend on one and the other side.
If the frame has the shape of a truncated cone, then either the sweep parameters are calculated, or graphically constructed using a special algorithm. But often do a lot easier. To do this, paint the outer side of the upper and lower circumference of the frame with a black marker and roll it over a sheet of paper.

On the traces left on it, a pattern is drawn, to which extra millimeters are also added to the bend and seam. The pattern is cut and applied to the frame, corrected if necessary, that is, an additional segment is added to it or excess length is removed.
After the pattern is ready, it is transferred to the fabric, as well as a PVC film or lining fabric. Next, the marked parts must be cut with scissors.
The method of rolling is not always suitable. Sometimes you have to draw the scan of a truncated cone yourself. If this is necessary - you can go to the annex to this article. There are detailed mathematical and graphical methods, calculators are placed to carry out the necessary calculations.
- PVC film and fabric are combined with each other, cleaved with pins and stitched. Another option for bonding materials is to glue with a strongly heated iron. Ironing is carried out from the side of the fabric, the film melts when heated and glues to the decorative layer.

- The next step is to fasten the fabric first to the top and then to the bottom circumference of the frame with the help of clothespins or stationery clips. When fastening, it is important to ensure that the bend of the fabric is uniform. The fabric should be well stretched on the frame.
- When the fabric is fitted, marks are made on it along the line of the vertical seam and along the upper and lower bend. Next, removing the fabric from the frame, sew a vertical seam on a sewing machine.
- Then the stitched case is put on the frame and leveled by the upper and lower marks.

- The fabric is bent through the wire of the upper circle, melted silicone or superglue is applied to the bend with a gun, after which it is temporarily fixed with clothespins or clips. Then, the same process is performed along the line of the lower circle. Bonded fabric is allowed to dry completely.

- The final stage of work can be sticking on the upper and lower edges of the lampshade of satin ribbon in the color of the fabric, or of the same matter - to complement the unfinished pattern.
The glued strip must be fixed immediately with clamps or clothespins. After a guaranteed glue hardening, temporary fixation is removed.

- Ready lampshade worn on a desk lamp or other lighting fixture.
The way of fixing the lampshade depends on the features of the lighting device. These can be special clamping flanges on the outside of the lamp holders, threaded bushings and more. Any home master will easily deal with this issue.
Facing frame tape
This option is available for anyone, even a novice master, since it is very easy to make the process of decorating with a ribbon.
To finish the created frame in this case, the following materials will be required:
- Tape required color width of 15 ÷ 20 mm. Its amount will depend on the parameters of the dimensions of the frame and the planned density of its braid.
- To make the product decorative, a border can be used, which is well-suited in design and color to the base material of the lining.
- Superglue or silicone hot glue (gun).
- Clothespins or stationery clips for temporary fixation of the tape for the period of glue drying.

Decoration works are performed in the following order:
- The edge of the tape is fixed to the upper circumference of the frame with glue and additionally fixed with a clothespin.
- When the glue is dry, the tape gently begin to wrap the walls of the frame, winding it through the upper and lower wire circles. During this process, the circumference of the frame is pre-lubricated with a small amount of glue (usually in a small area, for several turns) and fixed with tape clamps. It is also necessary to take into account the fact that the tape is wound on the walls so that in the upper part it finds more on the previously laid one, and its strips diverge somewhat downwards, but there would be no gaps between them.
- When winding the last turn, the edge of the tape is coated with glue and hides behind the previous strip.
- After the glue dries, the hem is glued along the bottom edge and, if desired, along the top edge. Its ends are fixed with an overlap, which is additionally coated with glue.
Frame decoration with coarse rope
Another interesting variant of decorating the metal frame is braiding it with thin twine and coarse rope. There are a lot of ways to decorate a lamp shade with this material, and in the example considered below only one of them will be presented.
To create this model lampshade need:
- Frame with often located lateral guides.
- Thin twine.
- Twisted rope of twine.
- Scissors.
- A gun for silicone hot melt and a few sticks of such glue.
The manufacture of this lampshade is made in the following sequence:
- The first step is the end of the thin twine is secured with a loop in the upper part of the frame, the upper circle.

- Further, each of the metal guides is woven together with a twine as tightly as possible, using one of the macrame knots. In the illustration, one of these simple knotting nodes is highlighted separately.

- When the piece of twine ends, it and the end of the new segment should be fixed on a metal stand or a circle using silicone hot melt. Then this area to become invisible, overlap weaving.

- Vertical guides are twisted to the level where horizontal twisted ropes will pass. In order not to miss the height of their passage, it is best to place the horizontal pattern on the metal parts of the frame using the corrector.
- In the planned places, the horizontal rope on the frame racks is firmly fixed with a string.

- Such a lampshade can be fixed to the ceiling either with the wide side up (shown in the illustration below) or in a suspended position with the open part of the hemisphere down.

- Additionally, the lampshade can be decorated with beads or glass garlands, seated on top of the frame "butterflies" or fasten artificial flowers.
As you can see - nothing complicated even for a beginner master. True, the work may seem tedious, but there is no need to hurry, the maximum accuracy - and everything will turn out.
Manufacturing frameless lampshade
In this section, we will consider three versions of frameless lamp shades, which are even more available in design than products that require a rigid skeleton.
There is, however, a fundamental reservation. In order to set the desired shape of the lampshade, the frame (or rather, the pattern) will still be needed, but temporary. As such a template, defining the configuration of the product, most often serves a balloon, an inflatable rubber or plastic beach ball.
For the manufacture of a lampshade in a similar way different materials are used, but the principle of the work is preserved common. Of course, each case has its own nuances, which will be described below.
Lampshade from knitted napkins
In this embodiment, you will need several knitted napkins of the same color or several shades that are well combined with each other.
As a temporary pattern is used tightly inflated balloon. For convenience of work, so that the template is stationary when gluing decorating materials, the ball is placed on a suitable open container, for example, on a pan or a bowl of the desired diameter.

In addition, a glue dilution bowl is prepared. In this case, transparent casein glue is sometimes used, which is often used to glue wallpaper. However, PVA is considered to be more durable in its qualities, and it is more often used for the manufacture of frameless lamp shades.
- So, now you need to soak each of the napkins with glue, and in a certain order to put them on the pattern-ball. The elements are completely immersed in the glue, until complete impregnation, and then wrung out, straighten and fit into the temporary frame. This takes into account that in the upper part of the future lampshade there should be a hole for mounting the lamp holder. However, it can also be neatly cut out later, after complete drying of the resulting volumetric shape. And after cutting this hole is best framed with a plastic ring, putting it on the glue and tacking it with threads.
- The first is pasted on the top one, and then the side napkins. They all overlap each other, approximately 100 ÷ 150 mm, so that after drying these fabric parts are securely glued together.
- Now it remains to wait until the glue is completely dry, because the lampshade due to it must acquire a certain rigidity.
- When the glue dries, the ball is punctured and deflated, and the lampshade continues to retain its shape.

- Further, a lamp holder with an already plugged power cord is installed in the hole. In the window of the lampshade, this unit is tightened outside and from the inside with special flanges moving along the thread on the outer surface of the cartridge. Such a connection will give additional rigidity to the upper part of the lampshade.

"Lace"linen rope lampshade
This version of the lampshade, made of clothesline, can be used for any type of lamp. Moreover, it can be hung in the form of a classic lampshade or, as in the example considered below, is fixed with a wide side to the ceiling.

To create this ceiling model you need to prepare:
Inflatable beach ball. The advantage of such a framework is that upon completion of work, you can simply bleed the air out of it, keeping it intact, and continue to use it for its intended purpose. Another option is a glass ceiling, the shape of which will be used to create a decorative lampshade.
Clothesline.
White thread and needle for sewing.
Glue intended for design works in the “Mod Podge” decoupage technique. Such glue is quite expensive, so it will be easier to make it yourself. To do this, ordinary PVA glue is diluted with clean warm water in a 2: 1 ratio, and for greater strength and, if necessary, giving a glossy effect, approximately one tablespoon of colorless water-soluble varnish is added for every 150 ml of glue.
Water-soluble paint - better in the form of an aerosol.
Transparent or white plain and masking tape.
The wooden plank with an even milled groove inside or with the sides nailed on both sides is used to form a figured snake out of a rope. A plastic cable channel of the required width may also be suitable for this purpose.

- The first step in the creation of this product is made blanks - drawing is formed from the rope.

For this purpose, the rope is abundantly lubricated with glue and placed in the form of a “snake” in the channel of the prepared rail. It is important to ensure that the relief was laid with the same step, that is, was even.
Here it is necessary to pay attention to the fixation of the rope pattern. The illustrations barely noticeable threads, fixing the bends of the rope in the desired position. In order to do this process will require the usual white thread and needle. Stitching of the bends is done without tightening them so that basically the stitching threads pass inside the rope and are visible only in some places. Fastening is carried out on the upper and lower edge of the workpiece, "snake".
The blank will be ready when the glue is completely dry.
- The next step is to prepare the ball to form a lampshade on it. In order to prevent the rope from sticking to the plastic surface of the ball, it should be pasted over with masking tape after inflating it.

- Dried rope preparation must be carefully laid on the ball. Laying lead in a spiral, starting from the top, not forgetting to leave (form) a hole for the cartridge or for a different retainer, depending on the characteristics of the lighting device. When laying the rope "snake", each next turn is desirable to grab the thread to the previous - by the same method that was used when forming the "snakes".

- After the shape of the lampshade is fully formed, that is, the rope "snakes" will be laid and stuck in a single structure, it must be abundantly smeared with glue, and then left to dry completely.

- Next, there is a process of staining. It is carried out on both sides after removing the finished product from the ball, from which air is pre-exhausted. For painting can be applied paint of any shade - white, gold or silver. If desired, the lampshade can be decorated in the style of "amber".
- After the paint has dried on, the lampshade-plafond is installed on the ceiling lamp with the help of a special decorative fixer or, again, with the use of cartridge flanges, depending on the model of the lighting device. When installing it is important not to press the cover lightly against the base, otherwise it may well be deformed.
Shade of thick thread or yarn
The simplest, and therefore most often used option is to make a lampshade from thick threads, yarn or thin rope. This material should not be too heavy.

For the manufacture of this version of the lampshade will require the following materials:
Balloon or beach ball of a suitable size.
A sufficient amount of thread (twine).
PVA glue.
Paint the desired color, if after making the lampshade you plan to tint in the selected shade.
Work on the creation of this product are in the following order:
- PVA glue is poured into a suitable container - this can be a regular bowl or a plastic container. However, with this approach, the entire working surface of the table will soon be smeared with glue. Therefore, it is recommended to use a simple device that is easy to make yourself. This is a deep plastic container with a lid in which the ball (coil) of yarn or twine is placed. Then glue is poured in there, which should close the threads completely.

A hole is made in the lid of the container through which the end of the thread passes. In the manufacturing process will only gently pull the material treated with glue from the container. At the same time, there will be no excess overspending - the excess glue will be wrung out when exiting through the hole.

- The end of the rope is fixed on the rubber surface of the ball or ball with a piece of adhesive tape. Further, the rope is randomly wound on the base, but usually do not forget to leave the window for fixing the ceiling in the lamp. Just along the border of this hole, the packing density, in one way or another, is maximal, which, in principle, is required.
On the rest of the spherical surface, the packing density of the threads is determined by the master himself. It should be remembered that the denser the wound rope layer will be, the less it will transmit light from the lamp.
- Having completed work on the future lamp shade, it is left until the glue dries.

- When the glue is completely dry, you must release the air from the ball, and then remove the shell from the lampshade.
- Further, the lampshade can be painted with aerosol paint or left in its original form.

- The final stage is the installation of a lampshade in the lighting device.
When installing, of course, a certain care is required, since despite the quite satisfactory rigidity of the resulting sphere, it can still be washed with carelessly applied force.
* * * * * * *
In the reviewed publication, only a few simple versions of the lamp shades are presented, from which you can choose the right one both in design and in the method of independent production. If readers have their own ideas, including already implemented ones, write to us, send photo or video reports, and they will be published without fail.
Here, for example, the master shares his ability to make a lamp shade in the technique of origami:
Video: Original origami paper shade
APPENDIX: How to draw the unfolding of a truncated cone?
Method one - graphical construction
Let's say right away - this method has a certain error with which, in principle, you can put up with it and, if you wish, try to minimize it. Further it will become more clear.
So, you need to draw a scan for a truncated cone.

What data is usually known?
The diameters of both circles are large ( D1) and small ( D2).
Height H.
If the framework of a truncated cone already exists (as was the case in some of the above examples of creating lamp shades), then it is not difficult to measure the length of the lateral generatrix L. If there is no sample - nothing terrible, this parameter will be determined during the construction.
- So, first of all a side projection of the figure is drawn. Such a projection is not necessarily done in full size - it is possible to use a convenient scale. This is not yet a reamer, but simply an auxiliary drawing, necessary only for taking dimensions.
The side projection of a truncated cone is an isosceles trapezium with a lower base equal to the diameter D1, upper base equal to the diameter D2and height equal to H. In the upper diagram, such a trapezoid is shown in the right part of the drawing.
- After the trapezoid has been precisely drawn, its sides must be extended with thin auxiliary lines to the point of their intersection. WITH.
- From this point, the distance to one of their distant trapezoid angles is measured ( Rb) and to the near corner ( Rs). Letters R it is not accidental that they were used: these values are nothing else than the radii of the arcs, which will restrict the sweep of the truncated cone upon further construction. It is clear that the length of the generatrix L equal to the difference Rb -Rs.
Naturally, if the auxiliary drawing was executed with scaling, then it is necessary to bring the measured values to real values.
Now you can go to a full-scale sweep. That is, the drawing will already be performed in real sizes, 1: 1.

- The sweep of a truncated cone is a sector of a ring formed by two circles, the radius of which is already known to us. It remains to determine the two radial lines that limit the angular length of this sector.
Proceed as follows:
Two circles with radii are drawn from the point of the selected center. Rb and Rs (you can, of course, not complete circles, but only arcs, degrees 140–150. Although, sometimes it takes much more). Thus, the width of the ring is given - it immediately turns out to be equal to the length of the side generatrix L.
From the center to the outer arc (from one of the edges of the drawing) is a radial line. She immediately sets one of the boundaries of the sector. (In the drawing, it is shown dotted from the center horizontally to the left).
Rv =π × D1 /n
n - an arbitrary number, but the larger it is, the smaller the error in the construction will be. It is simply explained - in fact, the length of the lower circumference of the cone is divided by n equal lengths of arcs. But the length of the arc to postpone the drawing is problematic, so the chords tightening these arcs will be put aside. And the shorter the arc, the less its length differs from the length of the chord.
In the example shown in the drawing, the number n = 6. But it is possible (and recommended) to take it more, for example, 10 ÷ 12.
Calculated radius is set on compass Rv, and an arc is drawn (the complete circle is shown in the drawing, just for demonstration, but this is unnecessary) so that it intersects with the outer arc of the already marked ring. The intersection point will give the center for the next arc (circle). In the general account it is necessary to repeat such a construction. n time.
After drawing the last ( n in a row) arc, through the point of its intersection with the outer arc of the ring from the center is a radial line. It just becomes the missing sweep boundary (in the drawing it is also shown with dotted lines - from the center to the right upwards).
Everything, on it construction of development is finished - on the drawing it is highlighted in the pink color.
Do not forget that this is a “clean” reamer, that is, without allowances or valves for assembling a truncated cone or for attaching the cut fabric to the frame. So if necessary, the necessary broadening in the right direction.
Method two - mathematical calculation of sweep parameters
The error of the graphical construction, and even with a large number n - small. But for those who love perfect accuracy, we can offer the construction of a drawing based on the results of geometric calculations.

So, it is necessary to determine the sweep parameters for a truncated cone with a radius of the lower circle R1, top - R2and tall H. (Please note: this is not about diameters, but about radii - it’s just easier to count).
And for drawing a sweep, the radii of the outer arc are necessary - Rbradius of the inner arc - Rs and the magnitude of the central angle frestricting the sector of the resulting ring.
Formulas leads will not - they are included in the online calculators of calculation.
Calculators for calculating the parameters of a truncated cone
Step 1 - determining the length of the generatorL
This value may sometimes already be known. But if not - it is easy to calculate.


