
How to sharpen a knife - musatam, a whetstone, or maybe it is better to use a hand or electric knife? We will consider all the options - after all, each tool needs an individual approach.
To sharpen a knife - it would seem, what could be easier? But no - there is a lot of wisdom in this matter, and here you need, if not skill, then at least knowledge of the basic rules of high-quality sharpening. But you should not immediately carry your knives to the workshop, there is hardly anyone there who will look for an individual approach to each blade. They will be driven through a circle that rotates at high speed, and will immediately be given to you. And the hot metal needs the right cooling. In production, strictly observing the technology of steel hardening, they do it, but not in the workshops.
Is it possible to do without sharpening?
Unfortunately, even the best knife, if it is used constantly, sooner or later blunt. Micron for micron blade will be erased - not very fast, but it will be. And those manufacturers who convince that their products never get blunt are simply silent, that they provided for sharpening kitchen knives in special supports and sheaths. Also regularly, as you grind the blade about the products, the blade is also edited when you remove it from such a nest.
Home processing can not be:
- knives with jagged edges, obtained as a result of factory laser sharpening;
- tool with hard-alloy or “magnetic” blade.

And since it is impossible to do without all the other types of grinding, then it’s time to learn how to sharpen knives at home. The choice of method will depend on the material from which the blade is made and on the availability of a suitable tool.
We use musat
Unusual device, remotely resembling a file with a comfortable handle. When buying a set of knives usually comes in the kit. Musat can be cylindrical, faceted or flat in shape. The cheapest sharpening is made of sturdy, notched steel, which is suitable for most ordinary kitchen knives. Where ceramic musats are less common. And the best tool is considered to be a diamond-coated tool, like sandpaper. You should choose it if you often use durable professional blades.
The correct sharpening of knives on musat begins with the exact setting of the blade position. The tool should be held vertically against a table or board, and the blade at the very base should be perpendicular leaning closer to the handle. After this, the knife makes arc-shaped movements, shifting it down and towards itself. Sharpening is performed from two sides.
You can simply hold the knife in your hand and carry the musatom along its edge, but here you have to take into account the direction of the notches. For such work you need experience, although it is worth practicing. By the way, this tool is almost useless for rough sharpening, so if you don’t have any other way to keep the knives in order, you should use the jelly more often.

Little ass
Today you can find not only a natural grinding stone, but also its artificial counterpart. The second, by the way, is made quite large and with large grains of abrasive. For finer straightening of the blades on the reverse side of the bar, fine spraying is often done. Natural stone is cheaper, but because of the fine grain it is more suitable for fine-tuning the knives that have already been sharpened. A very thick and completely dull blade with it will be difficult and long to sharpen. But it is ideal for sharpening blades of soft steel.
Whetstone - the easiest and most reliable tool for manual sharpening. But not everyone knows how to sharpen knives with a bar, therefore we will provide detailed instructions:
- Take the grindstone at one end or lay it on the table, holding it by the edge.
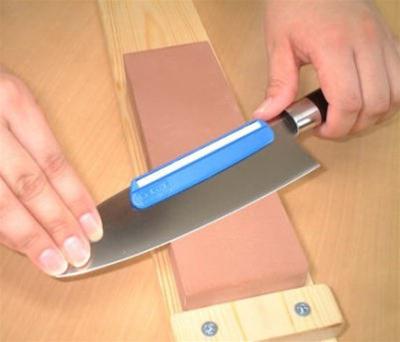
- Lean a blade at an angle of 20–25 ° to the surface of the trowel and with a slight pressure, stretch it up the bar. If it is, then it is better to increase the slope to 30 °.
- At the very end of the movement, the angle can be smoothly raised, removing the knife from the bar - so it will turn out sharper.
- Repeat the procedure several times, without changing the force of the clamp and the direction of movement of the blade, but increasing speed.
- Turn the knife over and sharpen the second side of the blade.
On a double-sided bar, sharpening is performed first on the coarse-grained side, and then the knife is “brought” on a thin abrasive. In the same way, you can perform the final knife grinding fixed with sandpaper, only the skin is better to choose a fine-grained and moisture-resistant.
A little trick: before sharpening a knife on a stone, lubricate the surface of the bar with special oil and let it feed for about 10 minutes. This will prevent the build-up of metallic dust and preserve the abrasive properties of the wheel.
Sharpeners
The universal device with a convenient handle has several sockets with mounted abrasive wheels. The angle between them has already been chosen, so using such a tool is easy. Simply insert the blade base into the nest and pull the knife over it. The canvas is sharpened on both sides at once, so you will have to make half the effort.
It looks like hand knives and the design of household electric sharpeners, but there the circles also rotate. Working with them is much faster, although the result is not always satisfactory. When using electric knives, you should not keep the knife in grinding circles too long - the thickest and hopelessly blunt blade will be enough for five minutes.

Sharpening on the machine
Since not only steel tools, but also their modern counterparts, appeared in the houses a long time ago, questions began to arise how to sharpen a knife, if it is, for example, ceramic. Manufacturers and specialists in one voice advise not to do this at home, so as not to spoil the fragile blade. But if you really need to, you can break this ban and learn how to put ceramics on your own.
For work you will need a grinding machine and a diamond-coated wheel. Ceramics is not afraid of overheating, but in order not to split it, you need to choose the right abrasive disc. When operating the blade, it is necessary to press the blade effortlessly, very easily. Of course, such sharpening will take a lot of time, but the result you get is excellent.
For steel it is better to choose a grinding disc with white electrocorundum, so as not to burn the blade. Mechanical sharpening should be done at medium speeds - about 1500 per minute. It is also useful to cool the blade in water more often.
You can check how well the knife is sharpened on a piece of paper rolled up with a straw. A sharp blade will cut it smoothly, a blunt one will tear and leave teeth. After work, do not forget to rinse the kitchen tool and wipe it dry - so you will remove the smallest particles of removed steel and abrasive.

Fine finish
Of course, it is possible to bring any kitchen knife to surgical sharpness. To do this, it is necessary to grind off one side of its blade to the appearance of small notches, and then align the edge, processing the second. Such a sharpening process, of course, will not last long, but at first the knife will cut almost any products. They bring blades with the help of various grinding materials that can be found in any house.
Good grins ceramics, if you choose a fairly rough surface. Turn the clay bowl upside down - usually there are unglazed portions. It is for them that you need to drive with a blade in order to bring the knife to an ideal state.
For jewelry work on the blade will need a piece of natural leather and polishing paste like GOI. The surface of the flap is saturated with it, and then the blade is ground. Before proceeding to fine-tuning, all visible notches are removed from the edge of the fine-grained stone. Polishing is performed in one direction - from the base to the tip with a diagonal inclination of the knife.
If the blunt knives no longer perform their primary function, or you worry that you can cut yourself, it’s time to sharpen them on a whetstone. Sharpening stones, also referred to as chops, are made from natural or synthetic materials, and can be used dry, with oil or water. Having chosen a suitable grinding stone, it remains only to sharpen a knife blade on it to its former sharpness. And with the right hands, your knives will be like new again!
Steps
Part 1
Choosing a grinding stone- You should also take into account the frequency of use of knives. If you use them daily, they will probably be dumber than with occasional use.
-
Select the appropriate type of grindstone. You will have to make a choice between natural or synthetic grinding stone, which can be used for wet grinding (using water), grinding with oil or dry grinding. There are also diamond grinding stones, which are metal bars, covered with a layer of very small artificial diamonds. Sharpening stones for wet grinding are the softest of all, so that they can quickly sharpen knives. But, unfortunately, these stones wear out faster than others. Stones for grinding with oil are the cheapest and they are made of harder materials.
- Working with a grinding stone for grinding with oil is rather dirty and you have to clean it up after it, but this type of grinding stone itself lasts a long time.
- Diamond grinding stones are among the most expensive, but they serve the longest.
-
Select the grindstone grain. Grinding stones come in various grains. In general, they are divided into stones of large, medium and small grain. If your knives are completely blunt, you need to start sharpening with a large grain of stone, and finish on a stone with a fine grain. If the knives are not long ago sharpened and they are not too blunt, try sharpening them on a stone of medium grain. Marking of the grit suitable for sharpening stones can be indicated by numbers ranging from 325 (coarse-grained stones) to 1,200 (fine-grained stones).
- You may be able to get a grinding stone with different grain from both sides.
Part 2
Sharpening-
Follow the instructions that came with the grindstone you purchased. Since there is a large variety of grinding stones, it is very important to familiarize yourself with the instructions attached to the grinding stone you have purchased. The instructions will tell you whether to moisten the stone with water or lubricate it with oil in the process of grinding.
- Diamond grinding stones are usually used in a dry form or moistened with water.
-
Practice keeping your knife at a 20 degree angle to a flat surface. To find a suitable angle, first take the knife in front of you so that the cutting edge of the blade faces straight down. This will be a right angle (angle of 90 degrees). Tilt the knife sideways by about half so that it is already at a 45 degree angle to the surface. Again, tilt the knife to the side by half so that its blunt edge is only slightly raised above the table. This will be an angle of about 20 degrees.
- If the knife blade is very large or thick, then it may require a slightly larger sharpening angle.
- When using a grinding stone with a very large grain, you may want to use a smaller sharpening angle, so as not to sharpen the blade too much.
-
Soak the stone for wet grinding for 45 minutes in water. If you took a stone for wet grinding, put it in a tray and completely fill it with water. Let it lie in the water for at least 45 minutes before sharpening knives.
- If such a stone is too dry, it may scratch the blade of the knife or leave burrs on it.
- Do not soak a grindstone in water to sharpen with oil, otherwise it may be damaged.
-
Place the grindstone on a damp cloth. Moisten a cloth with water and squeeze it. Lay a cloth on the work surface and place the grindstone on top of it. A rag will not allow the stone to shift when you sharpen knives. Do this with a grinding stone of any type (a stone for wet grinding, for grinding with oil or a diamond stone).
- If you took a double-sided sharpening stone with different grain sizes, put it on the rougher side up. So you can quickly sharpen knives before turning the stone on the other side for the subsequent polishing of the sharpening.
- You will probably want to take an old cloth for work, because then you will not be able to wash it off the crumbs remaining after sharpening.
-
Lubricate the grindstone for sharpening oil. If you have a grindstone that requires lubrication with oil, you can sprinkle it with oil or pour oil directly onto it. Rub the oil into the stone with your fingers. Make sure that it is completely covered with oil.
- Use special oil intended for sharpening. It can be both mineral oil and oil made without the use of petroleum products. In the oil for sharpening, there will be special additives that protect the metal of the sharpened blades.
- Refrain from smearing the grindstone with cooking oils (vegetable or vegetable).
Part 3
Knife sharpening-
Attach the knife to the grindstone. With one hand, grab the handle of the knife and attach it to the grindstone at an angle of 20 degrees. The cutting edge of the blade should be facing away from you. Attach the tips of the fingers of your second hand to the flat part of the blade near its cutting edge.
- The fingertips located on the blade will apply pressure and control the position of the blade during sharpening.
-
Run one side of the blade along the grindstone. Slowly slide the blade along the stone, gradually shifting it in an arc. As a result, the entire cutting edge of the blade from base to tip must be walked over the stone, ensuring uniform sharpening. Continue sharpening the knife on one side until it is sharp.
- Do not forget to moisten with water or lubricate the grindstone with oil when it dries.
-
Turn the knife over to the other side to sharpen it. Turn the knife the other side and run it on the grinding stone from the base to the tip of the cutting edge. Repeat the specified action until the knife is sharp to the touch, if you touch it with your fingertip.
Inspect the knives. Take out the knives that you would like to sharpen. See how hard the blades are to blunt to select a grindstone with the necessary grain. To check the knife, cut them with a tomato or an apple. Assess the resistance that occurs when working with a knife. The greater the resistance, the dumber the knife.
After long use in the kitchen any knife needs sharpening. Many, in order to do this quickly, resort to the use of a special grinding disc, which is driven by an electric motor. In case of his absence, the most desperate are trying to sharpen knives with a file, and even a few know how to sharpen knives with a bar.
This process is simple, but rather painstaking, requires perseverance and a little skill that comes with experience. Before the bar, you need to correctly select bars. In total, two bars will be needed for sharpening: one coarse-grained, and the second fine-grained. In the process it is necessary to constantly keep the knife blade wet. It is best to lubricate it with mineral oil, but in the absence of such at hand, it is possible and ordinary water.
Also, before that stone, look for a piece of leather. In this case, you can use the old belt. More precisely, you only need its back side, which is not processed and resembles suede.
Sharpening angle
Before you get to work, you need to determine at what angle we will sharpen the knife. The range is quite wide and lies in the range from 15 to 45 degrees. The choice is made depending on the quality of the steel from which the knife is made, and on what purpose it will be used in the future.
It is also necessary to take into account the following feature. The smaller the angle at which you sharpen the knife, the faster it will become blunt. This can be explained by the fact that the edge of a sharp knife quickly rounds out, or, even worse, crumbles.
How to constantly maintain the same angle?
We will understand now how to sharpen knives with a bar. To get started, place the bar on the table and lock it in place. Then position the blade of the knife in relation to the bar at the desired angle. Move the blade in a bar only in one direction, for example from yourself, trying to maintain a given angle. Immediately it can be noted that it is difficult. Therefore, it is better not to hurry, but to do everything smoothly.
Inexperienced can give such advice. Make a blade, the angle of which would correspond to the desired angle of sharpening. Put the blade on the wooden wedge and move the knife along the bar with it.
Sharpening

First you need to take a bar with a large grain. Moisten it with water or oil, as mentioned above, before working. Sharpen the blade until the so-called burr along the entire length. In order to determine its presence, simply hold your fingernail on the back side, which has not been sharpened, from the butt to the edge. Also, sharpen the back side, after which the burr should be bent the other way. Repeat the same with a fine-grained bar. After that, the burr will become a bit smaller.
The third time, repeat the manipulation with the bar, which has a fine grain. As a result, the burr will still decrease. To finally get rid of it, use the skin on the back side.
Thus, after reading this article, you already know how to sharpen knives with a bar. However, there are plenty of ways to make the knife sharper. This may be special sharpeners, which are sold in any underground passage. But the better sharpen knives, a person understands only with experience, having tried a whole arsenal of devices.
The ability to sharpen a knife has always been considered an integral attribute of any real man. And if in ancient times life depended on this art, then today the correct sharpening of knives affects only the thickness of the sausage slices for sandwiches and therefore usually turns into a prerogative of hunters and collectors of gunsmiths. We decided to correct the situation and talk about ways to properly sharpen a knife.
Today, you can find a lot of tools for sharpening: traditional donkey, Japanese water stones in vogue, advanced electrical appliances and a lot of everything else. But the most reliable method of sharpening still remains the old-fashioned method - to use an ordinary grindstone.
Do not forget that this process requires patience, a firm hand and certain skills, so in this case only practice will help to sharpen the knife correctly.
Choosing a grinding stone
Grinding stones are both natural and artificial. The former, as a rule, have a fine-grained structure and are more suitable for fine-tuning than for sharpening a highly blunted blade. Artificial assholes are made with a large grain on one side of the bar and with a small grain on the other, which makes them more versatile.
Having chosen the right bar, it is necessary either to lubricate it with oil, or moisten it with water and let it stand for 15–20 minutes. This is necessary so that the microscopic gaps between the grains of the stone are not clogged with steel particles. If we neglect this rule, the little ass will serve much less than we would like.

Sharpening
If the bar is double sided, first use the rougher side. This will quickly remove the necessary layer of steel. For proper blade sharpening, the key is the angle at which the blade is located to the bar. The ideal angle is 20 degrees, but experienced people advise you to approach this creatively - depending on the type of knife and what works it will be used for.

Hunting and folding knives are sharpened at an angle of 30–35 degrees, if sharpness of the cutting edge is needed, or at an angle of 40–45 degrees, in order to increase resistance to dulling. Tactical knives - 25–40 degrees. Professional cook, boning and filet knives are sharpened at an angle of 25 degrees, and home kitchen knives - 25–30, while Japanese kitchen knives are sharpened at an angle of 10–20 degrees; razors - 10-15 degrees. The main thing - to remember: the smaller the angle of sharpening, the sharper the knife, and the more - the longer it will remain sharp.
Sharpen the knife should be smooth movements, slightly lifting the handle when it comes to sharpening the bending of the blade. This will keep the same sharpening angle of the entire cutting edge. In addition, the blade must be led so that the direction of motion is always perpendicular to the cutting edge.
That is why devices that are popular among housewives and consisting of a piece of plastic, in which two disks made of abrasive material, are not suitable for proper sharpening. They sharpen the knife quickly, but the blades sharpened in this way will also become dull very soon.
You do not need to press on the blade with all your strength, but you should not iron the grinding bar with the knife either - it is important to find a middle ground. The blade should be sharpened until a clearly felt “burr” appears on the reverse side of the cutting edge. In this case, you can proceed to the processing of the back side of the blade.
Fine-tuning
After the blade-forming surfaces have been brought to mind on a rough grindstone, you can start fine-tuning them with a fine grain.
In order to make the blade razor-sharp, after processing with a fine-grained stone, you can take a special belt or just a piece of leather. Our reader Konstantin Luchnikov, a man in this case is sophisticated, warns: sharpening on a belt is different from sharpening on an abrasive bar. On the bar, you can sharpen both "on the grain" and "from the grain" (however, this is still a matter of controversy), but the sharpening on the skin is only "from the grain."
The skin should be treated with GOI grinding paste or any other abrasive paste. Sharpening on a belt is no different from sharpening on the wheel, so there are no special subtleties here - use the skin in the same way as a whetstone.

Alternative ways to tweak

As a grinding stone, you can use the ceramic edge of a plate or cup. Just flip them over and make sure the edge at the bottom has a rough surface.
The sets of kitchen knives today certainly include musat - a steel bar with longitudinal grooves and a handle. It is not suitable for sharpening, but allows you to keep the blade sharp for longer. Indeed, it is a much less time consuming process than a full-fledged sharpening a blade a couple of times before and after work on the blade.
In marching conditions, look for special stones, about which you can sharpen hardened steel, - the occupation is not the easiest. Therefore, hunters carry with them miniature donkeys, and often bring about the sheath in which this knife is kept.
Check the quality of sharpening
You can find out how well you sharpened a knife in several simple ways. The first and safest thing is to check the knife in action. To do this, take a piece of paper, preferably newspaper, and try to cut it. Or take a tomato and try to cut it: with a blunt knife, as you know, soft vegetables and fruits are difficult to cut. Japanese knives are checked in a spectacular way, tested by samurai: the newspaper is rolled into a tight roll, the ends of which are wrapped with tape. This design should be installed on the edge of the table and strike at an angle. If the knife is sharp enough, the paper column will fall apart into two parts, like a bamboo stem cut by a katana.

Also, the quality of sharpening is checked by touch. This is unsafe, but it allows you to identify possible defects that may appear in the process of working with a grindstone. You need to gently hold the thumb pad across the blade, not pressing. If the edge of the blade is clearly pronounced, then you have done a good job. The dull blade to the touch will be clearly rounded. The sharpness of the blade can be checked on the eye. To do this, bring the knife to the light source and see if the cutting edge does not glare. If there is glare, then there are stupid areas.
We use a knife, especially a kitchen knife, daily, repeatedly, and for cutting various products. But do all of us know how to sharpen a knife correctly so as not to do it all the time? With all the features and rules of this work, we will understand in this article.
What you need to know about abrasive for sharpening
Grindstone type
- Diamond coated. The highest quality sharpening with a minimum of necessary time. Minus - the high cost.
- Ceramics. The price is lower, but more effort will be required.
- "A rock". By its hardness it is not much higher than steel. Only suitable for sharpening metal blades. The effectiveness of giving sharpness to the cutting edge on such an abrasive is highly questionable.
Grain
For high-quality sharpening it is necessary to have at least two different abrasives - for the “rough” processing of the cutting edge and its final finishing. Sharpening a knife to the required sharpness with the same stone in most cases will not work. Conventionally grinding bars (circles) can be classified into 3 groups - with grains large, medium and small.
The terminology should be clarified:
- A bar is a stone of medium or large fractions, which is mainly purchased for home sharpening blades and is considered universal (but not from professionals).
- The crumb is a fine fraction abrasive used for final finishing of the cutting part of the blade. It is hard or soft. Visually differ in shade - solid ass is much darker.
The specific use of abrasive
On sale there are different types of stones (circles). Some samples require periodic wetting with water or oil. All these features are indicated on the packaging. When acquiring an abrasive, many of us believe that there is nothing special in the stone, so reading the instructions is a waste of time. To avoid some problems with sharpening, you should definitely get acquainted with the recommendations of the manufacturer.

Basic rules for sharpening a knife
- Processing the cutting edge of the knife is carried out sequentially, starting with a coarser abrasive. How exactly to start (with large or medium) depends on the degree of its deterioration and is determined independently. But the final polishing is only on the small fractional stone. If required, you will also need a piece of leather, and natural, and not its substitute. As an option - any pottery.
- Sharpening angle. Basically - 20º, unless otherwise agreed by the manufacturer.
- As the angle increases, more metal is removed from the blade. Therefore, when processing on a large stone, it is somewhat reduced, and when sharpening on the abrasive of medium and fine fractions, it is kept at a given limit - 20 (± 1) º.
- Knives with a thick blade, designed for rough work (for example, cutting bones), are sharpened at a large angle - up to 35 - 40º.
- The fact that the basis on which the bar is located must be strong, level and at a height sufficient for the convenience of work is understandable. But in order to avoid abrasive displacement, something should be put under it during sharpening (for example, a piece of soft cloth, thick paper).
- The knife is always held with two hands - the tip of the blade and the handle. In order to prevent the "casting" of the blade, it is systematically wetted in water. Especially important when processing it on e / emery.

Sharpening technique
- The blade must fit snugly to the abrasive over its entire area. When properly sharpened, it is perpendicular to its longitudinal axis (if it is a bar).
- All progressive movement - with pressure and from myself. The cutting edge at the same time must "look" at the master. On the "reverse course" it should not come into contact with the stone.
- Since the length of the blade is many times larger than the width of the bar, it should be gradually shifted relative to the latter.
- After complete “penetration” on one side, the position of the knife is reversed. Now part of the edge is ground on the back side using the same method.
Lapping blade on the bar is done a little differently. Everything is the same, only now the point must “look” from the master. The movements are smoother, aligned, and the clamp to the abrasive is as dense as possible.
On a note!
All the above rules for giving a blade sharpness fully apply to the process of sharpening with the help of e / shar. Naturally, after pretreatment on a rough wheel, it must be replaced with a sample with a fine grain.
 In some cases, it is necessary to bring the blade to a razor sharpness. This is done on a piece of leather, pre-coated with a thin layer of technical vaseline. As an option - to make a mixture of it and the crushed stone GOI (or its paste).
Check the readiness of the knife is best on a sheet of thin paper. If its razor sharpness is necessary, then it is tested on a piece of soft tissue.
- If you do not have a grinding stone at hand, you can sharpen a not too dull blade with the help of “sandpaper”. In addition to it, you need a solid object with a flat (flat) face. For example, a piece of wooden slats. It is wrapped in emery paper, and such an improvised device completely replaces the bar.
- If the blade steel is rather soft, then it is advisable to lightly spray the stone from any manufacturer with engine oil. This will prevent the filling of its pores with the smallest metal fractions.
- To purchase bars less than 150 mm is impractical. The longer the abrasive is, the more comfortable it is to work with it.
- Sharpen knives of ceramics should, focusing on the manufacturer's instructions. It is better to ignore any recommendations and hints of the “experts”, since if the blade is handled incorrectly, it can be ruined. Considering the cost of such a product, the advice is far from idle.
Each master has his own blade processing technique. On the Internet, you can find other (somewhat different from the above) recommendations. This does not mean that some of them are correct, while others are not. It should be understood that all of them are only common. One cannot take into account the specific features of stones, the steel of the blades, their linear parameters and the skills of the person who makes the grinding. Only practice will show how effectively a concrete knife can be sharpened on the abrasive available at hand.


