The tops of old boots or a piece of rather thick and durable leather can be turned into a knife cover with your own hands. Well, if father and son will take up this exciting and useful thing together.
The ability to work with the skin is always useful to a real man, even if he is not yet very adult. A scabbard or leather knife case is an attribute of masculinity. It can also be a wonderful gift that you make with your own hands. It is easy to sew, the main thing is to understand the basic principles of work and do everything with care and diligence.
Operating procedure
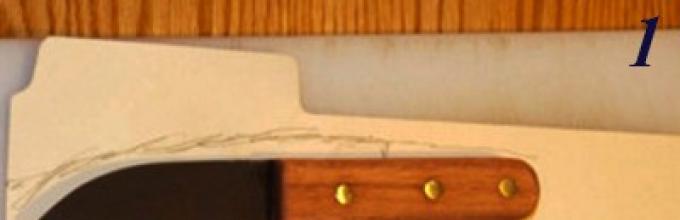
Getting started with a template. Simply put, we need a sheath pattern. And for a particular knife, which will lie there conveniently, without interfering with the owner when walking. And get out of them quickly and easily.

Prepare a piece of thin cardboard or heavy paper. Put on it the knife for which you will sew your leather case. The template or paper pattern for the future cover should be with some margin, and notice! - it is not symmetrical. The back of it has an extension, which in the finished form will go down to the blade.
If desired, you can sew into it the slots through which the waist belt is passed through, and your knife cover will turn into a real sheath. It is convenient when traveling on nature and in conditions of camp life. The knife in the case is always at hand, on the belt - it's cool, like a man.

Cut the pattern with scissors so that you can try on the knife and make sure that everything is done correctly. Our knife should be freely inserted into the case and at the same time not slip out of it.

If you are satisfied with the result, then fold the template in half and cut off all the excess in such a way that the bonding points are smooth and can be easily sewn.

Take the tape and glue the template around the edges. Move the knife inside the template to make sure that nothing interferes with its movement, it is not stuck anywhere and you like everything.

Once again, cut off all the excess, so that the edges are evenly aligned, and you do not have to suffer when stitching the edges of the leather blank.
Preparation from skin - we start a cut

Came the turn to make a pattern of leather using our template. Take a piece of leather and paint the pattern along the contour from the wrong side. Where it looks like suede, rough.
Cut out exactly the pattern. Well, maybe a little with allowance. A millimeter and a half. Do not overdo it so that the knife does not slip out of the cover and does not dangle in it.
note
Cut the pattern on the skin with a very sharp knife, well fixed in the holder (so as not to cut the hands) with a dangerous razor (there are special rotary knives for the skin) or with a surgical scalpel. Caution!
Sharp, exact actions will relieve the workpiece from stretching, irregularities and make the cut perfectly smooth. Appearance of a ready cover for a knife depends on it.
Skin formation
Now we need to give volume to our stocking. As a form for volume, we use the same knife that the cover is intended for.
Take a soft plastic wrap and wrap it in several layers on the blade and handle of our knife. To make it thicker than it actually is, but at the same time retained its shape. This will give the same volume gap, which is necessary for maximum convenience when using ready-made sheath.

In a low pot, heat the water and, in a still very hot one, gently lower that part of our leather blank, which will be the actual scabbard. Just a few minutes. The part of the skin that will be immersed in water will begin to bubble - it is air that penetrates the pores of the skin. The end that will fasten the zipper is not necessary.
Attention
Use oven gloves and a kitchen towel to prevent burns.

Take a dish towel, lay it on the table and carefully pull out the wet workpiece on it. Blot excess water on both sides with a towel. Place our knife wrapped with cling film in it and secure the edges with stationery clips as close as possible to each other.
Then, directly with your hands, press the wet skin against the blade and the handle, so that a cover in the shape of a knife is formed. While drying, check several times how correctly the sheathed shape is preserved when drying.
Note
If necessary, correct, wetting and pressing with your fingers those places where the skin does not wish to lie according to your plan.

It usually takes a few hours until the skin dries out, and you can continue to work with the workpiece. But it is better to be patient and leave everything in the clamps all night. After complete drying, you can remove the clamping devices. The cover should already hold the desired shape.

Fine pruning and preparation for firmware
If you have a special knife, which is called a rotary knife, then this will facilitate the task. If not, take the tool that you used when cutting the skin and carefully cut off the two layers of the edges of the workpiece. Efforts to do this you have to make a little more than with the cut of the workpiece, because you now have two layers of dried, hardened skin.
Be careful not to cut yourself.

This stage will not hurt you if you have very thick skin for a cover or you are a happy owner of special devices. You will need a gouge for the leather with the guide. Or fit a homemade needle from a medical syringe, which must be securely fastened in a wooden or plastic handle. Durable, so as not to break the hand and the groove was smooth, clear and without marriage.

Remember that the groove (groove) that you need to do, should be cut, not prokaryabana. It is necessary to ensure that the seam on the cover is as neat and professional as possible.
Now you need in the intended groove or pencil line, mark the line. This is best done with a special marking wheel. If not, then you have to work with an awl.
Pitch a line to choose "to taste", but it is best to stick to a stitch length of 0.5 cm.

Put the case on a wooden board so that the skin does not slip, and punch the holes with a wheel or an awl. Do it slowly. If required, with a small hammer.
After making the holes on the top of the case, lift the top edge and do the same at the bottom. Holes must match. It is better not to pierce both the combined edges of the cover at once, so that the top holes do not turn out to be ugly large.
Make sure that the holes of your line do not “dance”, that they are going in a straight line.
Belt loop
It is better to stitch a loop for a belt before began to sew edges of a cover. Fold a strip for a loop of the size convenient to you. Estimate, so that it is not long and not short, so that the knife can be easily pulled out of the cover, And the handle, when worn, did not cause inconvenience.

It is enough 4-6 exactly matching holes in the top of the valve and on the body of the case so that the loop for the belt is firmly held on the belt of the trousers. Take a sturdy hard thread and sew as you see in the photo. Secure the end of the thread with an inconspicuous, strong knot and cut close to the edge.
Knife cover seam
We will use the single needle method, since the seam is not long. It is decorative and reliable enough. Take very strong threads - it can be a hard thread, or synthetic.
First, pull the thread from the bottom into one hole and make a stitch, as in the photo, right up to the very end of the seam. Then go backwards, making exactly the same stitches.

It turns out a dense, durable and beautiful finishing line, which will decorate a leather knife case as well as if you bought it from a cool furrier. Take care that the tip of the thread is firmly fixed.
To do this, skip it in the middle of the thread itself, tighten it, then fasten it between the layers of skin and pass it through the very center of the thread several times. Cut off the tip close to the skin. Make sure your nodule does not break up.
Enjoy the result. If you did everything neatly, then the look of your leather knife case will be professional. However, if it turned out somewhat handicraft, do not be discouraged - this will only add brutality. Sheaths and should be reliable and comfortable, the beauty here is not the main thing.

Insert the knife in the sheath, stitched with your own hands and be proud of yourself. The blade must be a little tight in the finished case, as over time they will inevitably stretch a little.
Leather sheath for a knife. Leather sheath with his own hands. Leather sheath for a knife with his own hands. How to make a leather sheath for a knife. 1. On the contour of the knife outline the silhouette of the future of the sheath, as we imagine them. I always draw the design of the knife on the computer, it's easier.
2. We decide what the sheath will look like in details, it is more convenient for me to draw a computer project with a pencil “by hand”.
3. We select the materials that most closely match the handle of the knife in color and texture. There is boundless scope for fantasy, but limited only by material possibilities. To replace the rare and expensive crocodile we take the ostrich's knee, it also has a good texture and pattern. In addition to the exotic, I take a cap of 2mm and leather for the main coating, in this case, thick black chrome leather.
4. Since the leaf is from the new batch, I determine in which direction the maximum shrinkage during drying and the relative value of this shrinkage. To do this, I cut out thin strips of cheprak from the edges, along the long and short side of the sheet. Cut each strip exactly in half. One piece is left dry for control, and the second part is soaked.
Compare the length and determine that shrinkage of the order of 6% goes along the long side of the sheet.
So, we cut the sheath across the sheet. We do not need shrinkage in the longitudinal direction, and across the sheath will fit perfectly. We cut pieces of leather with a margin of 1-1.5 cm for errors.

5. Next, prepare the knife for wrapping. Cut out the cardboard lining of the blade so that the sheath has free space and the blade touches the sheath as rarely as possible. Since the knife has a small stop, then we cut out a leather trim to even the hollow for the handle.
Wrap the knife with cling film, install all the pads, then wrap the knife again with the film.

6. Soak the skin in warm water with fairies. 5-10 minutes. Then rinse well in running water.
7. To stiffen the chepraku, I soak it in water with PVA. Concentration on the eye, well, about a quarter of the bottle on my photo bath.
10-15 minutes should be enough. After soaking, lightly soak the skin with a napkin.

8. Then put the skin on the knife, distribute evenly and evenly. Along the edges should be about the same stock. We press the joint with flat stationery clips like Lion. We make sure that the line of junction of the pieces runs smoothly and straight, without zigzags, along the longitudinal plane of symmetry of the knife.

9. Use the expropriated in children stack for modeling clay for delineating the contour and lines of the knife and molding the skin.

We draw a bolster

Smooth the skin surface with the same stack.

The operation is repeated several times as the skin dries. We leave to dry in the same form at night closer to the radiator.

10. In the morning we get two hard halves, just like the shape of a knife. If the stiffness is not enough, you can once again soak the skin of the PVA with water (brush).

11. We process the ends of the mouth of the scabbard in size (we cut off the excess) and sign the halves “upper” and “lower” in order not to get confused in the future.

12. Then we put a piece of paper on the upper half and push it along the lines, draw the contours for the application with skin.

Lines on a piece of paper are additionally aligned with a ruler, bringing in close conformity with the initially desired shape. Remember that the cast of the real form will differ from our project due to the roundness of the form (wider).

13. A) Mark the stencil, cut windows on it and apply a stencil on the decorative skin in order to correctly get into the picture. Cut out the inset.
B) We get two pieces for the application.

14. Before sticking, the skin should be sherfed as much as possible, firstly, it will get rid of loose flesh, which will interfere with bonding, and secondly, it will thin the front part of the sheath, which is overloaded in thickness. I do it boring machine, very quickly and conveniently, but you need to turn on the vacuum cleaner at the same time, because there is a lot of fine fluff. We remove a little more at the edges, almost to the thickness of the paper. The central part of the ostrich's knee has rigid horn plates, as it were, do not touch them, we only remove the friable core.

15. Final check before pasting.

Helpful advice. If the decorative leather is thin, such as a snake, then you can also put a leather lining so that the decorative leather is as if convex. In my case, this is not required, because the ostrich has relatively hard horny scales and this trick will not work.

To save valuable skin, I left a free strip between the two visible pieces of the inset. It will later be covered by the outer skin. But to align the thickness, there you can glue something of little value.
16. Cut two halves of the covering leather, which will be the outer surface of our sheath. In my case, I took a chrome black leather thickness of about 1 mm with a pleasant texture. But then who has something, the main thing that the skin was not very thick. It is possible and to take a cap, to remove an excess thickness on LShM or to otsherfovat.

17. The back half is simply glued, pushing the covering skin along the lines and folds with the same stack. Avoid wrinkles. Thoroughly smooth.

18. With the face of the hassle more. It is required to cut out the windows under the decorative insert. We superimpose a stencil, which takes into account the curvature of the sheath (turns it into a plane), fix it with adhesive tape,

We take a semicircular or V-shaped chisel and tap the windows. The ends of the skin is useful to paint over black (in skin color).

The resulting leather frame impose on the top half of the scabbard to check. We mark the desired position and put unobtrusive labels, then to paste the leather frame.

19. Looking at the tags, we strip off the glossy part of the decorative insert to make the outer frame better glued. . The main thing here is not to hook on the visible part of the decorative insert, but the bonding strength is also important ... No need to hurry. Decorative leather must exactly match the crushed lines and chereprak folds. If something comes out, we cut it off.

20. Gently glue everything. We get two halves of the sheath with allowances for processing. The excess part of the chrome skin is cut off in a cheeprak shape.

21. Now we cut out the central frame from a 2mm cheprak so that the blade does not cut the threads. Outline the silhouette of a knife, and cut out the central frame along the contour:

Try on the frame on the sheath. Which half of her first glue it (lower or upper) does not matter, but I recommend sticking the frame with the sneeze out, in this case, it will be easier then to sand the frame thickness without losing the strength of the smooth layer. Mark the position of the frame on the half of the sheath with a pencil.

22. Now it is necessary to grind and level the planes of the halves of the sheath, and make the central insert thinner. I use LSM, but the grinder, I think, will also work.

We narrow the central insert closer to the tip. Grind only from the side of the core.

23. Glue the central frame with the fins to the outside. We do not forget to glue the smooth part of the frame with slightly sandpaper for better adhesion before gluing.


25. After grinding the ends of the mouth, remove the boring machine extra skin near the mouth from the inside. It depends on the shape of the knife handle, in my case, the knife has a developed waist, and the mouth of the scabbard tightly wraps the waist, making it difficult to pull out the wider central part of the handle. It is necessary to choose the right amount of material removal. Frequent fittings will help you. The main thing is not to hurry!

As a result, combining both processes (thickness of the central insert on the LSM and the boron machine mouth) we adjust the thickness of the central insert and the mouth shape so that the inserted knife slightly (but not much!) Dangles in the sheath. Those. we leave the stock under the pasting of the inner surface of the sheath with thin soft skin. For fitting you need to put her pieces. If you do not plan to glue from the inside, we immediately select the thickness and effort of inserting the knife to your liking. I do so that the knife does not fall out of the inverted scabbard with moderately strong shaking with the hand and would be taken out and inserted with a pleasant light effort (the erotic theme is remembered here for some reason). The result in the picture:

26. A) Now let's fix the suspension on the back half of the sheath. In my case, it will be a free suspension on the ring (or a half ring). For durability, I grind a strip of cheprak to a thickness of 1mm, then glue over chrome leather so that the difference in texture does not catch on. We grind the edges in shape, paint the ends, fuse with carnauba (see process description below). Drill holes.
B) From the inside of the scabbard we pierce the grooves under the seam.
C) Outside, we cut or grind off the glossy part of the skin where the suspension is installed for better adhesion.
D) We sew, the threads from the inside, just in case, I fix Central Asia. Make sure that nothing sticks out over the inner surface of the skin.
D) We have outside ready mount suspension.

27. Stitch the upper half along the mouth of the above technology.

28. Fix the decoration, if you have it. I sew it with thread.

29. Then I paste the inner surface of the sheath with thin leather (0.5mm), in my case, with the suede part outwards. I do not glue along the blade so that the chrome skin does not touch the wedge.

30. We try on the knife so that everything is smooth and the knife is sitting in the sheath with the necessary effort.

If required, we adjust the thickness of the central insert again to LSM.

31. I coat the halves from the inside along the blade with shoe wax, I heat it with a hairdryer to better absorb the wax. This will prevent the wedge from further contact with wet skin if the fate of the scabbard falls out. As practice has shown, even a wedge of rusty carbon felt in such a wax nest for more than a year.
32. Finally we glue both halves. Here durability is important, therefore we follow the technology of applying glue. Good knock on the perimeter. We dry.

33. After drying, we stencil the outer contour of the scabbard along the ends. Cut off the excess skin from the ends with a sharp knife. Trimming the ends on

We start the tedious procedure of polishing the ends of the scabbard. There are many ways, for example, special liquid skin for the ends, but I don’t have anything of this, I use dye, CA and carnauba wax. We paint the end face of the skin several times with paint and soak it in Central Asia. We dry. Then grind the butt on the LSM. We repeat the procedure several times, gradually reducing the grain of the skins on the LSM tape, until the result suits you. I stopped at 320 skin, though already heavily used, a little bald.
Important! After the last polishing, we don’t use the target in order to prevent the end face from cracking due to bending. It is very useful to finish the ends on the 120mm felt wheel, the nozzle on the drill, but I had this kind of GOI paste, and the shops still / did not work. I had to skip this useful procedure.
34. Finally we bring the ends of the scabbard with a felt mug of carnauba. We saturate and polish, especially the edges.

It turns out quite well. In life, much better than macro photography.
35. Now proceed to the marking of the seam. The main thing is not to hurry and do everything very smoothly. It is important to mark the holes so that they coincide above and below, as well as close to the ideal.

I use a 1mm drill. The main thing is not to hurry, accuracy and attention are important here. I always start to drill each hole from the front, then I drill it towards the back, trying to get holes in each other. In 90% of cases I succeed (all the same holidays - a difficult test for hands 8-), but it happens that the drill slightly misses, the main thing here is not to drill through holes. Nothing that sometimes the hole is obtained slightly obliquely (not perpendicular to the plane of the scabbard) due to a small footstep or the position of the markings on the front and bottom sides of the scabbard. The main thing is that the step be the same and all the holes are strictly along the line.

After drilling the holes, I tap each hole with a conical spout of a fountain pen, so that nothing extra sticks out and the seam is smoother. You can use the mega-super proprietary forum for a two-pronged device from a sawn screwdriver, but I'm still too lazy to do such a thing. Beautiful seam is the largest, if not the main (!), Part of the appearance of the scabbard.
36. Do not forget to drill drainage and compression hole. It is important to get between future seam threads so that they do not even partially block this hole.

37. Getting to the firmware sheath thread. At first, I grease them with shoe wax (classically beeswax is necessary, but I have not tried it). At the same time, it turns out a good lubricant for the threads, and most importantly, the holes are impregnated with this cream-wax from the inside, becoming immune to moisture.

38. After tying the thread, it is very convenient to melt the ends of the stinger of the electric burner. I think a soldering iron is also suitable.

39. The resulting sheath is impregnated with creams, waxes and glossy polishes for the skin. Who has what. It's a matter of taste. The main thing is to protect the skin from water. We remember that some waxes darken the skin strongly (in my case, the ostrich may darken), which does not suit me at all. I took the colorless cream and gloss, consistently. Diligently we clean the remnants of the cream, clogged up in all the cracks with a toothpick and a cotton swab. We polish with a cloth until the effect of cat eggs shine.
40. If there is still strength and desire, then in conclusion we make a suspension in the style of the sheath. By the same technology. Thin chereprak 1mm, I pasted ostrich, then a frame of chrome leather. All the pieces of leather are carefully otherfovany boron-typewriter.

The ends of the skin are polished with paint, LSM and carnauba. The holes for the threaded rivet are punched through with a sharply sharpened tubule, creams again, polished and, finally, the gimbal is mounted on the ring.

Is it really EVERYTHING ?! It remains only to photograph a high quality and celebrate this joyful event.
Ps. Making the scabbard took three days with smoke breaks and drying.

Needlework has always had its advantages over machine and factory production, it was distinguished by its originality and originality. Each product that a man has built with his own hands will carry an aura of time, events and the attitude of a person to this craft. What, simply can not be said about the production on the conveyor. How to make the original and durable sheath of genuine leather with your own hands quickly and simply at home, you will learn in this article.
The theme of the manufacture of scabbards does not become less relevant every year, so what's up there with the year, even decades cannot break interest in lovers of exclusive cold arms. Having the opportunity to improve the technology of making scabbard, numerous materials and ways to improve them can stump even the skilled craftsman of this craft.

How to make the original sheath of genuine leather, with no experience in the work with their own hands in this case, you will be helped to learn today's master - class for the manufacture of support for a knife. We can say that it is his decoration. Therefore, it will be useful to know how to perform this craft, not to lose a lot of resources, both for experienced craftsmen and for beginner craftsmen.

A large number of cold weapons are waiting for their time to find their exclusive unique decoration, this is important for both the blade and the ax. There is no difference what item will decorate this leather masterpiece, the main thing is that it should be made from a pure heart and with a soul.
No matter how long and hard the knife is in working condition, sooner or later it must be removed to the side. As for kitchen knives, it is much easier here. So, as a person prepares a large amount of time, the material is wear-resistant and permanent use simply does not allow the knife to deteriorate. But in the case of knives that are intended for use in rare trophy cases, for example, for hunting. That, with them the situation is much more complicated, even scrupulous.

There is no guarantee that your knife, which is made of high quality metal, having been left unattended for some time aside, will not lose its former appearance and good functionality. Therefore, you should take care of the future form of your pet in advance and prepare for it a suitable place and method of storage.
The sheath of thin leather, relevant, if used with a quiet carrying and temporary retirement of the knife until better times. It is worth thinking, if your instrument will lie quietly in the safe, then this method and material for storage will be optimal.

The skin has a lot of disadvantages and merits. Working with it is difficult and does not always have a satisfactory end result. Therefore, be careful when choosing a material and method of its manufacture.
Numerous photos and video materials can take you by surprise when choosing the sheath manufacturing technique. Therefore, in today's master class, you will see step-by-step instructions on making a knife made of leather for beginning craftsmen.
How to make a leather sheath with your own hands in a step-by-step MK
You will need:
- A piece of leather, preferably more plastic
- Thin fishing line
- Scissors
All these tools and materials you will need in the manufacture of crafts. Pay special attention to the quality of leather and thread. Because this criterion will be the most important for you in the future.
Step-by-step instructions for making leather sheath:- You have a knife on a piece of leather.
- Outline with chalk.
- Leave 1 cm for allowances.
- Pierce the holes along the contour with an awl until the edging is complete.
- Thread the line through the holes.
- Knots secure the fishing line at both points of the end of the sheath.
Your craft is ready. We will be glad if this article was helpful.
Comparing the skin with more modern materials, it has many drawbacks. Tannins contained in it, when in contact with water, turn out to be aggressive towards steel of the blade. Therefore, do not leave the blade in the wet sheath, and indeed, it is better to wait until they are completely dry. Wetted and dried leather sheath, can change its shape and be too cramped for a knife that has recently entered into them without the slightest hassle. Especially, it concerns the sheaths made by amateur craftsmen, who are not very well oriented in the properties of this or that material. But, in any case, it is better not to wet the leather sheath at all, and if they get wet, then they should be dried naturally, without warming around a fire, stove or other heating appliance. Even in the sun is not desirable.

It must always be remembered that the sheath is a very narrow slit; it can be very difficult or even impossible to clean out dried contaminants from it, especially of animal origin. Even if you soak the sheath for several days. Therefore, be careful and careful when using the sheath.
Video on the topic of the article
Every self-respecting hunter keeps his knife in the sheath. And some even have a few protective covers. And the majority prefers to do the sheath for the knife with their own hands. After all, it is quite simple to make this simple product, and independent production will make it possible to make it convenient and to your taste. Given that now you can choose any material for this, real hunters do not change the traditions - they make the sheath out of leather or wood.
Leather sheath: brief instructions
Leather sheath for a knife do their own hands start to do with the template.
- Take a sheet of paper, bend it in half and attach a knife to it.
- Circle it around the contour, leaving an 8–10 cm wide seam allowance on the blade side.
- Cut out the drawn pattern so as to duplicate only the contour of the blade, and leave the contour of the handle alone. The thing is that in real life this circuit will play the role of a loop for fastening with a half ring. It is important to take into account that in the future the width of the “handle” will coincide with the half ring that you prepare.
- Now put the finished template on a piece of leather. Pay attention to the fact that at the junction of the belt and the sheath it should be already about 3 cm long, and the ears should be left at the edges of the sheath. They will be a place for a button after the pattern is folded in half. Moreover, their size should be such that around the button remains 2 mm of skin.
- Provide two holes on the inside corners. Place them in the place where the wide part of the pattern (under the sheath) is combined with the narrow (under the handle). This is done so that during operation the skin is not torn at the corners.
How to make a knife sheath with your own hands from the skin? At first glance, everything is clear. But, nevertheless, in this matter there are some subtleties that will help to do this as best as possible.

Those familiar with the manufacture of scabbard firsthand, recommend:
- Complete leather sheath liner. Plastic is suitable for this. To fold it in half, the fold line is better to heat. After it is folded, both halves with a file make symmetrical, repeating the shape of a knife blade.
- To the sheath took the form of a knife, cut the skin moistened for 20 minutes in warm water. After she softens, the knife is wrapped around it. It must first be wrapped in cellophane. The skin is fixed with clothespins and left for a day.
- During this time, you can make a loop of the suspension, and after the clothespins are removed from the sheath, glue it to the right place and then stitch it.
- In order to make the knife sheaths with high-quality stitches with their own hands, mark the holes through 3-5 mm along the seam line and drill through them. It is necessary to sew the sheath with two needles, one of which with a single thread, and the other with a double thread.
- After everything is sewn, the sheath should be soaked again in warm water for 10 minutes, put a knife wrapped in cellophane into them and leave it for a day.
- When the sheath is dry, they should be treated with shoe wax or shoe polish.

Wooden sheath
Some hunters believe that the wooden sheath is more comfortable than leather. They are especially popular in Siberia and the Urals. Their simple and reliable design makes it possible to quickly remove and insert the knife without undoing the fasteners. And you can do it in gloves. Such a sheath can not be in a hurry to pierce with a bad hit of a knife.
Due to the fact that the sample is made in the form of a funnel, which is evenly narrowed from the mouth to the tip of the blade, the handle is tightly fixed in the sheath, almost wedged there. To get the knife, you just need to grab the handle and firmly squeeze your fingers. From such an effort, he literally jumps out of the sheath. Yes, and arrange the wooden sheath for a knife with your own hands can be very beautiful.
Production of scabbards on the Ural-Siberian technology
The process of making wooden scabbard takes place in several stages:
- pick up small plates (2 pcs.), the vertical size of which will correspond to the length of the knife, and the horizontal one is equal to two thicknesses of its handle;
- process the planks carefully, making them abut each other tight;
- place a knife on each of them and circle its outline;
- mark the depth of the sample for it on the end of the handle;
- wood should be selected along the contour, ready sampling should take the form of a funnel, evenly tapering from the mouth of the scabbard to the tip of the blade;
- between the sheath and the blade, provide a small gap (3‒4 mm).

If you could not perfectly fit the mouth to the handle, do not despair. Inside the mouth, glue a strip of fabric, pre-soaked it with epoxy. Wrap a knife in polyethylene and press fabric well against the mouth of the scabbard.
Finishing sheath processing
After the selection is made and the mouth is fitted to the handle, making the knife sheath with your own hands goes into the final stage:
- scrape the outside of the sheath, leaving a wall thickness of about 5 mm;
- next to the mouth, leave a side with a section of 5x5 mm in order to secure further suspension loops on it;
- to increase the strength of the scabbard, wrap a place under the rim with several layers of nylon thread, then soaked it with epoxy resin;
- at the bottom of the scabbard (at the tip), make several holes and draw the same thread through them to reinforce the product;
- at your discretion, make a vent at the bottom (it may not be);
- now glue the prepared parts of the scabbard;
- after the glue dries, sand the surface in a way that is convenient for you and soak it with linseed oil.
Additional elements and design of the sheath
So, the scabbards for a knife with their own hands made completely and can be used as intended. In addition, a suspension or belt loop is sewn from leather. Some for greater durability enclose such a wooden cover with leather, but this is, so to speak, an amateur.

The sheath can be left in this form or you can use a different finish - burning, wood carving or inlay. It all depends on your taste.
Now that you have become familiar with the technology of manufacturing, then how to make a knife sheath with your own hands is no longer a question for you, but an occasion to get down to business.
Any knife with a fixed blade, designed for operation outside the home, without a scabbard loses a significant part of its functionality. It is inconvenient to remove it from a backpack, and in a pocket of clothes it generally becomes traumatic. If the knife with which you are going fishing, hunting, mushrooming or camping, has no “clothes”, you can do it yourself.
My task is to sew the sheath for fulgang without a specialized tool and from available materials. The length of the knife is 250 mm, and the thickness in the butt is 4 mm.

Materials
- Leather. Cheprak vegetable tanning with a thickness of 3.5 mm - trimming from an old suitcase for tools. The sheath of such leather does not require additional elements of rigidity.
- Thread. A shoe waxed thread was bought sometime in a haberdashery shop.
- Wax. They will process the ends of the skin. I use carnauba (palm) wax - the most refractory and non-greasy to the touch. It is sold in flakes in cosmetic stores. Alternatively, suitable technical paraffin (candle) or beeswax.
- Cobble screw. He will play the role of a fastener. Instead of a screw, a spare button from a jacket or raincoat will do.
Instruments - Shoe knife
- Caliper with carbide inserts for marking. Instead, you can use the usual drawing compass or meter.
- Ball pen.
- Contact adhesive.
- Two gypsy needles.
- Passatizhi.
- Drills with a diameter of 1,5 - 2, 4 and 5 mm.
- Benchtop drilling machine.
- Belt sander.
- Cloth circle.
Marking and cutting details
By design, the product will resemble the sheath for the Finnish NKVD. We put a piece of cheprak bakhtarmoy up, and on it - a knife. This will be the front part of the sheath.
Carefully draw the outline with a ballpoint pen. Mark the line where the handle begins, and align the “failure” from the butt side. Put 10 mm on the caliper and draw two lines using the drawn contour as a copier. Evaluate the result, circle the pen and, if necessary, adjust the shape manually.

Pay attention to the position of the knife! I make the sheath under my right hand, and if you are left-handed, turn the blade to the other side, that is, mirror.
Cut the outer contour with a shoe knife. Particular attention should be paid to the line of the mouth, so that the handle adjoins it without a gap. Then we make the same detail - the spacer, but we cut through the internal lines as well. It will form the internal cavity of the scabbard and protect the seam from the undercut. When imposing parts "tails" spacers should protrude from the mouth. They are pruned after gluing.

The shoe knife should be well sharpened! Cut through each line with minimal pressure in several passes. On curved sections, work only with the tip. Lay the skin on a wooden base.
Gluing and contouring
We assemble the front part with a spacer on the glue. Control the width of the cavity with a blade.

The next detail is the wrong side. Mark it so that bakhtarma was in the cavity of the sheath. The side of the blade follows the shape of the two previous parts. The part on which the handle rests is laid out arbitrarily. The main thing is that the back should not protrude beyond the sheath. Then there is enough space on the strap, which will fix the knife, and on the hanger.

Glue the wrong side.

Cheprak - thick and tough material, which is almost impossible to cut without errors. After gluing, the ends of the scabbard will be uneven.

We process the contours on a grinder with a belt of 60 or 80 grit. As an alternative, you can use a grinder or sharpener with a flap wheel. It is better to process the skin on the emery tape, since the stone is clogged with its particles and “burns”. The task is to remove all irregularities from the knife and maintain the right angle between the end and sides of the sheath. After machining the contour, the width of the spacer is about 7 mm.

Use eye and respiratory protection! Due to dust and debris, contouring is best done in a workshop or on the street.

Marking seam
Marking seam do on the front side. We expose the size of 3.5 mm on the caliper, draw two lines from tip to mouth. The insert fastened to the rail rests against the end, and the second, mounted on the rod, is used as a scriber. The line will accurately copy the shape of the scabbard, and its quality depends on how well the face was polished.We put on the caliper the pitch of the seam (I have - 7 mm). We mark the first point for drilling at the intersection of the lines (the sharp tip of the sheath). Install one caliper insert into it, mark the next hole with the second one. Rearrange the instrument one step at a time until we reach the mouth.

To make the markup clearer and correct possible inaccuracies, it is advisable to repeat it with an awl. Determine the place where the strap will be (drawn with a pen).

Drilling holes
Pros working with leather make holes with a specialized punch tool. I used a desktop drilling machine (drill diameter 1.8mm).
The same operation can be done with a hand drill or with an engraving machine, but you will have to closely monitor the verticality of the spindle, otherwise, as a result, the seam on the wrong side will “walk”. While you are near the machine, you can make grooves for the strap and suspension. I drilled holes with a diameter of 5 mm and cut between them with a shoe knife.

We refuel the strap, insert the knife and plan the fastener. First, we drill the top hole (for the head, diameter - 5 mm), then through it we mark the bottom hole (for the screw, 4 mm).

After installing the screw and checking the excess part of the strap is removed. To facilitate the passage of the head through the hole, we make an incision in it of a length of 3-4 mm.
Please note: skin color has changed. After drilling, the billet of the sheath is processed on a sandblaster. After that, I rubbed the ends with carnauba wax and walked around the rest of the surfaces. As a result, the edges turned out to be darker. For applying carnauba wax, a cloth wheel was used, mounted on a sharpening machine. Paraffin can be applied by hand directly on the end, and the rest of the surface covered with shoe cream.

Firmware
I used a saddle stitch - simple and reliable. Cut the thread from the bobbin and thread the ends into two needles. We make two seams: from the butt side and the cutting edge of the knife.
To fix the thread, thread it in the ear, pierce 3 cm from the edge and tighten. So it will not slip when broaching through the hole. With this thickness of the sheath (about 10 mm), the thread should be 6 times longer than the seam. Do not do less, otherwise it will be inconvenient to work or it may not be enough.
Thread the needle into the hole at the tip of the scabbard and align the thread. To facilitate the broach, you can use pliers. Insert the needle on the front side into the next hole. We stretch the thread to the end, making sure that it does not twist. “Wrong” needle pass through the same hole towards. Perform the final tightening.

We start each stitch from the front side. We try not to pierce the thread that is already in the hole with the “counter” needle.
At the end of the seam must be secured. To do this, re-sew the last stitch in the opposite direction, draw the front thread to the wrong side, cut and burn.

The firmware itself took 20 minutes, and about 2 hours had to be spent on preparatory work.


