
Sometimes the old furniture literally conquers the quality of the tree from which it is made, as well as an unusual appearance.
To carry out such vintage interior in the trash simply does not raise a hand. But to furnish with their help modern housing is also not the best idea. But there is a way out of the situation. It is necessary to update the old furniture with your own hands, breathing new life into it. There is no doubt that after a small restoration the furniture will change!

1. In patchwork style

Upgrading old chairs.
Bright chairs will be a real highlight of the interior. To transform a soft seat, you need to drag it cover, sewn from multi-colored rags. And the solid legs and back are decorated with the help of decoupage technique. On the primed surface, you need to attach decoupage wipes or magazine clippings, soaked with a mixture of PVA and water. After drying, coat them with a layer of acrylic lacquer.
2. Club travelers

The decor of the old furniture geographical maps.
Surely in every house there are old geographical maps left from school days. They can completely glue the furniture using the decoupage technique described above. If such a solution seems too radical, then it is better to combine decoupage with coloring of individual sections. To paint lay smoothly, you must clean the furniture from the old finish.
3. Gentle relief

Update old furniture with wallpaper.
Wallpapers with convex patterns for painting - an excellent material for furniture renovation, the purchase of which does not burden even the most modest budget. Check the distant boxes: perhaps the remnants of wallpaper after repairs are waiting for their high point. Paste the pieces of wallpaper on the prepared and cleaned surface of the furniture. If the white color seems too boring, then paint the wallpaper and varnish it to protect it.
4. The most interesting is inside

Alteration of old furniture with their own hands.
The effect of surprise when looking at furniture, the back wall of which is decorated with bright patterns, is guaranteed. If the level of their own artistic skills allows, the back wall can be painted. This will have to pre-disassemble the furniture. There is a simpler solution: just paste it with bright wallpaper. In order for the update to be complete, paint the furniture itself in a harmonious color.
5. Fashionable ombre effect

The decor of old furniture in ombre technique.
Smooth color transitions are a coloristic device that has not lost its relevance for the past few years. So why not repeat it on the furniture? Use 4-5 shades of the same color, painting furniture vertically. It is not necessary to buy the number of cans of paint corresponding to the colors ombre. Available in base and white colors. The intensity of the base color is adjusted by adding different amounts of white to it.
6. Musical furniture

The decor of the furniture is old notes.
Long-read newspapers or old notebooks can be used to decorate vintage furniture. Part of the furniture color in the selected color, leaving empty areas where the paper will be pasted. Comply with the boundaries of staining will help construction tape. Then glue the paper soaked in tea or coffee and dried on the furniture. Soaking is necessary to give notes or newspapers a brown tint, creating an effect of aging. After the glue dries, varnish the paper.
7. Spectacular color duet

The decor of furniture with the help of stencil pattern.
In order for the selected picture to look neat, it is better to apply it with a stencil. It can be cut from thick cardboard or thin plastic. Color the selected item in a light color. After the paint has dried, apply a stencil pattern. To update the furniture looked spectacular, we recommend choosing contrasting colors of paint.
8. Maximum of color

Renovating furniture by painting.
The easiest way to freshen vintage furniture is to simply repaint it. But first you need to clean the surface of residual varnish and paint, applied many years ago. This can be done with a sanding machine or sandpaper. In some cases, it is enough just to pick up the paint layers with a knife, and they will easily come off. Then the tree needs to be covered with a primer, and after it dries - painted in a bright color.
9. Instead of a photo album

Update old furniture retro photo.
Vintage photos most often gather dust in the boxes until they fade and fray. But there is a more rational way to use them, which will allow them to see the white light, and you will constantly enjoy exquisite retro-aesthetics. Use the photo for pasting old furniture. If you take pictures in such a quality does not raise a hand, then make their duplicates, scanning and printing on a color printer. The decoupage technique will help fix the “doubles” of the retro photo on the furniture. To preserve the images do not forget to varnish them.
10. Simple but cute drawing

Drawing on furniture in the spirit of primitivism.
Even in the absence of developed skills in the field of fine art, it will be possible to decorate old furniture in this way. Choose a simple drawing in two or three colors and transfer it to the surface of the furniture, pre-painted in the selected primary color.
11. In the spirit of impressionism

Contrast decor of old furniture.
A lot of bright colors, not even combined with each other - this is all that is needed to transform furniture into a sample of abstract art. Clean the furniture from old varnish and paint, prime. Then start to cover it with small strokes of different colors. For convenience, first apply the first color, then the second and so on. In order to evaluate the compatibility of colors, we recommend creating a sketch on a piece of cardboard.
12. Impressive contrasts

Coloring furniture in contrasting colors.
Furniture, painted in two contrasting colors, looks unforgettable. In order not to accidentally cross the boundaries of good taste, we recommend choosing one neutral color (gray, black, white, beige, and the second bright (pink, lime, orange, azure). With this combination of tones the furniture will be spectacular, but not too defiant.
13. Abstract landscape

Spectacular pattern on the furniture.
It's hard to believe, but in order to paint an interesting landscape, you don't have to be an artist. The main thing - to choose the right colors and apply them in the form of uneven strips on the surface of the selected furniture. In such an abstract figure, anyone can easily recognize the mountain landscape.
14. Luxury ceramics

The decor of the furniture is mosaic and tile.
Remains of mosaics and tiles - an excellent material for the decoration of furniture. For cutting, use a manual tile cutter or special tongs. You can simply break a tile or a mosaic with a hammer, but in this case the pattern will be more chaotic. For gluing ceramics to wood, use acrylic or silicone construction glue. After drying, fill the joints between the ceramic fragments with tiled grout and later remove its excess.
15. Hardware strength

Furniture is embarrassed with new fittings.
Sometimes even such a simple technique as a change of furniture can dramatically transform the look of old furniture. And if you pre-paint it in a discreet color, the result will be really impressive.
Do you want to create a unique interior at no extra cost?
This will help you old furniture, photo alteration of which you can find with us. There are many ways to transform old, familiar objects for you.
The choice of method depends on the purpose of the furniture and the type of coating, as well as its condition at the time of repair.


Step-by-step photo-master-class of making furniture with your own hands from old interior items you can find on our website. The furniture renovation process includes two main steps:
- repairs;
- decorating.
Let us consider in more detail what is worth sharpening your attention.
Table repair
Tables are distinguished by functionality for writing, dining, kitchen and magazine. Depending on their purpose, their structure and, consequently, the process of restoration also differs. As a rule, dining tables consist of 4 legs, a bow and a table top. They can be solid or folding. When altering such furniture should pay special attention to the state of all elements, as well as their attachment. The legs should be the same, without damage. If necessary, they can be replaced.
The table top, in turn, is the main part of the table. Its surface should be smooth, without grooves, crevices and corrosion. If necessary, to achieve the desired effect, you can use putty on wood. With its help you can easily and quickly eliminate all the flaws of the surface. If necessary, it can be used in the repair of legs. The same scheme is used in the repair of coffee tables.


Kitchen tables have their own characteristics. Before proceeding with the repair, it is necessary to conduct a full inspection of this piece of furniture. An important role is played by the strength of the table top. It must withstand heavy loads and physical stress. In this regard, the basis on which it is installed, must also be strong.

An example of the use of putty on wood, which will help to correct all the irregularities of the old tabletop
Note! Kitchen tables are not only a place to work, but also used to store kitchen utensils. To do this, they are built drawers, shelves and doors. They should pay special attention.
If the table is equipped with shelves, then you should pay attention to their fasteners. If necessary, special wood or plastic caps can be purchased at a furniture store, and a thin, durable metal corner can also be used as a shelf holder. Pay attention to the state of canopies, with which the door is mounted. It is best to replace them with new ones, as with frequent use this part lends itself to the greatest wear.

Special polishing agents that can be found in any building or furniture store give freshness to natural wood.
If the table is equipped with drawers, then check how firmly their walls and bottom are connected. To facilitate their use, you can replace the fittings with which the drawers are pulled out. You can buy it in a furniture store. There you can also buy various types of convenient pens.
Tip! When replacing canopies, choose those that are designed for furniture. They will provide more convenient and reliable operation of the doors.
When repairing a desk you should pay attention to all of the above. After seeing a detailed master class on the alteration of old furniture with your own hands, you can repeat it yourself.

Repair cabinets and cabinets
Each house has furniture that is intended for storage. As a rule, these are different types and sizes of cabinets and cabinets. They can be different in height, depth, roominess. In addition, each of them can be a real decoration of your apartment. To do this, look at how to restore the old furniture with your own hands on.

A rather extravagant and extraordinary interior element - a bedside table from an old suitcase
First of all, it is worthwhile to inspect all the fixings of the shelves and, if necessary, replace them with new ones. You can also replace the mounting boxes for more functional and modern.
Depending on the size, door attachment methods may vary. In cabinets and small cabinets are used canopies. They wear out quickly, so when making repairs, they are best replaced with new ones.
If you remodel a large wardrobe and it has movable doors, then with time its fittings may be subject to wear. In the furniture store you can find special rollers-fasteners for sliding doors of the cabinet.
How effectively in this case looks restored old furniture, look further at the photo.


Repair of chairs
Without chairs it is hard to imagine any dwelling. Today it is so common subject that few people pay attention to it. This can happen in two cases - either with proper design of the chair as an interior item, or with its breakdown. We will consider how to come to the first from the second option.

A variant of the restoration of old chairs covers in vintage style
The chair consists of three main elements:
- legs;
- seats;
- backrest.
All of them can fail sooner or later. If the legs become the cause of the breakage, they must be firmly fixed, because otherwise the use of the chair becomes dangerous. If the seat is broken, it can be replaced by cutting a suitable piece of plywood or fiberboard. The same can be done with the back. Also, if desired, the chair can be made soft. To do this, on the seat and back you must attach a soft upholstery based on foam rubber.
Tip! If you decide to install or replace the upholstery in the chair, it is best to use a fabric attached to the foam. You can find one in a textile store, and you can fix it with a construction stapler.

Old furniture: photos of design options using painting
As you know, any piece of furniture should be not only functional, but also attractive. Therefore, when old furniture is updated, the photo of which you can see below, it is necessary to divide the work into several stages. The first stage is surface preparation.


It is necessary to clean the furniture from traces of old paint, varnish, and also from dirt. After this, it is necessary to putty gaps, if any, and then apply a primer. Then you can apply the base. To do this, select the paint of the appropriate color.

New life of a frame of an old bed from a natural tree - painting in gentle turquoise
Tip! It is best to use a water-based acrylic paint. It does not contain toxic substances, does not emit a pungent odor and dries quickly. At the same time the surface gets a glossy attractive look. But if you have a good aerosol spray, then he will do.


Dressing
Restoration of old furniture, the photo of which is presented below, includes decor. You can use different techniques and combine them. The most common is decoupage. For this you need the following:
- required image applied on paper;
- pVA glue;
- glue brush;
- lacquer, preferably water-based acrylic;
- lacquer brush.

Decoupage is a fascinating occupation, and the furniture made in this technique looks very gentle and unusual.
Tip! It is best to use large colored napkins with appropriate motifs as the image.
Grease the surface with glue, gently attach and smooth the picture. Let everything dry out a little, then open with varnish. It should be noted that the effectiveness of using this method during the restoration of old furniture with their own hands no doubt.


Another no less interesting method of decoration is the application of patterns with the help of lace. For this you will need:
- lace;
- paint of the corresponding color;
- scotch.
Take a piece of lace and attach it to the place that you plan to decorate. Secure the ends with duct tape. The remaining area is desirable to close the paper or film. Apply paint with a brush or use spray cans. Let the product dry. Remove scotch tape, paper and lace.
Tip! If you want to decorate a large area, it is best to use a piece of guipure of the appropriate size.
Both of the above methods are quite effective. Instead of lace and guipure, you can use paper templates. As a rule, often during the decoupage and the restoration of old furniture used wallpaper, remaining after repair.
Padding upholstered furniture
Over time, the upholstery of sofas and chairs not only loses its attractive appearance, but can also sink heavily, become not as soft as before. But if you do not want to throw away your favorite piece of furniture or you don’t have the money to buy a new one, you can hold the waist at home.


Renovated Chebbi-Chic Dining Room

A detailed master class on how to customize furniture with your own hands, and photo examples are presented on our website. You need to purchase the appropriate fabric from which the new upholstery will be made. It may be:
- the barracks;
- velours;
- leatherette;
- crepe;
- alcantara;
- skin, etc.
The choice of material for upholstery depends on your financial capabilities. You can buy it both in the textile and in the specialized furniture store. You will also need a construction stapler and staples for it.
From the old upholstery is best to get rid of. It can be fixed with glue. In this case, you will need a construction knife or (if stapler brackets are attached) you will have to use a flat screwdriver. Removing the old strap, begin to install a new one.
A small workshop on the replacement of the old pouf upholstery
Cut the required piece of upholstery, attach it so that the edges go to the place where the old ends, and attach with a stapler. You can carry out such manipulations as with the soft part, so with the back and bylets.
If the upholstered furniture has lost its volume and softness, they can be returned by replacing the foam rubber. It is necessary to fix it with the help of special small studs. If you are afraid that such manipulations are beyond your power, you can stick the foam on top of the old upholstery and cover the new one. But it should be borne in mind that the furniture should not lose its functionality.

We give the new volume of the seat of the old chair
You can add any volume to your product. For this purpose it is necessary to choose foam rubber of the corresponding thickness. If there is a folding mechanism, then after the waist it should function as before.
Tip! If you need to replace the upholstery and renew its volume, it is advisable to use a fabric attached to the foam. You can purchase it in a specialized shop or stitch both materials yourself.

Dressing banners upholstered furniture
If you change both layers of upholstery, you can apply different types of decoration options that will give your furniture a more aesthetic look. There are lots of ways to do this. We consider the two most common:
- The fabric used for the strap can be attached using patterned seams. This will create a special decorative effect.
- Purchase buttons or textile clips and use them to tighten the fabric and foam rubber by joining them together.
Upholstered furniture with a cover
A more economical and simple way to hide stains is sewing covers. To do this, you can pick up any fabric you like. It is important that it is durable. Most often for this purpose is used:

- the barracks;
- velours;
- velvet;
- jeans;
- calico;
- other.
Taking measurements of the size of the sofa, you can sew a cover that will cover the back, seat and, if necessary, bylts of your sofa.

A small workshop on sewing a removable pouf cover
Making a cover, you can use various techniques of a decor. You can put embroidery in a certain place. If desired, you can sew the appliqué. To do this, fragments of the pattern are cut out of the pieces of fabric and sewn to the base, forming a single picture.
You can also apply the currently popular patchwork - the art of making products from patches. In this case, for the manufacture of the cover, you can use pieces of old unnecessary things.
We update byletz with plywood
Scuffing, stains and even torn upholstery on bylets can be hidden with the help of a special lining. For its production you will need:
- plywood;
- small metal corners;
- the smallest furniture screws.
You can cut the plywood yourself or ask for help from specialists where you will get it. You will need 5 pieces by the size of your bylets. The cover plate should cover its outer, inner, back, front and top parts. Having made the measurements, simply make 5 corresponding rectangles and fasten them from the inside of the structure with the help of angles and screws.

Further, it is enough just to put on the design on the bite. It can not only play the role of decoration, but also be quite functional. You can use the pad as a mini table. If necessary, apply paint or decorate it in any way you like.
Tip! After making the plywood lining, sand it on both sides with sandpaper.
It is not necessary to buy new furniture in order to make your home more modern and functional. Take an example from this inventive guy who was able to make out of old, worn out pieces of furniture, create wonderful things! Do not often see so useful and cute interior elements…
How to convert furniture from old to new
Cooking
- When children grow out of their crib, it’s time to start reading and writing. Make a crib party table - ingenious solution!
- The crib can be transformed into a special one for various children's activities.

- Great example bathroom decoration.

- Incredible adventures tv.


- It is not clear how and why this kid had a cart from the store at home. But they turned out great chairs!

- Wow! Second Life ordinary wall. It turned out great!

- Kitchen chairs can be so cute. garden bench.

- Great example modern sofa. Yes, your eyes do not deceive you, it is made that way.

- Organizer for a variety of household things. Make it really very easy!
- Wonderful turned out.

- Old postal The box can be such an original interior decoration. Incredibly romantic!

- Ideas for use old pianos. If the tool cannot be repaired, you can arrange such a perfectly organized space.


- Bike in the bathroom - very stylish and convenient support for different things. Decorative bike, just think!

- Here's how to adjust.

- Ottoman from old magazines! Be sure to do this.

Organize your home space in the best way. Perhaps these will help you
Despite the fact that the furniture of the Soviet times is quite reliable and strong, it is not considered beautiful, especially competing with modern furniture. In addition, by this time it is pretty worn out and needs repair. Even in such conditions, the owners feel sorry for her to leave. To buy a new, modern, you need a lot of money, because the furniture has always been not cheap, it is not cheap now. In this case, there is one, an alternative option to leave the old furniture and not buy a new one - try to update the furniture with your own hands, giving it an attractive and modern look. Cabinet furniture is quite easy to rework, especially since there are all the materials necessary for this. In any case, it will be much cheaper to purchase materials for furniture renovation than to buy new furniture. One of the easiest and most accessible techniques is changing the color and replacing the hardware. There will be no special problems with accessories, but with the change of appearance everything is much more complicated. There are several options, but the most common are two - painting and sticking a special film or wallpaper.

The most affordable and simple option is pasting old furniture with self-adhesive film. On sale you can find a film for every taste, both color and monotonous, of various colors, shades and textures. Many prefer the film under the tree, but there are other options that meet the spirit of modernity. Such an approach can really turn an old wall into furniture, which will have an attractive and modern look. It is not difficult at all, it is enough to do your work slowly and carefully, which will provide an interesting result that deserves attention. To see this, just look at 2 photos. On the first photo there is an outdated Soviet wall made of chipboard, and on the second - the same wall, but after the update.
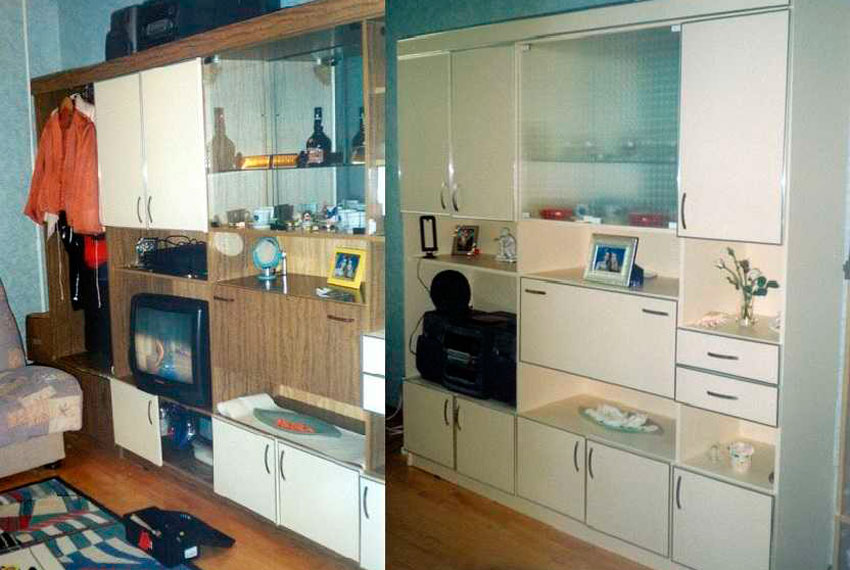
The wall has received a new look due to the use of a compacted furniture adhesive film, the color of "cream" with a matte surface. Where there was an open part of the wall, there are installed glass doors, pasted over with a translucent matte film. For edging used furniture layout, color chrome, and also self-adhesive.
The work consists of the following steps:
- The old wall is disassembled, all that is not required is removed, including accessories.
- All surfaces are cleaned from dirt and degreased. To do this, use a soft cloth and detergent. After that, the product is rinsed with warm water and vinegar and finally the surfaces are wiped with a dry, clean cloth.
- Fragments of the required size are cut out of the film, with a margin of up to 1 cm. After pasting, the excess film is cut off with a clerical knife.
- The surface before pasting is sprayed with water from a spray bottle. The wet surface will allow you to precisely position the film, as it can be moved, or even unglued, if it was not possible to glue it properly for the first time.
- Before pasting, a protective film is removed from the film, after which it is laid on the surface. Having correctly positioned a fragment of the film, it begins to be smoothed with a soft cloth in the direction from the middle and towards the edges. The main thing is that there are no air bubbles under the film. In this regard, all the work is done, slowly and very carefully.
- When bubbles form, they are punctured with a thin needle and air is expelled from them. This operation is also performed using a rag, moving from the edges to the puncture point. After that, this place is carefully rubbed with a rag.
- After the film is glued, a thin cotton fabric is taken and placed on top of the film, after which an iron with an average heating temperature is used. The fabric is ironed with the film.
- In conclusion, the finish is glued (edging) and fittings (handles) are installed.
- Such technology is applied to every detail pasted over. Glass is glued in the same way, only from the inside. After complete assembly, you get a completely new furniture wall. In this way, you can breathe a second life to such items as bedside tables, dressers, cabinets and kitchen furniture.
After the wall was successfully plastered, the old cabinet was also renewed and installed on the right. The result is that the entire wall is filled with updated furniture. With the same technology, you can upgrade old kitchen furniture - stick self-adhesive film and replace the handles.

There is also a second option for upgrading furniture, less expensive and, most interestingly, no need to disassemble anything. In this embodiment, only the doors of the furniture are glued in and not with a film, but with non-woven wallpaper. For pasting using white glue. To the edges of the wallpaper are not bullied, they are cut into blanks, the size of which is 5 mm smaller than the size of the doors. Judging by the photo below, the result is not bad at all.

The advantage of this finish is that the finish at any time can be replaced with new wallpaper.
As a rule, the surface covered with wallpaper lasts for five years. This technology has been used in the decoration of the kitchen. To make the surface clean, wallpaper is covered with two layers of PVA glue. Here the most important thing is to do everything carefully so that no smudges form, because you have to work with a brush.
As an option, the wallpaper can be varnished, but before that it is better to experiment on unnecessary wallpaper. It is important to determine what will be the reaction of wallpaper to varnish. Choosing a varnish, you need to know that acrylic and cellulose give a transparent surface, and polyurethane, after a certain time, will turn yellow. Polyurethane varnish is practically not affected by solvents and, if it is necessary to remove it, you will have to resort to mechanical stress. Usually for this purpose, large sandpaper is used or an electric drill with a nozzle is used.
How to update the dresser
An old chest of drawers can stand in the attic for several years and lose only its appearance. As a rule, the old lacquer coating cracks, but otherwise, it can be the envy of modern furniture. It does not crack and remains as reliable and strong as it was before. In this case, the chest of drawers is subjected to a more complex renovation, using painting and decorating, using polyurethane molding and wallpaper.
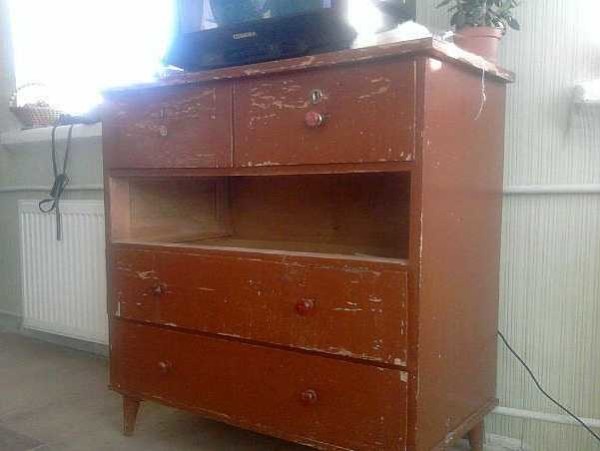
Stage number 1. All accessories are removed from the dresser, after which the old coating is removed. As a rule, the old lacquer coating is removed mechanically, using sandpaper (coarse) for this. All shells, cracks and chips are filled with putty and wait until it dries. After complete drying, the surface is polished with fine emery cloth. The result is what is in the photo below.

Stage 2. Installation of polyurethane moldings. The main task is to choose the right moldings so that they are not small and not large. Basically, products are selected with a width of up to 5 cm and very narrow, if you look at them in profile.
Acquired moldings very carefully and carefully cut into segments of the required length, and the corners are cut at an angle of 45 degrees. At the same time, you need to take care that the pattern coincides. Molding is fixed with PVA glue. Alternatively, you can use and screws for reliability. At the same time, before they are screwed in, recesses are made for them. All the grooves are sealed with a putty very carefully, otherwise there may be problems when the putty dries.

Stage 3. All surfaces for sticking are treated with a primer. As a primer, it is possible to use PVA glue diluted with water in a 1: 2 ratio. After complete drying of the primer proceed to painting. As a rule, 2 layers of water-based acrylic paint are applied. Color - coffee with milk, although the color in the photo does not match the specified due to poor color reproduction.

Stage number 4. Dressing is carried out on the basis of wallpaper, made by screen printing technology. The pieces of wallpaper are cut off clearly by the size of the inner part, bordered by molding. Wallpapers are glued to the glue of PVA. After complete drying, the entire chest of drawers is coated with water-based varnish in 2 layers.
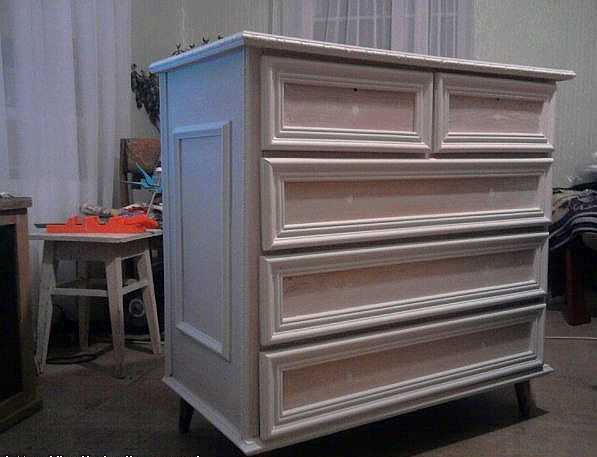
Stage number 5. In conclusion, modern legs are screwed to the dresser in the form of castors for furniture and handles are installed.

If you carefully study the technology, then everything is much easier than it might seem. Although, all stages require certain accuracy, otherwise there will be problems with the appearance. In the same style, you can upgrade and wardrobe. The result is not a bad kit for a room or bedroom. Maybe not quite modern, but original and stylish, and most importantly - quite cheap.
If the old furniture has a lacquer coating, then it is very difficult to get rid of it. In the absence of obvious flaws, it is better to resort to using a primer for complex surfaces and only then proceed to paint. This approach will minimize the effort to upgrade old furniture.
Update old nightstands
The photo below shows the process of updating the old polished bedside table. First of all, the polishing was removed, after which the surfaces were puttied and ground. After that, it was painted with acrylic paint in two layers. In conclusion, paper from the gift bag was glued onto the door, which made it possible to obtain an original drawing. After that, the whole bedside table is covered with two layers of semi-gloss acrylic lacquer.

All stages do not present special difficulties if there are the slightest skills. All processes correspond to the sequence of actions described in the restoration of the dresser. The result exceeds all expectations.
 This old nightstand is up for update.
  This package will serve as an excellent decoration for doors.
  The result of updating the old nightstand.
 Do it yourself is easy and affordable for everyone, if there is a desire. Unfortunately, without desire nothing will turn out. Below in the photo, you can see the nightstand, reworked by a very simple technique: a nightstand, just pasted over with relief wallpaper and varnished twice.
How to remake the table
Having adopted such a technology, it is enough just to turn an ordinary coffee table into a modern interior item. They just take it and paste over wrapping paper. This is a thick paper that is glued without problems and does not become limp under the effect of varnish.
First you need to do the legs and edges of the tabletop. They need to be painted in a light color so that they are more combined with the new style. After that, you can proceed to further work.
Before pasting, cut out the paper from a somewhat larger size than the size of the table top. PVA glue is used for gluing. The surface is well rolled roller, so that there are no air bubbles. The result should be a perfectly smooth surface.

After that, remove the excess material, holding the emery bar with a fine grain on the edge of the tabletop, pressing the paper to the tabletop. This method allows you to very smoothly remove excess material, which is more like a professional action.
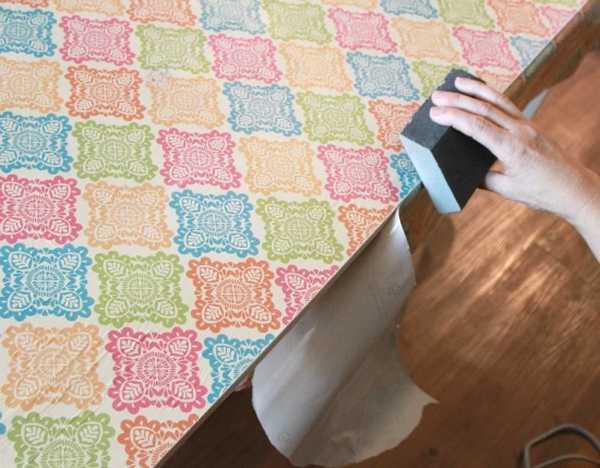
In conclusion, the surface is covered with two layers of varnish. In this case, the layers should be thin. Each layer is applied perpendicular to the previous one.

Furniture rework: photo ideas
In any home wardrobe occupies a very important place. It is a pity that over time it loses its original appearance: the appearance of cracks, dull paint makes it unattractive, it goes out of fashion and looks irrelevant. We have to think about its future.
There are at least two ways out of this situation:
- buying new furniture;
- update the old cabinet.


With your own hands, you can give a new life to the chiffère, turn it into a unique object, while saving significant funds.
How to restore?
Any antique wardrobe requires a small restoration, which will significantly improve the appearance.
You can restore the chiffonier yourself if you use the advice of experts:
- A metal brush is applied to the treatment of decayed wood, after which dead tissue is removed.
- The fine dust formed in the process is washed off under the tap.
- Sometimes in the wooden elements of the cabinet there are holes from studs, some irregularities and cracks. All this must be cleaned with a spatula. It is necessary to apply several thin layers of putty to match the wood. Each layer should dry before applying the next.
- Then dried in fresh air all layers for 1-2 days. You can not dry a tree in the sun.
- Sometimes there are metal parts in the furniture, which eventually became rusty, such places should be treated with a special solution.
- Then the restored surface can be painted or decorated at your discretion.
- Perfectly suitable self-adhesive film, imitating wood, stone, metal.

How to paint?
A wardrobe that went out of fashion, but still quite strong and will last more than one year, you can just repaint. In this simple way, a new design of cabinets, dressers and any other old furniture is created. In this case, it is not only about giving freshness to faded surfaces, but also about a complete replacement of the color solution, which will add originality to the product. Painting - the most common version of the update old stuff. Despite its simplicity, it is necessary to approach this process correctly. For a durable result, you must first prepare the furniture walls.


Below is a step by step master class.
It will help to produce high-quality and competent painting at home:
- it is important to pre-clean the surface of paint residues: one layer will easily remove the emery-blade disc; several layers will be treated with special brushes as a nozzle;
- all walls, doors and other parts must be sanded manually or with a tool;
- leveling occurs by applying a primer or putty to hide defects caused by many years of use;
- it is necessary to wait until the leveling layer is completely dry, and after that you can start painting;


- for applying a painting layer from all sides take a brush, roller or sponge, however, it is faster to use a spray gun or a spray gun. With this method, the paint is applied under pressure, so the doors, shelves and walls inside the cabinet are well painted;
- as a rule, several layers of paint are applied. It provides rich color and good surface preservation. It is better to paint the cabinet with acrylic, alkyd enamel or other high-quality paint;
- paint should be allowed to dry completely, after which you can apply a layer of varnish. It makes the cabinet glossy and shiny. If you prefer a matte surface, you can refuse varnishing. However, the use of this coating has a protective function, prevents abrasion and gives the tone greater depth. You can use not only glossy, but also matte and silky topcoat.


Decor
If you decide to leave and decorate your own old wardrobe, it is possible to decorate it in different ways. There are many techniques that are used for decoration.
Decorative plaster
This is a rather complicated decoration option. First, the product is covered with old paint, necessarily treated with sandpaper. According to the stencil, it is necessary to apply volume elements to the cabinet facades with decorative plaster. The stencil itself must be removed before the plaster dries. Then the uneven parts are smoothed with a spatula. Finished decorative elements are lacquered or painted, gilding or antique patina is possible.


Photo printing
The sliding wardrobe or just the old wardrobe is very updated with photos or photo wallpaper. Any pictures are enlarged using wide format printing in a print shop. The surface is decorated with a panel or a collage of photographs, most often it is wardrobes with flat doors. However, the service of such printing is expensive, so often use the budget option - wallpaper, which are sold in any repair shop. Choose the most different themes - nature, beautiful cities, animals and a lot more. If you use a glue based on starch, in the future you can change the annoying pattern.


Stained Glass Film
You can decorate an outdated piece of furniture yourself without possessing special skills. Very simply, the stained glass film fashionable this season is stuck on the glass door of the cabinet. This will add the presentability of old furniture. In addition to the decorative function, the film keeps the glass from impact and scratches. It is very easy to remove the film, and such a decorative technique looks very impressive, because imitation is as close as possible to a real stained glass window.


New hardware
In the process of decorating there are no trifles. Every designer knows that 40% of the success of any interior is parts and accessories. In this case, you can transform the cabinet beyond recognition by changing all the accessories on it. New pens - this is important.


It is a pity if you have to throw away the old, but high-quality furniture, especially wooden. But such products can be updated and used more than one year. In order to choose the right decoration method, it is important to consider the material and the degree of wear of the old cabinet.
Natural wood
Previously, wooden furniture made very high quality. Before upgrading, remove dust with a dry cloth. Then check the hardware, and if it is broken, it must be repaired or replaced. Inside the cabinet it would be good to carry out the treatment with an antibacterial agent, a more budgetary option - simple vinegar. He will destroy the unpleasant smell.


Then the choice of the method of decoration is made.
- Toning.First, all surfaces are aligned with wood filler, matched to the tone of the cabinet. After the layer dries, uneven spots are ground with sandpaper. Processed and flat surfaces are treated with a special structuring tint for wood. Choose a decorative tinted color darker than the original shade of the cabinet. Such processing will completely transform the appearance of the product.
- AgingFurniture made of natural wood can be “aged”. The effect of worn under the old cabinet surface is achieved as follows: the light tone of the tree is painted in any dark shade, depending on the color palette of the room. Then, after complete drying of the paint, it is necessary to rub a few fragments with a candle, after which light paint is applied, for example, beige, white, cream. When after the second colored layer is rubbed with sandpaper, rubbing will be visible through some bright spots. which is darker. When decorating a dark closet, make craquelure. To do this, put a craquelure varnish on the surface. After it dries, small cracks are formed, which are highlighted with the help of dry pigment or oil paint of the desired shade.
 Toning
 Aging
Aging
- The painting. This option provides for pre-staining furniture paint light shade. After drying, the facades of the cabinet are painted with acrylic paints. If you do not have the skills of drawing and painting, you can paint the closet on the stencil.


Chipboard
If the cabinet is in good condition, it will be possible to use the same decoration options used in the design of wooden products, excluding tinting. The cabinet in poor condition involves the replacement of doors.
- Dark polished. In our country, the iconic model of such a cabinet was extremely common. The decor of this product is very complicated in terms of modernization, since the synthetic dark varnish used previously for polishing furniture is almost impossible to remove. In addition, other decorative materials on it do not hold. Here you need to make a willful decision and replace all the doors, if they are in poor condition. A well-preserved cupboard can be redone in one of two ways:

- Tupovka - toning using a sponge. For applying take a golden or copper metallic paint, which falls even on such a polish. The application technique is different in that in some places the ink layer is filled with a sponge up and down. Then the perimeter of the door is decorated with glued PVC stucco. In the central part of each door is stuck outlet of stucco, similar to the design of the perimeter.
- Stencil ornament.For the application of such an ornament is also used gold or copper paint, but in an aerosol bubble. At first it is pasted on the closet door of the stencil in the form of an ornament. After that, the stencil is the basis for the paint with an aerosol matt varnish, which acts as a primer. After 5 minutes, a tinted aerosol is applied. After a five-minute wait, you can remove the stencil.
 stencil ornament
 dull
dull
Sometimes the original idea of updating old things leads to the emergence of a new one. A large number of diverse and unexpected techniques are recommended by designers. Among them:
- The decor is lace.In itself, lace or lace fabric is unique and does not cause any doubts in aesthetic value. It is no coincidence that for him there is always a mass of applications in the field of decor, including furniture. Exclusive furniture design with your own hands is easy to do using it. You will need lace and paint. You attach a lace canvas to the facade in the right place and draw a brush with paint over it. Then the lace is removed and a beautiful lace pattern remains on the facade.


- Decoupage Perhaps the most amazing effect is given by the decoupage technique. The wardrobe is decorated with napkins, which have a suitable pattern on their surface, they can always be found in any hardware store. The drawing is cut, layered and then pasted with a special glue for decoupage. The surface with the pasted drawings must be covered with furniture lacquer. As a rule, it is applied in two layers. This decor looks especially good on a light background. The cabinet, which was originally dark, must first be painted before decorating.


