You will need:
White cardboard
Sparkles
Ruler
Latex primer (optional)
Glue stick
Scissors
Stationery knife
Jewelry (tinsel, bells, balls).

1. First, download the template by This link or you can draw a house of similar size.
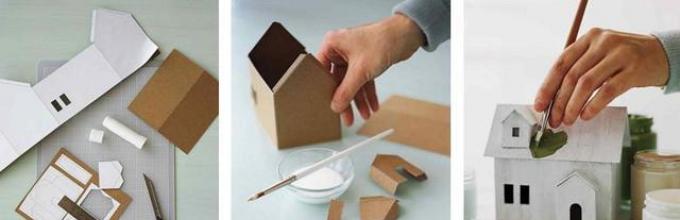
2. Cut out all the paper parts and glue them onto white cardboard with glue-stick or double-sided tape.
3. Cut out the parts from the carton. Cut out doors, windows, and other details with a stationery knife.

4. Fold all the elements along the fold lines and glue it all together.
5. If desired, you can apply a primer to the paper house so that it does not deform.
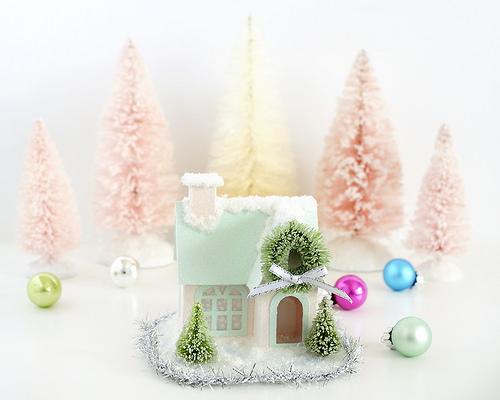
6. Paint your house and after the paint has dried, start decorating it.
The house can be hung on the Christmas tree with the help of a thread attached to the roof so that it hangs evenly, or you can simply put it on a flat surface so that it decorates the house.
DIY "House of paper tubes" do it yourself

You will need:
Thin paper (you can use regular printing)
Scissors
Pencil
Decorations.

1. Twist each sheet (or identical pieces of sheets) into a straw. It is better to use a pencil - it's easier to twist.
2. Draw on paper or cardboard windows and a door and cut.
3. Glue the tubes together as shown in the image (to make a hut).
4. Glue the windows and the door to the hut.
5. Decorate the house to taste.
Another option:


The house of Santa Claus with his own hands (master class)

You will need:
Carton box or
Scissors
Sandpaper
Stationery knife
Tassels
Polyurethane foam and gun (optional).
1. Prepare a cardboard box and make a house out of it. You will need to cut into pieces and glue them.
2. Cut the windows and the door with a stationery knife. You can draw them in advance simple pencil.

3. Paint the house or you can decorate it polyurethane foam. To do this, foam should be applied with strips so that each strip has a width of 1.5 cm. During drying, the foam will swell, so that it is better to leave 3-4 mm between the strips.
4. After you have covered the house with foam, leave it for 30 minutes to allow the foam to dry.


Making a stand for the house.
Cut a rectangle out of cardboard, which should be larger than the base of the house.
Glue the house to the stand and decorate the stand around the perimeter with foam.

* The use of foam is optional. To simulate snow, you can use cotton wool, which should be glued with white glue.
* It is also possible to cut snow slides, snowdrifts, a snowman or a Christmas tree from paper or white cardboard and glue them to the base, bending the bottom part and putting glue on it.

If you used foam, then after it dries, cut off the excess parts with a stationery knife and sandpaper.

Paint all the desired details.

A house of cardboard with their own hands: the home of the gnome

You will need:
Cardboard Cylinders of Toilet Paper
White paper
Colored paper
Black felt pen
Glue stick
Hot glue or PVA glue
Spangles of different colors (including white).
1. Cut one cardboard cylinder of toilet paper in half, and the second and third so that you have two long and two short pieces. So you will be at home of different sizes.

2. Cut the white paper into strips 15 cm long and 2-3 cm wide more than the height of the cylinder that will be wrapped with this stripe.

3. Cut out windows and doors from colored paper. Use the marker to draw the door handles, and the details of the windows.
4. Using glue-pencil stick windows and doors to white stripes.
5. Wrap the appropriate cylinders in strips and secure them with glue. Bend the excess paper inside the cylinder.

6. Make several cones of different colors out of colored paper, glue the ends of the cones, and glue the cones themselves with PVA glue to the cylinder-houses.
* You can add a little glue to each roof of the house and sprinkle glitter on it to imitate fallen snow.


Paper house with their own hands: New Year's paper village

You will need:
Corrugated cardboard (cardboard from ordinary packaging)
Stationery knife
Scissors
Ruler
Pencil
White acrylic paint and brush
LED festoon.

1. Prepare a cardboard and a pencil draw on it several houses connected to each other. You can use the ruler. You will have a small village. Cut the village out of cardboard.


2. Bend the cut part with an accordion along the lines that connect the houses. To make even folds, place the ruler on the fold line and fold the cardboard.


3. On the cardboard, draw and cut the Christmas tree. Circle the Christmas tree on another part of the cardboard and cut the second Christmas tree. Make a cut on one tree from the top to half, and on the other from the bottom to half and connect both parts to get a 3-D tree.


4. Apply white paint on the roofs of houses and Christmas trees to mimic the snow.
5. Put the village and the Christmas tree on a white cloth or felt and put the LED garland next to it.
House do it yourself (photo)

Paper or white cardboard on which you can print.
* You can draw a similar drawing yourself and cut it.
Scissors
Stationery knife
Glue stick
Candles on batteries.
1. Print and cut the drawing of the house. Cut windows and doors with a stationery knife.
2. To make the roof cut a rectangle measuring 15x9 cm. Bend in the middle.
3. Assemble and glue the house and glue the roof to it.
* You can make a few houses to make a small village.
* You can also cut the Christmas trees from green cardboard.
4. Put a candle with batteries inside the house.
* You can decorate the house to taste. Use markers, glitter with glue, cotton (snow), etc.
House out of the box with their own hands

You will need:
Box (for cereal, pasta, for example)
Ruler
Pencil
Scissors
PVA glue
Clothespin or masking tape (if necessary).

1. Open the box completely and place it on the table.

2. Draw a straight line 2.5 cm below the middle along the unfolded box.

3. Make cuts from the original fold lines of the box to the line you have drawn (see image). White dots indicate where to make cuts.

4. Cut off the parts of the box where the letter X is written.

5. Turn the box over and apply glue on a small bend (see image).

6. Fold the box inwards and secure with glue.


7. Bend the opposite narrow sides so that the roof is turned out. Each part must be bent in half (see image).

8. Cut the wide sides so that they can be glued to the part of the roof that was formed in step 7. You need to cut it with a margin so that this stock can be bent and glued.


With your own hands - in the material you will find templates and simple step by step instructions with photos.
Even super cool store toys never outweigh those made by caring mother's hands. In addition, it is possible to attract children to work - then it will be even more fun and creative! Make a dollhouse with your own hands from cardboard, and so that it does not empty, settle into it.
In order to make a toy house out of cardboard with your own hands, you will need:
- cardboard
- cotton fabric
- glue / glue gun
How to make a toy house out of cardboard for children with their own hands. Step by step instructions with photos
To get started, print or draw and cut out the details for the sample template. Two walls with a ledge under the roof, two walls - without, two parts for the roof and one door.


Then circle the details on the fabric. Leaving an allowance of 1-1.5 centimeters. Cut out the details. Cut corners as shown in photo.

Fold the fabric around the perimeter, glue it to the cardboard parts.

In order to make windows in a cardboard house, cut the fabric with the letter X where the windows are located on the cardboard part, wrap the resulting shreds inward and glue them.


When all the details of the cardboard house are fully ready, we glue them together, as shown in the photo.

What could be more interesting than how to make a house out of cardboard with your own hands, and give it the look that you like the most?
A cardboard house is a toy that every child can use. Someone will use it for role-playing games, someone - for the formulation of small scenes and plays. But without a cause, he just will not.
Before you make a house, from a cardboard you need to cut a blank, which has the appearance of two pairs of rectangles, above and below to which rectangles are attached. The pairs of main rectangles alternate: first, the rectangle is wider, then narrower, then wide and narrow again. At the first, wide rectangle, we make an additional narrow insert on the side. The joints of the rectangles are bent.

In the second wide rectangle we cut a window. Cut the cardboard into shutters.

We collect our workpiece, fix it with glue or adhesive tape. The upper inserts are still free, do not bend them inside.

Now we need. We take dry hollow sticks. Cut them into two parts. We will have logs that are very similar to real ones.

We lay out the walls of our house with logs.

It is necessary to paste over each wall, if possible, fixing the logs as close as possible to the corners.

Cut out of cardboard two identical rectangles and a pair of identical triangles. We get the details of the roof.

Glue these parts to the upper inserts above the house.

Before glueing rectangular fragments, we connect them together.

Then we take velvet long leaves.

We lay out the rectangular parts of the roof - like tiles or shingles.


We take a small bundle of straw.

Cut it into straws of different lengths, and lay them triangular part of the roof.

The edges are laid out from the sticks.

Our house takes the form of a forest hut!

On the edges of the shutters glue sticks.

And proceed to the decoration. You can, for example, hang Physalis on the roof - it will look like a real lantern.

We hang a bunch of leaves or herbs near the window.

Hut ready!


It remains only to find a suitable place for it. You can, for example, put such a house in the garden, on the veranda or between pots of flowers. Get a miniature forest.

That's all! We learned how to make a cardboard house for children not only interesting, but also unusual, giving it a resemblance to a forest hut or a hut.

House of cardboard - ideas with photos
This simple house is easy to glue together, focusing on the schematic drawings below.

Here is the scheme of the simplest house.

The dollhouse is a special dwelling in which children's favorites live. You can buy it at a toy store, but you can save money and make a house out of cardboard with your own hands with your child. It will be fun entertainment that will bring the joy of communication to both of you.
What is needed?
Make a fabulous house for a child is quite simple. One has only to stock up on imagination and patience. You will also need:
- sharp knife;
- glue;
- scotch;
- scissors;
- watercolor;
- tassel;
- colored paper and other finishing materials.
Drawings and photos will help you to make a beautiful dollhouse.
For dolls
Fairy-tale house can be made in several floors: you will need 2-3 boxes for this, but you can do without one. If there are no solid boxes in the house, use several adhesive sheets to join several cardboard sheets: the dollhouse will not be worse.
- Take the cardboard box. If it is not glued, fasten the edges well. It is better to do this with scotch tape, otherwise the fairytale house will be fragile, and it may fall apart during the game. Cut out the windows.
- Two separate sheets of cardboard fasten at a 45 degree angle. It will be a roof. Place it on top of the box.
- From individual sheets of cardboard cut partitions for rooms, which will contain a fabulous house.
- Place them inside the box.
- Now it is time to finish. It can be arbitrary: from fabric, colored paper, beads, patches or scraps. You can paste over a dollhouse for children with white paper, and then ask the child to paint it. He will surely take part in this venture with pleasure!
- As for the interior, here, too, do not skimp on the fantasy. After the next repair in the apartment there will always be pieces of wallpaper, fabrics, oilcloths. They can also be placed inside and pasted over a dollhouse.
Here so the children's fantastic small house on a photo can look.
And this is how the dollhouse looks from the inside:
Video instruction
Scheme
For babies
Sometimes children want not to play with dolls, but to climb into a small children's house and arrange their space in it. Give them that opportunity! Making a house with your own hands is also very simple. The difference will be only in size, so you have to look for a large box from under household appliances, for example, a refrigerator or a washing machine.
- Glue the sides of the box or tape them together.
- Use a stationery knife to make holes for entry and windows.
- In order to have more space in the house, you can remove the top of the box and attach an L-shaped roof in its place. Thanks to this technique, the kids will feel more spacious in the house.
- It now remains to do the finish. Children's house can be decorated with natural materials: twigs, bars, cones, etc. You can simply paste over the paper and paint.
An ideal mount for all items would be an adhesive tape or stapler. Glue - unreliable material: the children's house during the game may break.
This is what a children's house looks like in the photo. Agree, the scheme of crafts is very simple and hardly difficult for loving parents.
Wooden
On New Year
New Year's house for children will differ only in exterior decoration. The scheme of crafts will be the same. To make the product a fabulous, New Year's look, glue it with glitter, cotton, attach paper snowflakes.
Inside you can put a small artificial Christmas tree and dress it up, and Santa Claus with the Snow Maiden or a snowman can live in this house.
That's how it will look in the photo New Year's house for children.
How to make a playhouse for children from a cardboard box with their own hands? But not out of the shoe box, but out of the box, for example, from a washing machine so that children can get into it and play inside. We offer you a simple step-by-step instruction to the genius of how to make a house out of a cardboard box.
A large cardboard box of household appliances is an invaluable resource for games. There are hundreds of ideas for its use: from toy storage containers to. We already wrote what cool things you can. And today - a special workshop for especially large boxes. We will learn how to make a house out of the boxes with your own hands.
Children will definitely appreciate the gaming space that allows you to retire even in the middle of a noisy living room. Do not forget to knock on the door, if you decide to look for a visit.
How to make a house out of the boxes with their own hands
In order to make a gaming house out of a cardboard box, you will need:
- Large cardboard box.
- Stationery knife
- Hot glue gun
- Quick-drying acrylic paints.
Open the box and trim the sides of the top cover as shown in the figure. Cut off the lower part of the cover completely.

From the scraps of the cardboard box, form a roof for your house, and connect the parts with a glue gun.


First draw and then cut out the windows and the door with a sharp stationery knife.

Cardboard on the roof of the house will be laid under the tiles. Apply cardboard casings around windows and doors.

Make a hole in the roof and form an attic window. Secure the roof window with a wide tape.

Paint your house out of the box with quick-drying acrylic paints in two or three layers. If the child is quite small, it is better to pre-paste the cardboard slices with tape. so that the baby does not scratch.

If the cardboard is sufficiently dense, the house of the cardboard box can be supplied with real fittings: door handles, number plates, etc. Do not forget about the curtains on the windows for an even more cozy atmosphere in the house.


