
Hortensia - a magnificent bush with bright flowers in the form of large clusters. Many gardeners are breeding this type of garden plant and know that only strict adherence to the steps and rules will help to properly reproduce the hydrangea in the fall.
Timing
Optimally chosen time for transplanting hydrangea will allow the plant to quickly and easily take root. Each method has its own term:
- in early spring, reproduction is best done by dividing the maternal bush; this method is also used in the fall, but only if hydrangea is reliably protected from the winter cold;
- cuttings procedure carried out in mid-summer, in rare cases, it is possible in late autumn;
- march is suitable for planting seeds;
- deposits transplant hydrangea allowed in the fall and in the spring.
Propagation of hydrangeas is not an easy task, which requires a lot of effort and attention, but in return the plant will decorate the area with its beauty and aroma.
Methods of reproduction of hydrangea
Like many other garden plants, hydrangea can be propagated in the fall using several simple and accessible methods:
- planting seeds;
- grafting;
- division of the mother bush;
- layering;
- shoots.
Each of the methods of reproduction in the fall has its pros and cons. For example, if you plan to grow a plant from seed, you will have to spend a lot of time and ensure proper care. Moreover, it is not always that all the sown seeds germinate. Therefore, the popular breeding of hydrangea at home in the fall cuttings, layering or dividing the bush. These three methods are considered optimal and affordable even for beginners.

This method is considered the most effective and affordable. Using it, get a lot of seedlings from one mother plant. This method can be used at any time of the year.
The reproduction of hydrangea garden cuttings in the fall consists of the following stages:

If the cuttings of hydrangeas in the fall are carried out according to the rules, then in a few weeks strong roots will begin to grow. With this method you can not use young shrubs and thin shoots, as they often rot. The first two years in winter, hydrangeas are very vulnerable and may die. When the first frosts appear, they are protected by several layers: loose foliage, branches of coniferous trees and foil. When they begin to bloom, additional funds will not be required.
Reproduction of hydrangea in the fall by dividing the bush
This method is considered the easiest, so even a novice in this area can easily cope with the division. The process is best done in the spring, but if for some reason it is necessary to carry out reproduction in the fall, then each young plant should be covered for the winter, protecting it from frost.
Graduation of grafting:
- A large bush is dug and carefully examined so that there are no diseases or injuries on it.
- The plant is divided into several parts, on each of them leave buds, which will help to quickly give new shoots.
- Carefully cut the roots with a sharp knife, sprinkle the ends with charcoal. If not, then you can use a brilliant green solution.
- Compost, peat and mineral fertilizers are added to the wells before planting.
- The resulting cuttings are planted, watered and mulched with peat.
Important! The number of parts derived from hydrangea is limited by the number of buds on it.

In addition to the standard division of the roots in the autumn with the reproduction of hydrangeas, you can carry out the process without digging out a large shrub. It is enough just to take a pitchfork, make a tunnel 15 cm from the branches, tilt the flower and cut off a small part of the root system.
Reproduction of hydrangea by dividing is a good tool for the rejuvenation of old shrubs. The method is not recommended for hydrangea paniculata.
Reproduction of hydrangea in the fall layers
To carry out the reproduction of the shrub layings can be in late autumn. The procedure can begin only after the hydrangea has finished to bloom. It is better to combine this process with the preparation of hydrangeas for winter. It will take a little time, but by the spring several plants ready for rooting will appear from one branch.
Important! If reproduction of hydrangea with layering is planned, then it is better not to use lignified branches.
Phased reproduction by layering:
- to dig up the soil around the bush, but not too deep, so as not to harm the root system (15 cm depth is enough);
- level the ground well;
- around the bush make a groove of no more than 1.5 cm;
- put hydrangea slides in each furrow;
- each shoot is well pressed to the soil (to help you can take a hook or a wooden log);
- the top of a shoot not longer than 12 cm is left above the ground and preferably vertically;
- to sprinkle the shoot with earth, but not too thick, otherwise weak young shoots will not be able to break through to the sun;
- after 2–3 weeks, the first shoots will appear on the surface of the earth;
- after they grow to 10 cm, they are spud.
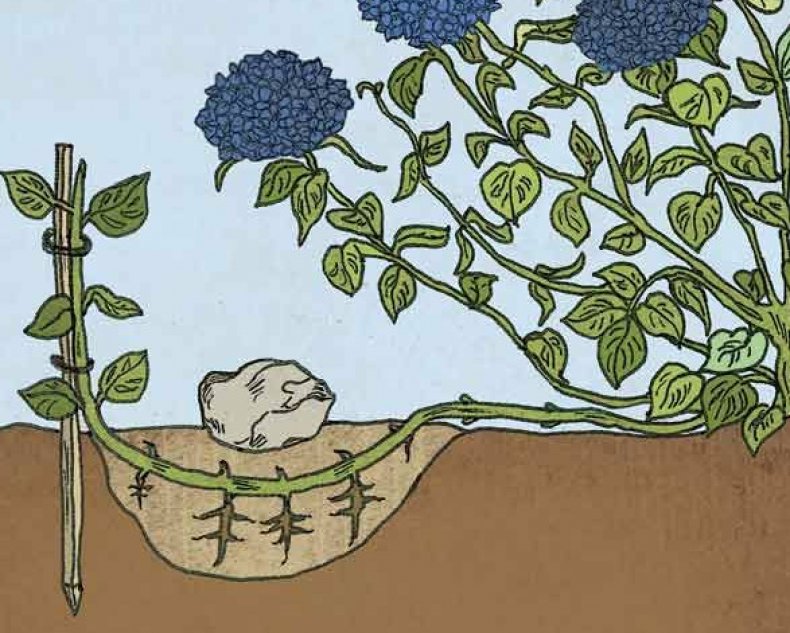
Be sure to maternal bush and grooves around it should be regularly watered. It is recommended to separate the layers and arrange them in the spring or the next year in the fall.
Important! For the roots to form faster, the lower part of the stem is thoroughly cleaned and notched in a circle. The surface is necessarily processed by a growth factor.
This method of reproduction of hydrangea is rarely used by gardeners. If you take care of her properly, there are not so many branches on the bush. But because of the simplicity of the run, it is great for beginners.
Reproduction peculiarities of different plant varieties
There are many types of hydrangeas, but more often gardeners prefer several of them, because they do not require special skills of cultivation and care. But breeding patterns may vary:

Important! It is more preferable to carry out paniculate hydrangea breeding closer to the autumn, since after winter most of the young, fragile shoots die.

Conclusion
The reproduction of hydrangea in the fall is a difficult process, so it is worthwhile to patiently and carefully follow all the steps. A year later, a new young plant blooms profusely. The main rule: regularly water the hydrangea, truck as it is afraid of drought.
Related records
No related posts.
Beautiful bright cause universal admiration for their lush inflorescences of various colors. Many gardeners want to breed this wonderful plant on their site.
Reproduction of hydrangea is carried out by cuttings, dividing the bush, layering, seed and grafting. The last two methods are very laborious and difficult for amateur gardeners. Reproduction by dividing the bush is inefficient, and the lack of reproduction by layering is a limited number of branches that can be bent. Therefore, the most effective and affordable method of propagation of garden hydrangea is propagation by cuttings.
Cultivation of hydrangea cuttings can be carried out in spring, summer or autumn. Autumn breeding involves the preservation of a young plant at home. The plant pot is placed on the windowsill in a bright and cool room. In spring, planting hydrangea cuttings is best done in early March. Still, the most favorable time for cutting hydrangea - the beginning of summer.
How to propagate hydrangea cuttings?
In order for the plant to stick well, you need to know how to properly cut the hydrangea. Experienced gardeners recommend cutting cuttings from a bush in the early morning or in cloudy, cool weather. Green cuttings about 10 cm long are cut from annual shoots, the lower leaves are removed, leaving a pair of upper leaves shortened by a third with several buds. Bottom-related cuttings from the bottom are treated with a growth stimulator, the upper section is disinfected with green paint and planted obliquely in pots with good soil containing a mixture of turf, peat and sand in a ratio of 1: 3: 4. The cutting is placed in a dug hole about 5 cm deep. Pre-soil is treated on a “steam bath” to destroy mold spores and bacteria spores. You can use the finished soil mixture intended for azaleas.
For the best rooting of cuttings, hydrangeas are sprayed several times a day with very fine sprays through a spray bottle, creating the effect of artificial fog. The sprouts are placed under glass jars, but they are ventilated every week. The process of airing should be short-lived to prevent the hydrangea leaves from drying out.
How to grow hydrangea from cuttings?
Within a month, the cuttings take root, and the shelter is removed. In areas with a milder climate, rooted cuttings in summer, too, are planted in moist loamy soil, where they begin to grow rapidly, acquiring a well-developed root system. In winter, sprouts are carefully closed. If winters are harsh, then the developing plant must be left in a pot, placing it in a cool room until the next spring, as the tender hydrangea can die.
It is necessary to cover a plant planted in open ground from frost for at least two winters until hydrangea blooms. Flowering is a sign that the hydrangea has adapted and has acquired a certain frost resistance. A more gentle type of plant - large-leaved hydrangea, needs annual shelter for the winter period.
Reproduction of hydrangea cuttings in water
Some gardeners practice the initial stage of growing hydrangeas (when cuttings are intensively rooted)  produce in water. For the formation of the root system to occur painlessly, water must contain a minimum amount of calcium salts. Usually the process of rooting takes 3-4 weeks. After the young roots reach a length of 2.5 - 3 cm, the shoots are transplanted into pots with soil. The further process of growing hydrangeas takes place in accordance with the already indicated algorithm.
Propagation by cuttings of hydrangea is a rather long and laborious process, but as a result you can get a lot of new beautiful plants!
Hortensia (or hydrangea) is one of the oldest plants on earth. Data from archaeological excavations in different parts of the world give every reason to say that hydrangea (or perhaps its distant ancestor) grew on Earth millions of years ago. And although its appearance is often associated with Japan, it was in America that the remains of hydrangeas, dating from 40 to 70 million years old, were found. By the way, it was from there that it was brought to Europe in the first half of the 17th century. According to the most reliable version, the name of the plant comes from the confluence of two distorted Greek words “hydro” (water) and “engion” (vessel for liquid; it is this form that the seed barrels of hydrangea has). That is, in the approximate translation, the name of the flower means "a vessel with water."
Hydrangea garden
In the world there are more than 80 natural species of hydrangea, which are mostly flower bushes. In addition to them, there are also cultivars cultivated by European gardeners on the basis of previously open. For example, the first natural variety with which they met in Europe was the hydrangea tree. In the XX century, on its basis, the Hydrangea Treelike Grandiflora was bred. There are also species bred on the basis of large-leaved hydrangea and paniculate hydrangea, the most popular species of today.
Not immediately, but the hydrangea attracted the attention of European gardeners - in particular, the ability to bloom for several months during those periods when most flowers fade, and the ability to hold on to the first serious frosts. It was decided to improve these characteristics, and the already mentioned varieties were born. Hydrangea is not difficult for growing and feels great both in the garden and in the indoor pot. In some countries - for example, in Belgium - from the middle of the 20th century there are family greenhouses specializing in the cultivation and reproduction of numerous varieties of this charming flower.
Both indoor and garden hydrangeas reproduce in five ways:
- seeds.
- green cuttings.
- layering.
- offspring.
- dividing the bush during transplantation.
All these methods are good and worthy of attention, but among gardeners, especially gardeners, it is considered that hydrangea reproduces best of all by cuttings.
Practice shows that it is most effective to engage in cuttings in the summer, in July, when the hydrangea buds begin to appear, but the buds are still preserved. Their presence is important because experts recommend cutting the cuttings with leaves that have one or more buds. For propagation, only cuttings of young plants are suitable, therefore, if cuttings take place on an old bush, then you should first “rejuvenate” it by conducting an appropriate pruning.
Cutting cuttings has several important nuances that are worth paying attention to:
- they, as well as subsequent cultivation, should be carried out in a shaded area of the garden.
- most suitable for rooting cuttings from lateral shoots located in the lighted lower part of the crown. They are good because they have relatively large buds and are not susceptible at first to diseases, which significantly increases their chances of successful reproduction.
- moisture should remain in the tissues of the cut shoots - it depends on whether the rooting process will be successful. To save it, you should cut them in the early morning.
- finally, when working, they should not be allowed to dry out. To do this, cut the shoots should be immediately put into the water and without delay to proceed with further cutting.

First you need to remove the green top with a bud, and the remaining divided into several parts so that each has two or three pairs of leaves. When this is done, the lower leaves can be removed, and the upper shortened by half and put the cuttings in the solution of the root stimulator so that the leaves do not fall into it. As a solution, you can choose any of the following - root, heteroauxin or zircon - but you need to do it in strict accordance with the instructions, and after making, wait two hours in a dark place. That is, it is reasonable to start cutting shoots and cuttings from hydrangea only after preparing the solution.
If it is not possible to purchase an industrial solution, you can prepare it yourself. The recipe is simple: one teaspoon of honey per glass of water. Honey stimulates the formation of root thickening (callus) at the end of the cutting, from which the root system then grows.
Together with the solution you should be prepared and pre-moistened the soil in the ratio of peat and sand as 2: 1. When all this is done, you can plant cuttings and cover them with banks. In dry weather, you should water them daily right on the banks - this is how not only moisturizing, but also refreshing is performed.
Uncovered cuttings are preferably sprayed twice a day.

The result of these efforts will be the rooting of the cuttings in about a month and the appearance of new leaflets on them from the very buds that you prudently left when cutting. When this happens, you can replace the jars with several layers of any material that can cover and protect young shoots from early autumn frosts. In the winter, slightly grown up hydrangea should be thoroughly covered with fallen leaves, then a low frame should be installed and covered with a material that can protect young shoots from frost. If there is a coniferous forest in your area, then you can put a lapnik tree on top.
In the spring, cuttings are transplanted to the bed for further growth. When they are old enough, they can be transplanted again - already on a permanent place, where they will delight your eye with its beauty.
In addition to the garden, hydrangea can be diluted in the fall at home. Do it like this:
- a stalk is cut in length of 12-15 cm. preferably from the escape on which there was no flower this year.
- leaves of two lower nodes are removed from it.
- large leaves are cut in half.
- the bottom of the cutting is dipped into the powder of the coater and then stuck to the depth of two internodes in a special disinfected soil, which is a mixture of wet loam with coarse sand. If there is no rooster, then it is not scary - you can stick without it.
- in one pot, it is permissible to seat no more than three cuttings.
- then the pot is placed in a clean transparent plastic bag, and three sticks-sticks are stuck into the ground so that the leaves do not touch the package walls. After that the package is tied. The purpose of such manipulations is to prevent the penetration of air into it and create a hot humid environment for the sprouts.
- after this, the growth tracking process begins. Once a week you should check the cuttings and the ground in a pot and remove the fallen leaves. The package should be opened only when watering, which should be carried out moderately, and for a short time, so that the newly formed leaves have time to air. Depending on the temperature in the room, the cuttings will sprout in two or three weeks. Then the package can be removed.
In winter, standing on the windowsill vases with growing plants can wrap old newspapers to avoid the formation of ice. In the spring, when the frosts end, you can carry the pots outside and, putting them in the shade, gradually accustom them to open air in rainy weather. When they grow and get stronger, they can be transplanted into the open ground. By autumn, seedlings should grow into bushes that can survive the winter. The first winter for young plants is a harsh test, and it depends on your thoroughness whether hydrangea can survive it.
As for the room hydrangea, the florists believe that, oddly enough, at home can be bred in winter, in January or February. Do it like this:
- for the beginning, cuttings from basal shoots are cut, but in such a way that on a segment of seven to eight centimeters there are up to three internodes.
- remove the lower leaves, and the upper divide, depending on their size: a third - if they are small; half - if large.
- the lower cut is processed by the root stimulator, and the cuttings are planted in peaty-sandy soil, where they are covered with banks to keep the temperature + 18-20 and humidity of 75-80%. Cuttings should be kept in the light and daily remove them from banks for airing. Watering should be regular, but moderately - the soil should not dry out. The cuttings take root in about three to four weeks, after which they are seated in pots with a diameter of 7-9 cm.
By the autumn, the cuttings will turn into multi-stem bushes from three to four shoots. If indoor hydrangea undergo cuttings in the spring, then by next winter you will receive a plant with only one stem.
As you can see, the reproduction of hydrangea is not particularly difficult - neither at home nor in the garden. The main thing that is required of you is attention and diligence, and she will repay you many times.
Choosing the best time to trim a hydrangea
Hydrangeas, blooming on the shoots of the current year, are cut shortly after wintering.It is believed that pruning hydrangeas should be done before the sap. But we, with an eye on further cutting, always cut off the bushes of hydrangeas with the start of sap flow. Because otherwise, the cuttings rooted extremely badly.
Therefore, as soon as we see in the spring that the hydrangeas have buds slightly swollen and acquired a “lively appearance,” we immediately begin cutting the bushes.
In this case, it is important and not to hurry, and not be late.
The cutting of hydrangeas in the time when the buds have already started to bloom, also leads to a low percentage of rooting cuttings.
Tree hydrangea is always first grafted - it wakes up faster after winter than paniculate hydrangea.
At the hydrangea tree we cut long shoots, leaving only 3-4 buds.
Cut the cuttings with two nodes from the cut branches. Directly under the lower kidney, we make an oblique cut, and above the upper kidney - a straight line, retreating from the kidney 2-3 cm.
Cut the cuttings of hydrangeas into a greenhouse-cutting machine, where a suitable peaty-sandy soil has already been prepared.
The lower kidney cuttings immersed in the ground to a depth of 3 cm.
Racks with transplanted cuttings of hydrangeas cover the "house" of polyethylene. Landing plentifully spill. Then daily we spray or water the cuttings, depending on the soil moisture.
Hydrangea paniculata we prune much less. In the bush of this type of last year's shoots need only pruned by a third.
From the cut branches of paniculate hydrangea, we cut the cuttings according to the technology described above, then we plant them in the same cutting.
Rooting of spring woody cuttings of hydrangea, of course, lower than the green summer. It is about 60-65%. However, this allows us to obtain high-quality varietal planting material of hydrangeas in sufficient quantities.
The resulting rooted bushes of tree and panicle hydrangea are planted in open ground. There they have time to grow up to the onset of autumn cold, and then successfully winter.
Hydrangea is grafted in spring and summer. But, to more accurately answer the question - you need to know the type of hydrangea. In general (without knowing the form) I can only answer approximately - cuttings in the spring, when you cut out the last year's extra shoots. And the best cuttings - in the summer (ideally - July, usually until mid-summer), or apical shoots, well-rooted part of any shoot with semi-woody cuttings. Under the plastic can until next spring.
Hydrangea propagates mainly with green cuttings, which are cut from the shoots of the current year, as well as winter cuttings, dividing the bush, layering, seed and grafting. But most often - spring or summer cuttings. Spring cuttings are taken in early June, and summer ones are cut in July, but before the lignification of the shoot. To do this, take the cuttings from the shoots of the current year (1). Cooked cuttings should have one interstitial, straight upper cut and lower oblique, and the leaves are shortened by half (2). The apical cuttings (3) rooted 5-10 days faster, and the bush from such cuttings is more compact. Preparing the apical cuttings, removing the growing point and shortening the leaves by half (4). The cuttings are placed in a fertile substrate with the top layer of sand in pots or in a greenhouse under the film (5). Rooting rate of cuttings is quite high - 70-80%, except for petistal hydrangea, which practically does not take root in this way. When treating cuttings with indolyl-butyric acid in a concentration of 0.01-0.005%, almost 100% rooting (6) is observed, the duration of which is 20-25 days. Rooted cuttings are planted on a bed in August or left to winter in pots in the basement, occasionally moistening the ground, and planted in the spring in the ground. In a greenhouse or on a garden, it is desirable to sustain young plants for two years, constantly pritenya them and moisturizing the soil. Flowers appearing on rooted cuttings, you need to pick off. Cuttings of garden forms of hydrangeas, grafted onto the roots of the main species, develop much faster than when rooting with green cuttings.
Personal experience: late in the fall, cut off a hydrangea bush and simply popped the cut cuttings into the ground, in my surprise they were alive in the spring and 5 of 10 survived further.
I usually spring when pruning old branches and inflorescences. I cut a couple of branches, divide it into cuttings and stick it in the ground. You can still dig up the extreme branches with the roots from a large bush. And plant. Usually, everything is well rooted without any chemical preparations. Sometimes I stick cuttings into the film greenhouse where the thread is with the edge.
Gardeners are often interested in how to multiply the hydrangea at home and what methods exist for this.
Such a flower can be found in the garden of every experienced gardener who is engaged in the cultivation of various plants. Naturally, if a decision is made to plant a hydrangea, it is easiest to purchase a ready seedling in the nursery. But, as practice shows, it is rather expensive, and finding the necessary variety is not always possible. It should be remembered that the process of breeding hydrangea itself is very exciting and interesting.
First of all, you need to know that the hydrangea can multiply using ordinary seeds, which are easy to buy at any garden store. This method is one of the simplest, since it suffices only to sow the planting material in the box for seedlings. He does not need any preplant preparation.
It is necessary to remember that the seeds in the soil should not be embedded, but it is necessary to cover the box with plastic wrap or ordinary glass. It is imperative to ensure that hydrangea grows in moist soil.
Literally 20 days after planting, the first shoots will appear. After that, for two years, seedlings are grown, and then they can be planted and moved to real land in the garden. Until then, the height of the seedlings should be about 30-40 cm.
If it is decided to use seeds for breeding, it is necessary to know that with their help only natural hydrangea can reproduce well. All other species that were artificially developed will lose all their unique decorative qualities. Therefore, in such cases, it is desirable to consider other options with which this plant multiplies.

Growing green cuttings
One of the most common ways of growing hydrangea is grafting, which is used by many experienced gardeners. This process can be carried out at any time of the year, but all conditions should be followed to ensure correct planting material.

Hortensia is better to graft when green buds appear on the plant. This time falls around mid-July. The first step is to prepare a stalk, which is a part of the stem without leaves with one or several buds. In order for it to get better, it is necessary to use young plants for breeding. If there are only old bushes in the garden, then the so-called rejuvenating circumcision is required in advance.
It is necessary to pay attention to the fact that the cuttings that are cut from the side shoots taken in the lower part of the crown will be much better rooted. It is these layers that allow the reproduction of hydrangea cuttings in the spring or in the summer, will allow you to grow a completely healthy plant. An equally important point is the need to preserve moisture in the tissues of the cutting as long as possible. That is what will further influence the process of its rooting.
For better preservation of the liquid, it is necessary to prepare the cuttings very early in the morning, when the tissues contain the maximum amount of moisture. After this, care must be taken to ensure that planting material does not dry out during the day. First of all, it is necessary to cut off the shoots and immediately put them into the water in a rather shaded place, and only then to cut the cuttings there. It is imperative to remove the bud and the green top, since it is impossible to propagate this plant with their help.

The part of the shoot that remained after pruning should be further divided into several parts, but in such a way that each of them has at least a few leaves. Then, the prepared cutting is placed in a special liquid, which is a root growth stimulator, and the leaves are not placed in the solution. In this form, the cuttings should stand in a dark place for no more than 2 hours. After that, you can safely plant them directly in open ground.
Cuttings in winter
In the event that it is necessary to reproduce hydrangea paniculate or large-leaved, then the process of grafting is desirable to carry out in the winter period. It should be in advance (back in October) to cut the seedlings and keep them in a fairly cool place until planting. To plant hydrangea cuttings in the winter, you need to take a number of actions, including the following:
- 1 In October, dig up a whole hydrangea bush from the ground, which will act as a uterine plant. It should be put in a pot and put in the basement.
- 2 Prepare an earthen mixture of components such as turf, humus, sand and peat in a ratio of 4: 2: 1: 1.
- 3 As soon as January comes, the plant should be moved to a cool place, but the main thing is to have enough bright light. In that case, if the temperature is about 10 ° C, then the shoots in a few days will begin to actively grow.
- 4 In February, all processes that have two internodes must be cut off the uterine hives. It is necessary to leave about 1 cm under the leaves and above them. The upper cut of the plant should be oblique, and the lower - straight. This is done in order to further not confuse the lower and upper parts in the process of landing.
- 5 At the same time, the upper leaves should be cut in half, and the lower leaves - completely. Then the upper cut should be treated with a small amount of green stuff, and the lower ones should be dipped into the root system growth stimulator.
- 6 To protect planting material from root rot, you need to put 1 Glyocladin tablet into the soil.
- 7 Then, the cuttings are planted in a pot of nutrient soil and without fail sprinkle ordinary river sand around the plant.
- 8 After this there is an active growth of cuttings. With the onset of spring, they need to gradually accustom to the street. To do this, it will be enough to systematically take the pot to the open air and in sunny and rainy weather.

When the leaves of the cuttings cease to curl, they can be safely planted in the garden, observing further rules of care. Subject to all the rules, cutting hydrangea will be crowned with success.
Layering and scions
Such a plant as hydrangea, can be propagated using layers and the so-called offspring. In the first case, the process is desirable to carry out in the spring, when the plant has not yet had time to bud.

First, you should dig up the soil around the bush and level it. Next, you need to make a small radial grooves, the depth of which should not exceed 1.5-2 cm. Then shoots from the lower part of the bush are laid in them. If the branches begin to straighten, they should be attached with special rods, and then again sprinkle a small amount of earth.
To obtain root suckers, you can use the following method. On the layers should be found the first kidney, which is below all. Before it make a special waist with soft wire. In the process of thickening the shoot, the material will begin to be pressed into the bark, after which the roots will arise. By the end of the summer season, a number of young roots will appear on each of the layers.
As soon as planting material reaches a height of 15-20 cm, it should be riddled. Then this process is carried out at least once a week. As soon as the height of the mound reaches approximately 20-25 cm, the hilling should be stopped. In October, the otvodki dig and separated from the parent bush. Then the seedlings need to be covered with earth again, and already with the onset of spring they can be planted on the garden bed. After 1 year they will be ready for planting in the garden for permanent residence.
Also, hydrangea reproduces quite well with the help of shoots. But in case of using this method it is necessary to be as careful and attentive as possible. In the autumn, it is necessary to remove the top layer of the earth and separate the shoots in a manner that does not harm the roots of the uterine bush. Separated shoots need to be planted in the ground and left there until full development. With proper care, this process can last for about 2 years.
When starting planting hydrangeas, it is advisable to follow simple tips:
- 1 Before planting the plant in open ground, it is necessary to apply various organic and mineral fertilizers to the soil in advance.
- 2 If you want the bush to be big enough, it is better to use seedlings, which are about 4-5 years old. In this case, planting should be carried out in the pit, whose width is 50-70 cm, and depth - 35-40 cm.
- 3 It is possible to plant a plant both in autumn and in spring, the main thing is that in this region there should not be enough harsh winters.
- 4 When planting hydrangea in the spring, it is necessary to shorten the roots slightly and always cut off all annual shoots. At the same time on each seedling should be at least a pair of buds. As soon as the plant is moved to the ground, it should be watered well, and then mixed with peat, the layer of which should be no more than 8 cm.
- 5 As an additional feed in the autumn, it is desirable to use complex mineral fertilizers. In the spring, urea will be an excellent option, which should be used at a rate of about 20 g per 1 bucket of liquid. At the same time for 1 bush will need about 2-3 buckets.
- 6 When applying slurry, care must be taken to ensure that there is no overabundance of organic matter, because the inflorescences can break off due to this. With a normal amount of fertilizer development of inflorescences will occur quite actively.
- 7 If the care will comply with all the rules, the hydrangea will have to bloom in the second or third year after planting. If this does not happen, it will be imperative to remove all unblown buds. Without regret, the so-called rejuvenating circumcision is carried out, which will help the bush to grow and flourish an order of magnitude faster.
To breed such a bright and beautiful plant as a hydrangea in your own garden, you can use one of the above methods. The effectiveness of each of them has been tested not by one generation of amateur flower growers, but the main thing is proper care of the plant in the process of its active growth. Taking into account all the basic advice of experienced professionals, it will be possible to grow in your own garden many shrubs of brightly blooming hydrangeas that will delight the owners of the site for a huge number of years not only with large buds, but also with a pleasant scent.


