
Probably every owner wants to create something in his garden. Therefore, today we decided to devote our article to the unique in its beauty and style. the labyrinthwho came to us in from old Europe. It was there, in the XVIII century, that the fashion for living labyrinths of dense and high plant walls arose. Notable guests as entertainment were divided into groups and were looking for a way out, thus solving original puzzles. Often under the cover of night in the secluded corners of the labyrinth, the gentlemen arranged a date for the ladies of their hearts, and in case of danger they hid unnoticed in a thick fence.Sadly, but with the advent of the XX century with its complex geometric forms are gone, and in landscape design, naturalness and simplicity began to be appreciated. But today, the fashion for the refined and complex beauty begins to revive, and with it the labyrinths return, but more modern and diverse.
What is a maze?
 If you refer to the encyclopedia, the labyrinth It is a section inside the park where the passages between dense sheared greens (for example, limes, hornbeams, laurels) are specially entangled. But the dictionary of symbols says that is a metaphor for a person's journey from birth to death. If you look from a technical point of view, the labyrinth is nothing more than a complex system of transitions and tracks that lead to a specific goal, namely to the center of the maze.It is interesting that labyrinths were depicted on the rocks by our ancestors, and such drawings were found all over the world. There is a theory that in this way the ancient people tried to entangle evil spirits and protect their dwellings from them. However, modern specialists are also confident that a well-executed labyrinth is able to correctly direct energy flows and with dignity to perform the function of a talisman. It is absolutely unimportant of what materials the labyrinth is made of, how huge and confusing it is, the most important thing here is the correct drawing.
The overall composition of the maze
 If you decide to makelabyrinth in his garden
, then, first of all, it is necessary to take a suitable place under it and decide on the area. It should be noted that the majority, and their height does not matter, look great from above. And this means that it would be very nice to see a labyrinth from a house window, for example, from the second floor. As for the general concept of the garden, the labyrinth can be placed near the recreation area or on the playground as a place for games and walks.The simplest form of the labyrinth is (you can make two interlocking spirals). In more complex forms of the maze, dead ends, multiple entrances and various paths to the center can be provided.The central platform of the labyrinth must be well thought out, because it is the goal of an intricate journey. It is possible to place a paved rest area with a table, benches, and pots in the center of the maze. Also, the center of the labyrinth can be: garden sculpture, pergola with climbing plants, flower bed, sundial, a small pool with a fountain, an interesting plant, for example, in a small maze you can put a bonsai tree on a stand.Let's now take a closer look at how you can make some of the types of labyrinths that are most common in.
If you decide to makelabyrinth in his garden
, then, first of all, it is necessary to take a suitable place under it and decide on the area. It should be noted that the majority, and their height does not matter, look great from above. And this means that it would be very nice to see a labyrinth from a house window, for example, from the second floor. As for the general concept of the garden, the labyrinth can be placed near the recreation area or on the playground as a place for games and walks.The simplest form of the labyrinth is (you can make two interlocking spirals). In more complex forms of the maze, dead ends, multiple entrances and various paths to the center can be provided.The central platform of the labyrinth must be well thought out, because it is the goal of an intricate journey. It is possible to place a paved rest area with a table, benches, and pots in the center of the maze. Also, the center of the labyrinth can be: garden sculpture, pergola with climbing plants, flower bed, sundial, a small pool with a fountain, an interesting plant, for example, in a small maze you can put a bonsai tree on a stand.Let's now take a closer look at how you can make some of the types of labyrinths that are most common in.
Labyrinth flowerbed
 The labyrinth of flowers is one of the most simple labyrinths in execution, for placement of which it is not necessary to give large areas of the garden. For labyrinth flowerbed
you need to pick up compact, not sprawling (spherical bushes or with erect stems), not prone to self-seeding. This is necessary so that the outlines of the labyrinth do not blur with time and it would not turn into a simple blurred spot. For example, for actively arranging the labyrinth flowerbed, such actively intersecting flowers as and poppy. But the excellent choice would be perennial and annual curb flowers: coleus, rose bordyarnaya, salviya sparkling, dwarf snapdragon, etc.
The color maze flower bed must be fairly homogeneous, otherwise its outlines will not have clear lines. However, if your labyrinth consists of several lines, for example, two interlocking spirals, they can be made contrasting with each other. The labyrinth of can be compact and intended for viewing only, and can be a place for walking, where the flower rows are combined with garden paths.
The labyrinth of flowers is one of the most simple labyrinths in execution, for placement of which it is not necessary to give large areas of the garden. For labyrinth flowerbed
you need to pick up compact, not sprawling (spherical bushes or with erect stems), not prone to self-seeding. This is necessary so that the outlines of the labyrinth do not blur with time and it would not turn into a simple blurred spot. For example, for actively arranging the labyrinth flowerbed, such actively intersecting flowers as and poppy. But the excellent choice would be perennial and annual curb flowers: coleus, rose bordyarnaya, salviya sparkling, dwarf snapdragon, etc.
The color maze flower bed must be fairly homogeneous, otherwise its outlines will not have clear lines. However, if your labyrinth consists of several lines, for example, two interlocking spirals, they can be made contrasting with each other. The labyrinth of can be compact and intended for viewing only, and can be a place for walking, where the flower rows are combined with garden paths. An interesting option is "Disappearing" flower labyrinth
located on, which appears only in spring, but renews annually. Such a labyrinth is made of onion flowers, which do not require annual digging: grouse, tulips, daffodils.
In order to make a similar maze with your own hands, you will need: a few meters, a long rope and a sufficient number of flower bulbs. Bookmark the labyrinth flower beds should be carried out in early autumn. To do this, with the help of a rope you need to lay a drawing of the future maze on the lawn. Then cut and remove the lawn turf along the contour so that the landing site with a depth of two bulbs is obtained. The standard width of the flower ribbon is 0.5 m, but maybe less - it all depends on the total area of \u200b\u200bthe labyrinth. Now you want to put the bulbs in the ground (preferably tight), then cover them with removed sod. The labyrinth is ready, but you will see its outlines only in spring, when the flowers will ascend.
An interesting option is "Disappearing" flower labyrinth
located on, which appears only in spring, but renews annually. Such a labyrinth is made of onion flowers, which do not require annual digging: grouse, tulips, daffodils.
In order to make a similar maze with your own hands, you will need: a few meters, a long rope and a sufficient number of flower bulbs. Bookmark the labyrinth flower beds should be carried out in early autumn. To do this, with the help of a rope you need to lay a drawing of the future maze on the lawn. Then cut and remove the lawn turf along the contour so that the landing site with a depth of two bulbs is obtained. The standard width of the flower ribbon is 0.5 m, but maybe less - it all depends on the total area of \u200b\u200bthe labyrinth. Now you want to put the bulbs in the ground (preferably tight), then cover them with removed sod. The labyrinth is ready, but you will see its outlines only in spring, when the flowers will ascend.
Hedge maze
 Hedge maze
, especially if it is taller than a man, is perhaps the most tempting, but also the most time-consuming option, which also requires constant and thorough care. In addition, the area for such a maze will require considerable - it is unlikely to be able to place such a miracle on the traditional six hundred square meters.But if the area of \u200b\u200byour garden still allows, and there is an opportunity and desire to care for, then such a labyrinth will be able to claim the title of a favorite place for walks and games. Especially since the maze of hedgerows with proper care for many years and even centuries, do not lose their attractiveness.In order to make a maze of you need a scheme that will need to chart on the ground, as a plan of landings. Usually such a fence is made one-sided and sheared several times a season, observing all the rules of topirian art.For the arrangement of the maze of hedge fit plants such as common privet, evergreen boxwood, fine-leaved elm, shiny cotoneaster, blood red and white turf, common laurel. For a good example, as the simplest time variant you can make from annuals. For such a purpose is well suited kohia Venikawhich height reaches 1 m. This plant creates green dense weight and remarkably gives in to a hairstyle and molding.
Hedge maze
, especially if it is taller than a man, is perhaps the most tempting, but also the most time-consuming option, which also requires constant and thorough care. In addition, the area for such a maze will require considerable - it is unlikely to be able to place such a miracle on the traditional six hundred square meters.But if the area of \u200b\u200byour garden still allows, and there is an opportunity and desire to care for, then such a labyrinth will be able to claim the title of a favorite place for walks and games. Especially since the maze of hedgerows with proper care for many years and even centuries, do not lose their attractiveness.In order to make a maze of you need a scheme that will need to chart on the ground, as a plan of landings. Usually such a fence is made one-sided and sheared several times a season, observing all the rules of topirian art.For the arrangement of the maze of hedge fit plants such as common privet, evergreen boxwood, fine-leaved elm, shiny cotoneaster, blood red and white turf, common laurel. For a good example, as the simplest time variant you can make from annuals. For such a purpose is well suited kohia Venikawhich height reaches 1 m. This plant creates green dense weight and remarkably gives in to a hairstyle and molding.
Stone labyrinth
 A very interesting option for landscape composition is stone labyrinth
, which, like the maze-flowerbed, can be a small overview or large-scale walking composition. To create a stone labyrinth, it is desirable to select rather large stones of approximately the same size, color and shape. You can lay a chain in one row or build a low clutch-side of them.By the way, such a labyrinth will decorate the garden not only in spring and summer, but also in winter: under the snow, the outlines look extremely impressive. A huge advantage of the stone labyrinth over many other species is that after construction is completed, it practically does not need to be cared for.However, it does not have to consist solely of stones, it can be fully revived with the help of vegetation. Especially good for this purpose suitable low alpine plants, young, sedums, etc. Moreover, the masonry can easily be turned into a flowering wall, planted between the stones.
A very interesting option for landscape composition is stone labyrinth
, which, like the maze-flowerbed, can be a small overview or large-scale walking composition. To create a stone labyrinth, it is desirable to select rather large stones of approximately the same size, color and shape. You can lay a chain in one row or build a low clutch-side of them.By the way, such a labyrinth will decorate the garden not only in spring and summer, but also in winter: under the snow, the outlines look extremely impressive. A huge advantage of the stone labyrinth over many other species is that after construction is completed, it practically does not need to be cared for.However, it does not have to consist solely of stones, it can be fully revived with the help of vegetation. Especially good for this purpose suitable low alpine plants, young, sedums, etc. Moreover, the masonry can easily be turned into a flowering wall, planted between the stones.
Fantasy maze
 Fantasy maze
- the most unpredictable of all types of labyrinths, because there are no laws here and the only limit is only the limit of your imagination. The fantasy labyrinth, unlike the traditional labyrinths, has no clear outlines, a pre-planned pattern and the main goal - the center. The main thing here is confusion, intersections and turns, the word must have a surprise effect when you do not know what awaits you around the next corner.A fantasy labyrinth can occupy the whole garden along with the approaches to the house, the seating area and. The basic idea is that small walkways should have frequent turns and even “loops”, so that, standing on one part of the maze, you could not see what was hiding on the other, literally a few meters away from you. To achieve this effect can be due to high plants, arches. Hedges in the fantasy maze do not mow, they are free
Fantasy maze
- the most unpredictable of all types of labyrinths, because there are no laws here and the only limit is only the limit of your imagination. The fantasy labyrinth, unlike the traditional labyrinths, has no clear outlines, a pre-planned pattern and the main goal - the center. The main thing here is confusion, intersections and turns, the word must have a surprise effect when you do not know what awaits you around the next corner.A fantasy labyrinth can occupy the whole garden along with the approaches to the house, the seating area and. The basic idea is that small walkways should have frequent turns and even “loops”, so that, standing on one part of the maze, you could not see what was hiding on the other, literally a few meters away from you. To achieve this effect can be due to high plants, arches. Hedges in the fantasy maze do not mow, they are free
 grow, overshadowing the next surprises.
Behind every turn you can expect something new: an unusual landscape composition, an elegant sculpture, a gazebo or a rest bench. But the most interesting thing is that a continuation of the fantasy labyrinth can be anything, even. Borders of cabbage or pergolas with a decorative pumpkin and curling beans may well line up along the paths here. As for vegetable beds, they can be made in the form of twisted spirals - this will emphasize their belonging to the maze.
But whichever option you choose, in any case the labyrinth will be one of the most spectacular elements and will certainly become the pride of the owner of the garden. And it reminds you that there is a way out of any, even the most complicated maze, and therefore even the most complicated dreams can come true.
See what unusual games you make out of scrap materials. They can take children in a campaign, in the country, at home.
How to make a giant domino yourself?
Often, urban residents are sorely lacking movement. You can fill this gap in the country by making unusual games. Dominoes are suitable for adults, but unusual.

To move such chips, have to work hard. But first you need to apply diligence to make dominoes. For it, you will use:
- boards;
- saw;
- dark stain;
- paint brush;
- white oil paint;
- circle pattern;
- grinding machine or sandpaper.

Now successively, letting each layer dry, apply two or three layers of stain.
When the last one dries, then we proceed to an interesting marking process. If you are not striving for a perfectly smooth shape, then you will be able to paint the separating strips with white paint with a brush. If you want them to be immaculate, then use a stencil. This item, but with a round hole, will help to apply other elements to the dominoes.
Draw circles on the figures, let them dry, then you can try out the game in action.

"Tic-tac-toe" for children
Sometimes the idea for entertainment can be found almost under your feet. See how to make the game “Tic-tac-toe” even more interesting by taking stones.

Here's what to use to make these unusual games:
- the board;
- saw;
- a sheet of paper or cardboard;
- stationery knife;
- ruler;
- white oil paint;
- stones;
- scotch;
- tassel.
Now put a layer of white paint on this template attached to the plank, let it dry, paint it a second time.
While the surface for the game dries, let's do the stones. First wash them well with a brush, and dry them. Then draw on some crosses, on others toes.

You can diversify this entertainment, if you color the stones in two species under insects. One player is given ladybugs, another is striped bugs. Wins the one who can quickly build their figures in a straight or diagonal line.

If you want to play Tic-Tac-Toe as soon as possible, but there is no suitable base, then you can use squares cut from cardboard or tiles.

Unusual games for children: master class
They can also be made from what is at hand.

For this you need:
- plastic bag with zipper;
- clear hair gel;
- sparkles;
- rubber figures of fish, algae or pieces of plastic.
- Use a transparent plastic bag, which sells pillows, other products. If you do not have one, you will need 2 strong packages that you put one into the other, seal the hole on top with tape.
- Pour a transparent gel into the prepared container, pour glitter there, shake it several times.
- If there are inhabitants of the deep sea from rubber or similar waterproof material, place it inside. If not, cut them out of thin plastic.
- It will be interesting for the child to practice with such a toy, but pour the solution up to the top so that it does not leak through the upper opening.
For it will need:
- plastic bag with a device for closing;
- colored electrical tape of different color;
- scissors;
- dry peas, beans or beans.
Crafts from disposable plates do it yourself
They will allow you to get attributes for games in just a few minutes. The balloon can be thrown to each other not only with hands, but with such interesting devices.

To create you will need:
- two plastic disposable plates;
- glue;
- 2 ice cream sticks;
- balloon for the game.
Disposable plates will quickly become attributes for daggers and crosses. For this, the corresponding characters are drawn on the reverse side with a marker. The field for the game you quickly make of the belts of clothing or tape. These elements need to be expanded parallel and perpendicular to each other at the same distance, sew up their intersection. After that, the original game is ready.

If you have a cardboard sleeve from disposable towels or other material, use it for the next entertainment. Also for him to cut the bottom of disposable plates, paint the remaining rims that the child will do with great pleasure.

Using adhesive tape, glue the sleeve on the inverted plate, it is better to attach the weighting agent on the reverse side. Now you need to throw rings at the base, thereby training your accuracy. As it can be used and sleeves from toilet paper. Having moved away for some distance, the child will throw rings from disposable tableware of a certain color here.

Look at the chic decorations for young ladies made from the same junk material. If you have disposable plates after the celebration of some event, do not throw away, wash them, dry. From their bottom you need to cut the bezel, and from the top: a heart, a leaf, ears, a star or another object.
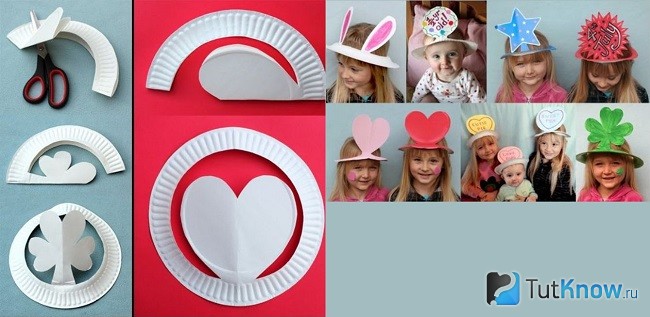
The schemes below will simplify your task, you can make such headdresses for girls who will certainly like these accessories.

But for the boys, you can choose the right model, using for this purpose not a plastic, but a cardboard disposable plate. If not, you can cut the hat out of regular cardboard, decorate it with a stylish sticker, which is also easy to make.
If the children decide to play princes or princesses, take:
- disposable paper plates;
- scissors;
- beads;
- glue;
- pencil;
- ruler.

If you need to quickly make a carnival mask, disposable plates will also help. Cut each in half, paint it in the desired color, paint such face details as mouth, ears, eyes. But the latter is better cut to be able to look through the mask. Wrap a wooden skewer with paper tape. Glue on one side of the mask.

Outdoor games for children in nature
They are also made from virtually nothing. For the next you need to take:
- empty cans;
- drill or nail with a hammer;
- rope;
- scissors or knife;
- 2 rattles;
- strong branch.
- Sharpen the ends of the spears, hammer them into the ground.
- Make two cans in the cans opposite each other. If you have a drill, drill them with this tool, if not, then put the jar on the block, put a nail on the inside, hit it several times with a hammer. Get a hole of the desired diameter.
- In these, push the rope, tie its ends.
- Hang the jars on the branch that you want to fasten at the ends of the rams as a horizontal bar.
- Children will throw small balls here. Let more points be for getting into banks that have a smaller diameter.
Such entertainment is well arranged on a hike, using the cans taken with you, opened with the help of a ring, so that their edges are not sharp. If there are no balls, take the crumpled pieces of the newspaper instead.
Such fun in nature can be made from empty plastic bottles. Put them in a loose cardboard box tightly to each other. Let the children throw rings on them, competing in accuracy.

For the next unusual game you will need:
- two plastic cans with handles;
- two types of colored electrical tape;
- little ball.

In plastic containers cut the bottom, if you wish, you can cover them with white acrylic paint. If not, then immediately attach strips of electrical tape to the bottom of the bottles. Moreover, one of them will close the sharp cut, framing it on both sides. Now children can throw a ball to each other and catch it with such interesting devices.
Here are some other fun in nature you can think of using cans.

Color them. Let the child build a pyramid of this material, and then the children will compete in accuracy, trying to get balls into such a container.
If you drill holes in this material, but closer to the bottom, pass a strong rope here, fix it well, then you can make such small stilts.

How to make a labyrinth with your own hands?
If the children are a little tired of moving games, then offer them a more relaxed, let the children rest. For the next you need to use:
- plastic or wooden tray with handles;
- wooden sticks or cocktail straws;
- glue;
- small balls.

Speaking about how to make a maze, it should be noted that it can be more voluminous.

Make such a strip of cardboard from the box. If you want to make a labyrinth for a hamster, then use thin plywood. The child will be delighted with another cardboard maze, which will help to create boxes.

Cut in some places rounded holes that the baby was able to pass. Connect the structure with scotch tape. Such an unusual game is waiting for a child, if parents show their imagination. Do not leave him here alone, because, not finding a way out, the child may panic. Therefore, stand nearby, direct it in a calm voice, encourage, praise and support.
Here's how to make a maze using cotton buds.

For this you will need:
- cotton buds;
- glue;
- cardboard sheet;
- color paper;
- little ball.
To make it easier for you to create a maze, look at the following two diagrams, where the options for the location of its obstacles.

Unusual race track for boys
Having shown ingenuity, parents will make a road for their favorite children in the country or directly at home. Consider first the street options.

To translate this idea, take:
- shovel;
- cement;
- sand;
- water;
- thin brush;
- white oil paint.
- First you need to make a markup of the future route, for this purpose outline the contour with a shovel, then using this tool, remove the turf to a depth of 7 cm
- Put some sand in here, moisten it. Pour the solution prepared from water, cement and sand from above. When it hardens completely, apply road markings with white oil paint.
- Even before this, when the cement grabbed a little, but remained pliable, you can lay small stones on the edge of the road. Secure half of the tire from the wheel in the form of a hinged bridge.
- Make a pedestrian crossing on the road, put signs to the child received the first skills that he will certainly come in handy in life.

They can be studied not only on the street, but also at home. See what a beautiful multi-tiered road will help create the remaining sleeves from toilet paper.

Some of them need to be cut in half lengthwise, inserted into whole elements, secured with scotch tape, thereby connecting the individual parts into a solid structure. A road is drawn with chalk on the floor, after which it is possible to produce cars so that they can sweep along this race track with a breeze.
If there is not enough space on the floor, you can make unusual games on this topic right on the wall. To do this, you need a magnetic road, then the cars will hold tight on it.

The next race track the child will appear, thanks to the mother. The parent needs to prepare:
- a piece of burlap or other dense flesh-colored fabric;
- a cut of black linen or a wide band of such color;
- white threads for embroidery.

Glue or strip the black stripes in the form of car lanes onto a rectangle of dense flesh-colored fabric. Previously, or at this stage, you need to embroider a dividing strip on them with white threads. The child will enjoy playing here.
If you need to quickly take the baby, come up with a new entertainment, then paste on the carpet an insulating tape of a contrasting color to turn it into a highway.

If you are not afraid to damage the sofa, then attach the tape not only to the floor, but also here. Get a two-tier race track.

- If you are resting with a child at sea, he is bored on the beach, first grab paint here.
- Find flat and bulky stones. Some of them need to be turned into a highway, others into cars, buses that will go on it.
- Paint the other stones with the child to make small houses of them, signs of movement.

So, from virtually nothing, you can create unusual games, thereby taking the child for a while. The main thing is to be smart or use the already proposed ideas. If you want to get acquainted with others, then watch the offered videos.
The first one tells how to make a funny toy that draws itself.
The second story tells how to quickly make an interesting game out of junk materials that even a child can create.
Arranging a cage for a hamster is a very exciting activity to which children can and should be attracted. In the hamster house should be all that your pet needs to maintain a rolling lifestyle. In this he will be helped by a labyrinth for a hamster, sold in love with the pet store. This attraction is made from different materials, the designs of different models are also different. But if the prices in the shops scared you, you can make a maze for a hamster with your own hands.
Labyrinth Types
Rodent tunnel can be straight or branched. Hamsters especially like when the space contains a lot of moves, dead ends and windows. If you put a treat in several rooms of the tunnel, then his search turns into an exciting game for Fuzzy.
The location of the following attractions distinguish:
- Internal. In this case, the pipes for hamsters are inside his permanent home - the cage. Houses for hamsters with a tunnel are convenient in that the animal can walk on them whenever it wants.
- External. Designed for playing with a pet outside the cage under the supervision of the owners.
The internal tunnels configuration is usually simple, because the size of the cell often do not allow you to create a room with many rooms and passages. But when you create an external tunnel, you can be creative, make a lot of dead ends, windows and corners.
What you need to make a maze for a hamster with your own hands?
Selection of materials for the attraction is a simple task. You can make tunnels for hamsters with your own hands from the following materials:
- cardboard and paper (old boxes, thick books, paper towel liners, etc.);
- plastic (beverage bottles, plumbing parts);
- wood.
To implement the idea you will need a variety of tools. Selection of working inventory depends on the selected material. A minimal amount of tools can be dispensed with when creating cardboard tunnels: you will need scissors and glue for paper, or paint or pencils if desired. If you make a plastic attraction, stock up with more and tape, it will help fasten parts and disguise plastic "burrs". It is hardest of all to make woodwork; you will need a lot of equipment: a hammer or glue, screwdrivers, screwdrivers, a saw or a jigsaw. But wooden structures will last a long time.
Making simple tunnels
Cage for a hamster must contain at least one small tunnel. And for games outside the home suitable complex designs of medium and large size. You can make a permanent entertainment room for your furry friend, or rebuild the attraction each time, changing its dimensions and direction of moves.
Children are showing great interest in creating entertainment for hamsters. We suggest you to study the instructions for creating simple tunnels that even a schoolboy will understand.
Paper tube for cell
The simplest option is to use a cardboard sleeve from paper towels as a building material. You can put it in a cage unchanged or make windows in the tube so that the animal will go out through them.
The tube of the sleeve can be installed in the outer cardboard maze.
Game room
Do your kids love to play with hamsters and watch them? Then give them an idea: make a tunnel for a hamster out of an unnecessary cardboard box. The kids will happily take up the business, connect the creative imagination and make the attraction with love.
There are lots of construction options. We will explain how to make a hamster maze in two different ways.
- The first method does not involve the use of glue. Take a box and pieces of cardboard: 3 strips should fit the length of the room, 5 - width. On long pieces at the same distance from each other, make 5 cuts, and cut the short parts three times. Cut the doors, the windows and the holes for the pipes between the cuts. Now you can collect our room. Install long partitions upwards with cuts, and insert short parts into them with a cut down. Get a grill. If you have pipes planned, insert them into the round cuts. Put the grid in the box - and you can start playing games right away!
- The second method is based on gluing the walls. It is good that you can create a variety of branches, as well as a rest room for a small creature. To glue the walls, use ordinary or building tape.
Important! The walls of the box must be high enough, otherwise a smart animal will jump over the edge and run away.
Labyrinth from the designer
Preschool children and schoolchildren like to build various castles and fortresses from the designer. Offer them to make a hamster attraction - they will happily complete this task. Moreover, children themselves know how to make a labyrinth for a hamster from the Lego designer interesting and convenient.
If you are building a walker for a dzungarika, small parts are better suited. For larger Syrian breed, use medium details. With the help of a small constructor inside the maze, you can build a small obstacle course for the animal, at the end of which you can put a tasty nut.
Book Fortress
Old hardcover books are suitable for creating a large spacious tunnel. To do this, they need to put the roots up. It is better to completely enclose the space with books so that the hamsters do not scatter in different directions. For one animal, the stroke can be made in the size of 5-8 cm (so that the animal can easily turn around in it), but if you have several Fuzzies, the tunnels should be more spacious.
In such a book fortress, kids love to make hamster races. Rodents are put in a common closed room, after which they open the “door” and observe which animal will be the first to reach the exit. It is important to ensure that the participants do not break the rules. If a cunning hamster climb over the wall, it must be returned.
The maze of books can also be used to teach animals. To do this, you should put small pieces of delicious food along the chosen path, repeat the operation several times with the same route. Then you should put the treat only at the exit. You will be surprised how quickly your smart hamster will find him!
Plumbing tunnel
If you have recently had a repair in the apartment and there are unnecessary parts for connecting pipes, use them to create an extensive maze! Such an attraction will suit both small Dzungar and larger Syrian and Caucasian hamsters. By the way, the tunnel from the plumbing looks very original. Another advantage is the collapsible design of the attraction, that is, you can periodically change the direction of the moves.
Making it is very simple: connect the parts in any direction. Hamster will be more interesting to play if the pipe will be several outputs. But in this case, do not leave Homa unattended, otherwise you will have to look for him throughout the apartment!
Master difficult rpg
Young children will not be able to make complex tunnels for hamsters on their own with their own hands; the help of adults will definitely be needed. But adolescent boys will cope with the task with a bang!
Plastic bottle tunnel
Plastic bottles of soda and juices are in every home. But not everyone knows that they can make a tunnel for a hamster. For this purpose, better suited capacity of 0.5 liters. If the rodent cage is the place where the tunnel will lie, then only 3-4 bottles will be needed. For external attraction quantity can be chosen by any. All bottles should first be removed from the labels and thoroughly washed so that they do not smell.
When building a bottle ride, follow the plan below:
- Cut the top and bottom to make a cylinder. A stationery knife is better for this purpose.
- On the bases of the cylinder will remain sharp burrs, about which the fuzzy can get hurt, so they must necessarily disguise. To do this, seal the sections with tape.
- In two cylinders of the same diameter, cut round holes. It is important that the size of the circle coincides with the diameter of the bottle that you attach to it. Wrap edges with tape.
- Now prepare the details that will fulfill the role of ramifications. One of the ends of the bottle must be compressed and cut corners at a slight angle. When you release the bottle, it will smooth out, and the cut will acquire two smooth grooves, thanks to which the part will fit tightly to the cylinder with a hole. We do the same with the second bottle. Don't forget to tape the edges!
- It is time to make 2 T-shaped connections. Place a bottle with a wavy edge against the hole in the cylinder, wrap the connection with tape, and then wrap the supporting part. In order to design was more durable, repeat this operation twice.
- Now fasten the T-shaped connections with each other with the same tape. Maze from the bottle ready for use!
Important! If you are going to build a long tunnel using this method, then branch off more often. It is necessary for air circulation.
Wooden maze
If you are patient and careful, have woodworking skills, try to make a tunnel for a hamster with your own hands from wood. Polished boards or plywood are suitable for this purpose. Such an attraction is safe for hamsters, they are happy to run on intricate moves.
A wooden tunnel can be made in large sizes to play with animals, arrange hamster races. If the space of the cell allows, set your pets a three-tier labyrinth of wood. Of course, you will have to work very hard, cutting out windows and ladders, but the pet will be pleased. When creating such a small attraction it is better to use a special glue for wood, not nails.
Now you know how to make a tunnel for a hamster with your own hands, using available materials that are always at hand. Having built a room with partitions for your touching fluffy, you can not only play with him, but also develop the intelligence of your pet.
Labyrinth is
- fascinating means of developing attention, perception, memory and thinking;
- wonderful opportunity to create spaces of children's parties, quests, travels;
- a great helper in increasing reading speed and other specific application points.
Let's plunge into the world of big and small labyrinths together.
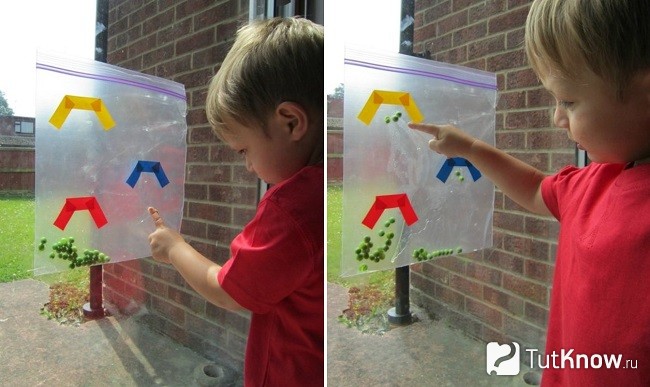
Little mazes
 From 1.5 years old, children can make small labyrinths of improvised means.
Children can walk on them with small toys, fingers (like feet) along the corridors of the maze, roll balls on them.
Or put in a labyrinth a light ball of cotton or a napkin and drive it through the maze with the help of air - blow it into a cocktail tube ..
Someone will maze in 1-2 minutes. He can carry away another child for 5, 10, 15 minutes. Both are good. As such, the plot here is not very important. At this age, children usually do actions for the sake of actions. Playing with a maze, kids learn attention and concentration.
Somewhere from 2.5 years children have a desire to build labyrinths on their own. Give children different constructors and natural materials for their labyrinth projects.

Labyrinths can be done from almost everything. Pick up the material that is currently like a child.
- Labyrinth of bricks (and other building material)

- Cocktail Tubes

- From Kuyzener's counting sticks


- Plasticine labyrinth

- Labyrinth of laces, belts, ropes

- You can also use chestnuts, cones, acorns, sticks and twigs, stones and beans. All that is at hand.
Playing with labyrinths, the child is aware of the very idea of \u200b\u200bthe labyrinth and its boundaries, which in the future will help him easily pass the labyrinths drawn, develops his creative potential.
Labyrinths can be built both by themselves and interweave them into a story game.
Playing or not playing depends on the particular child. There are children who like the process - just go through the maze, make it, sketch.
There are children who are important plot.
And then Princes can save the Princesses. Moomin troll to visit Snusmuriku, machine to call in the garage.

After 3.5 years you can already offer to build maze scheme.
Given the drawn scheme, and building material (bricks, counting sticks). Start with simple labyrinths, with right angles.

In the same period, it is possible to propose a reverse task - to draw diagrams of child-created labyrinths.
Such classes are a soft transition from visual-effective thinking to visual-figurative, and also build a path to an abstractly logical one.
Also at this age, it is already possible to suggest drawing labyrinths with a finger and / or a pencil (felt-tip pen, chalk).
To get started, choose simple labyrinths with smooth lines.

They are easier to pass with a finger and easier to lead with a pencil.
The drawn labyrinths, in addition to the development of attention and perception, help to hone fine motor skills. The child learns to draw smooth lines without going beyond the boundaries of the maze.
And another important point is that the child learns to move his eyes along a given trajectory, which is an important skill, when mastering reading.
Those. on the one hand, the child, while playing with a maze, hones logical thinking, on the other hand, he gains skills that will help him learn to read.
Therefore, after 5 years, offer your child to go through the maze first with his eyes, and only then with a pencil.
At the same age (provided that the child can already build a simple labyrinth according to the scheme and draw a diagram of the labyrinth built by him), you can add tasks for the development of memory.
They are simple.
You show the scheme, the child studies it for some time (from 30 seconds to 2 minutes, depending on the complexity). Then the scheme turns over, and the child builds a maze.
Start with very simple schemes.

And complicate as the child is ready.
The inverse problem is also possible.
The child looks at the finished labyrinth, then turns up and draws his scheme from memory.
These tasks are relevant for children from 5 to 12 years.
I also like to insert maze games into home quests and holidays. In one of the following newsletters, I will share ideas on the use of the labyrinth in encrypting messages and on holidays. Follow the newsletter!
In the meantime, continue and see what the "average maze."
Middle labyrinths
Not big, not small. Average.
Labyrinths for playing alone and in a team.
Roll in the maze machine from the entrance to the exit. Agree, understand each other. These labyrinths are relevant from 4 - 5 years and to infinity. They are a great continuation of any holiday and just yard games.
They can be made from improvised means, as in the photos below - cardboard and cocktail tubes

And it can be more serious, for reusable use. For example, from plywood and ropes or cardboard and plastic pipes. Below I will give a few photos from the network that will help you come up with and make your own unique maze for team games.


In this issue, you learned about a variety of flat mazes and variations of games with them.
And in the next issue of the "Labyrinth of Ideas" you will find a story about large labyrinths and games with them and with them, as well as ideas of three-dimensional labyrinths and labyrinths of spaces.
Stay with us!
You will need
- Plywood, woodworking tools, cladding material, sound component, wires, lighting lamps, toys and accessories.
Instruction
First you need to decide on how it will be yours. In the city it is rather difficult to do it, unless you have a bunk apartment. Best to create the labyrinthand a country house or cottage. Think about where you want to place your future the labyrinth. This may be the basement of your home. This will give your the labyrinthhave more mystery and mystery. You can also make a small the labyrinthin which your children will play. By placing it under the second floor, you can watch from above as your child tries to find the only correct way.
Let's say that you have chosen a place for the future. the labyrinthand a basement. now is the time to think about drawing. This is one of the most important parts of the building. the labyrinthbut. Labyrinths are of different types and different complexity. Best in the house the labyrinth rectangular or square shape. Such the labyrinth simple to build. Develop detailed the labyrinthbut on paper. You can take a ready-made scheme from any source, or you can use your own fantasy. Remember that the labyrinththere should be only one right way out. Also try not to do too complex ways. Still, this is a small entertainment for your guests, not torture. After making the sketch, make an accurate drawing with dimensions. The width should be sufficient for an adult to move quietly in it, but not so wide as to give the impression of an enclosed space.
Now that the detailed drawing is ready, you can proceed directly to the preparation of the room. It is necessary to completely clean it from unnecessary items. Also examine the floor, walls and for irregularities. They must be removed. Now you need to purchase material from which you will make the corridors of the future. the labyrinthbut. It is best to use thin sheets and plywood. They are easy to handle and do not take up much space. The material must be taken with a margin in case you ruin some of the blanks.
From the purchased material make blanks the labyrinthbut. There will be a lot of them, so you should collect them as they are made, starting from the far wall. It is recommended to fasten parts with screws. Make sure that the parts below are snug against the floor and there are no small cracks through which light can penetrate. When all the blanks are installed, you need to think about lighting. It all depends on your imagination. It is best to install small lamps in different parts. the labyrintha, but it should be done evenly so as not to highlight the correct way out.
After installing the lighting you need to take care of the external decoration. You can paint the walls the labyrinthand in some color or imitate the surface of oak boards. But it is best to sheathe the walls the labyrinthand with a cloth, for example, a material similar to velvet. Also think about accessories. Install stylized toys with a mysterious dull lighting. Bats with luminous eyes will look beautiful. You can also hang portraits of magicians or sorcerers, slightly highlighting them. It will be very realistic if you add sound to all. To do this, install several


