When the furniture loses its former gloss and attractive appearance, it is customary to get rid of it. But if you replace the table or chair easily, then with a cupboard is not so simple. After all, this furniture is often someone's gift, inheritance, or just a huge, scary, but extremely useful in everyday life subject, which really do not want to leave. What to do in such a situation when the old cabinet is tired, and you don’t want to buy or do a new one at all? The only answer is to repaint the furniture yourself.
In fact, it is much easier to paint a wardrobe than it might seem at first glance. Especially if you use aerosol cans. Indeed, in this case, no rollers, solvents, or brushes will be needed. The repair kit will only include sandpaper, masking tape, polyethylene (or old newspapers) and. How to apply all this? It is very simple: using abrasives, the surface will be prepared for painting, masking tape and polyethylene will help cover those places where paint should not fall, and aerosol cans themselves will become the main tool when painting the cabinet.

Important point: Surfaces coated with varnish are subject to mandatory sandpaper. It is also highly desirable to apply a primer to the surface before painting and wait until it is completely dry. Before using aerosol cans, shake them well for a few minutes. And the very same spraying should be carried out in several thin layers from a distance of 30 cm.

If you decide to paint the cabinet, then do not be afraid to use bright colors, use stencils, unusual color combinations, and make drawings. Unleash your imagination! And you can stock up on a huge portion of creative with the help of a special, thematic collection of photos from the company Rusavtolak.
![]()


It is easy to paint the wardrobe in the nursery - just select the most vivid colors and diversify the doors with additional elements.

Classic Soviet slide can be easily turned into a very curious element of the interior.

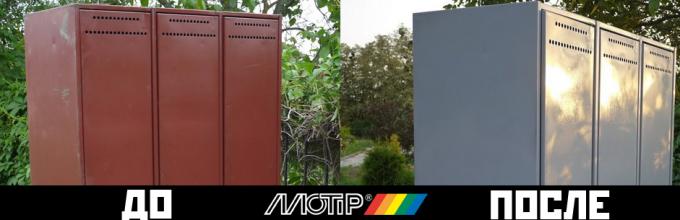
Fully painted such an extremely widespread wardrobe is a matter of a few hours.

How much a regular wardrobe changes, you only need to repaint it qualitatively and remove the doors

It is extremely easy to draw such stripes - for this you need to stick the masking tape exactly and press it hard. After spraying the paint it can be easily removed and get this effect.

If you are going to paint your closet again, then we should not forget about the new hinges for its doors.

If you always received marks "excellent" in the drawing lessons, then you can paint the cabinet with the help of original drawings.

The back wall of the cabinet can be varied with ordinary colored and patterned oilcloths.

To paint the cabinet like this is an extremely difficult task. But the result is worth it!

Strokes can be made with a usual marker with a thick pen, and then sprayed over with a protective colorless varnish. Or use an aerosol can, pre-covering nearby surfaces.

Nothing complicated, but it looks very cool and fresh!

An excellent example of this "girly" work. Why not?

On sale never to meet the furniture of such bold colors. But to make it so - a couple of trivia.
Want to paint your closet also? This will help you ordinary home gauze!

Extremely simple work. But minimalism is just in fashion now!

We should not forget that aerosol paints come with various special effects. For example, a coating with a craquelure effect will look like this.
Not a bad job, but you could choose a different fastener for the doors.

In order to paint the cabinet like this, only a few spray paint cylinders are required.

The locker left from the old slide can be easily turned into a cute and independent element of the interior.

Extremely successful painting, which is ideal for the design of the room

It is much easier to paint the cabinet in such a nice color and put patterns in mind of the lizards than it seems. Just try it!

You can paint (and need!) Even new furniture, if for some reason you have ceased to like it.

Sometimes, for the resuscitation of furniture, it is enough to just “spray it” slightly with paint ...

... or wash, clean and re-varnish.

Want to paint a vintage style wardrobe? Not a problem - after drying the paint, carefully remove the coating from the corners and protruding surfaces.

If you repaint the cabinet in a different color, then it begins to look and feel completely different. Checked!
In any home wardrobe occupies a very important place. It is a pity that over time it loses its original appearance: the appearance of cracks, dull paint makes it unattractive, it goes out of fashion and looks irrelevant. We have to think about its future.
There are at least two ways out of this situation:
- buying new furniture;
- update the old cabinet.


With your own hands, you can give a new life to the chiffère, turn it into a unique object, while saving significant funds.
How to restore?
Any antique wardrobe requires a small restoration, which will significantly improve the appearance.
You can restore the chiffonier yourself if you use the advice of experts:
- A metal brush is applied to the treatment of decayed wood, after which dead tissue is removed.
- The fine dust formed in the process is washed off under the tap.
- Sometimes in the wooden elements of the cabinet there are holes from studs, some irregularities and cracks. All this must be cleaned with a spatula. It is necessary to apply several thin layers of putty to match the wood. Each layer should dry before applying the next.
- Then dried in fresh air all layers for 1-2 days. You can not dry a tree in the sun.
- Sometimes there are metal parts in the furniture, which eventually became rusty, such places should be treated with a special solution.
- Then the restored surface can be painted or decorated at your discretion.
- Perfectly suitable self-adhesive film, imitating wood, stone, metal.

How to paint?
A wardrobe that went out of fashion, but still quite strong and will last more than one year, you can just repaint. In this simple way, a new design of cabinets, dressers and any other old furniture is created. In this case, it is not only about giving freshness to faded surfaces, but also about a complete replacement of the color solution, which will add originality to the product. Painting - the most common version of the update old stuff. Despite its simplicity, it is necessary to approach this process correctly. For a durable result, you must first prepare the furniture walls.


Below is a step by step master class.
It will help to produce high-quality and competent painting at home:
- it is important to pre-clean the surface of paint residues: one layer will easily remove the emery-blade disc; several layers will be treated with special brushes as a nozzle;
- all walls, doors and other parts must be sanded manually or with a tool;
- leveling occurs by applying a primer or putty to hide defects caused by many years of use;
- it is necessary to wait until the leveling layer is completely dry, and after that you can start painting;


- for applying a painting layer from all sides take a brush, roller or sponge, however, it is faster to use a spray gun or a spray gun. With this method, the paint is applied under pressure, so the doors, shelves and walls inside the cabinet are well painted;
- as a rule, several layers of paint are applied. It provides rich color and good surface preservation. It is better to paint the cabinet with acrylic, alkyd enamel or other high-quality paint;
- paint should be allowed to dry completely, after which you can apply a layer of varnish. It makes the cabinet glossy and shiny. If you prefer a matte surface, you can refuse varnishing. However, the use of this coating has a protective function, prevents abrasion and gives the tone greater depth. You can use not only glossy, but also matte and silky topcoat.


Decor
If you decide to leave and decorate your own old wardrobe, it is possible to decorate it in different ways. There are many techniques that are used for decoration.
Decorative plaster
This is a rather complicated decoration option. First, the product is covered with old paint, necessarily treated with sandpaper. According to the stencil, it is necessary to apply volume elements to the cabinet facades with decorative plaster. The stencil itself must be removed before the plaster dries. Then the uneven parts are smoothed with a spatula. Finished decorative elements are lacquered or painted, gilding or antique patina is possible.


Photo printing
The sliding wardrobe or just the old wardrobe is very updated with photos or photo wallpaper. Any pictures are enlarged using wide format printing in a print shop. The surface is decorated with a panel or a collage of photographs, most often it is wardrobes with flat doors. However, the service of such printing is expensive, so often use the budget option - wallpaper, which are sold in any repair shop. Choose the most different themes - nature, beautiful cities, animals and a lot more. If you use a glue based on starch, in the future you can change the annoying pattern.


Stained Glass Film
You can decorate an outdated piece of furniture yourself without possessing special skills. Very simply, the stained glass film fashionable this season is stuck on the glass door of the cabinet. This will add the presentability of old furniture. In addition to the decorative function, the film keeps the glass from impact and scratches. It is very easy to remove the film, and such a decorative technique looks very impressive, because imitation is as close as possible to a real stained glass window.


New hardware
In the process of decorating there are no trifles. Every designer knows that 40% of the success of any interior is parts and accessories. In this case, you can transform the cabinet beyond recognition by changing all the accessories on it. New pens - this is important.


It is a pity if you have to throw away the old, but high-quality furniture, especially wooden. But such products can be updated and used more than one year. In order to choose the right decoration method, it is important to consider the material and the degree of wear of the old cabinet.
Natural wood
Previously, wooden furniture made very high quality. Before upgrading, remove dust with a dry cloth. Then check the hardware, and if it is broken, it must be repaired or replaced. Inside the cabinet it would be good to carry out the treatment with an antibacterial agent, a more budgetary option - simple vinegar. He will destroy the unpleasant smell.


Then the choice of the method of decoration is made
- Toning.First, all surfaces are aligned with wood filler, matched to the tone of the cabinet. After the layer dries, uneven spots are ground with sandpaper. Processed and flat surfaces are treated with a special structuring tint for wood. Choose a decorative tinted color darker than the original shade of the cabinet. Such processing will completely transform the appearance of the product.
- AgingFurniture made of natural wood can be “aged”. The effect of worn under the old cabinet surface is achieved as follows: the light tone of the tree is painted in any dark shade, depending on the color palette of the room. Then, after complete drying of the paint, it is necessary to rub a few fragments with a candle, after which light paint is applied, for example, beige, white, cream. When after the second painted layer is rubbed with sandpaper, rubbing will be visible through some bright spots. which is darker. When decorating a dark closet, make craquelure. To do this, put a craquelure varnish on the surface. After it dries, small cracks are formed, which are highlighted with the help of dry pigment or oil paint of the desired shade.
 Toning
 Aging
Aging
- The painting. This option provides for pre-staining furniture paint light shade. After drying, the facades of the cabinet are painted with acrylic paints. If you do not have the skills of drawing and painting, you can paint the closet on the stencil.


Chipboard
If the cabinet is in good condition, it will be possible to use the same decoration options used in the design of wooden products, excluding tinting. The cabinet in poor condition involves the replacement of doors.
- Dark polished. In our country, the iconic model of such a cabinet was extremely common. The decor of this product is very complicated in terms of modernization, since the synthetic dark varnish used previously for polishing furniture is almost impossible to remove. In addition, other decorative materials on it do not hold. Here you need to make a willful decision and replace all the doors, if they are in poor condition. A well-preserved cupboard can be redone in one of two ways:

- Tupovka - toning using a sponge. For applying take a golden or copper metallic paint, which falls even on such a polish. The application technique is different in that in some places the ink layer is filled with a sponge up and down. Then the perimeter of the door is decorated with glued PVC stucco. In the central part of each door is stuck outlet of stucco, similar to the design of the perimeter.
- Stencil ornament.For the application of such an ornament is also used gold or copper paint, but in an aerosol bubble. At first it is pasted on the closet door of the stencil in the form of an ornament. After that, the stencil is the basis for the paint with an aerosol matt varnish, which acts as a primer. After 5 minutes, a tinted aerosol is applied. After a five-minute wait, you can remove the stencil.
 stencil ornament
 dull
dull
Sometimes the original idea of \u200b\u200bupdating old things leads to the emergence of a new one. A large number of diverse and unexpected techniques are recommended by designers. Among them:
- The decor is lace.In itself, lace or lace fabric is unique and does not cause any doubts in aesthetic value. It is no coincidence that for him there is always a mass of applications in the field of decor, including furniture. Exclusive furniture design with your own hands is easy to do using it. You will need lace and paint. You attach a lace canvas to the facade in the right place and draw a brush with paint over it. Then the lace is removed and a beautiful lace pattern remains on the facade.


- Decoupage Perhaps the most amazing effect is given by the decoupage technique. The wardrobe is decorated with napkins, which have a suitable pattern on their surface, they can always be found in any hardware store. The drawing is cut, layered and then pasted with a special glue for decoupage. The surface with the pasted drawings must be covered with furniture lacquer. As a rule, it is applied in two layers. This decor looks especially good on a light background. The cabinet, which was originally dark, must first be painted before decorating.

Sometimes it is not necessary to throw out the old cabinet. If the owner has a taste, then the subject can be given a new life. And what content with themselves gives the furniture, renovated with their own hands! So that it really becomes a matter of pride, you should carefully study how to paint the furniture from particleboard at home. This knowledge will help inexpensively refresh the look of the table, bedside tables, walls for the living room, bed, dresser or stool. The tips of this article are universal for any chipboard items.
Chipboard - a material that perfectly replaces wood. Knowledge of its properties will help clarify how to paint furniture from chipboard. So, here they are:
- Strength - when external forces act on a particle board, tension arises inside it, counteracting the destruction process. The limit of this property under tension is up to 0.5 MPa, and when bending it is up to 25 MPa. The strength of the material is due to the homogeneity of its structure;
- Ease of processing - despite the substantial density, chipboard is excellent for cutting, milling, grinding, gluing and painting;
- Moisture content - even after drying, chipboard retains an average of 8% moisture. So the correct color is able to isolate moisture and prolong the life of the plates;
- Moisture resistance - it is at the slabs just below the woody one, but high-quality slabs can safely carry the humid air of the bathrooms. This quality also depends on the material they are lined with. The best indicators of moisture resistance in plastic coated chipboard;
- Fire resistance - chipboards are able to restrain the spread of fire and retain basic qualities in case of fire. To improve the fire resistance of this material is impregnated with compounds containing flame retardants. A good non-flammable paint can also enhance this property of the material.


How to choose paintwork materials
Chipboard is excellent “friendly” with acrylic and latex paints, as well as with alkyd enamels.
Acrylic paints have significant advantages:
- Non-toxic, they can be applied directly in the apartment;
- The basis of the acrylic composition is water, so it can be diluted to the desired consistency;
- Convenience: inaccurate smears of such paint can be removed with a wet cloth;
- Fast drying. The thin layers dry out after a few minutes, and the thick ones after two hours;
- A rich palette of rich, bright colors;
- The coating is water permeable and vapor proof. Its color does not tarnish and does not fade under the rays of the sun.
Well-proven acrylic paints are called Olimp, Helle, Triora, Parade and Ceresit. Latex paints are water-dispersive enamels. They are good because they do not contain harmful substances and create a durable, wear-resistant layer on furniture. Minus latex formulations - the inability to resist microorganisms. In wet rooms, mold forms on the painted surface. The most popular latex paints - KABE, DALI, Sniezka.
Alkyd enamels are resistant to moisture, and therefore they can be used for the kitchen and bathroom. Their disadvantage - the content in its composition of toxic organic solvent. Apply this paint with caution. Alkyd materials lie flat, do not create lumens and dry quickly. It is best to paint furniture from chipboard with Tikkurila Miranol paint.
As for the choice of paint color, then you need to be guided by the requirements of the style of the interior. To give the furniture the effect of natural wood, you can use lacquer with a warm shade.
For the restoration of the surface of chipboard suitable for any of the above means, but in the name of their own safety should be avoided compounds with lead.

Acrylic

Alkyd
Required tools
For the process of furniture restoration, except paintwork materials, you will need:
- Rubber gloves;
- Grinding skin (sandpaper);
- Solvent to remove the old coating;
- Degreaser-detergent;
- Flannel rags;
- Scotch building;
- Glue;
- Acrylic putty;
- Acrylic primer.
The last 2 materials are needed to prepare surfaces for painting. The priming, which works according to the principle of adhesion, creates a reliable basis for the subsequent process. Construction scotch helps when using several colors in dyeing. It prevents accidental mixing. With this "helper" you can even draw ornaments or geometric shapes.
Basic tools:
- Brushes and rollers;
- Putty knife;
- Screwdrivers;
- Knives;
- Hairdryer construction.
It is convenient to paint the furniture with spray cans. In this case, it is not necessary to use a pallet, rollers and brushes. The painted object is better to enclose with a film like an awning.
It is important to purchase high-quality brushes, otherwise hairs that fall out will spoil the work, remaining on the painted surface. For primer need thin roller. It also needs to be carefully checked. The quality tool has a firmly fixed foam and a stable handle. In addition, you will need newspapers, plastic bags and cardboard - bedding to maintain cleanliness in the work area.

Main processes
No matter how “itching your hands” would rather begin the wonderful process of transformation, you cannot immediately grab the hand. Otherwise, the new paint will quickly peel off. It is necessary to approach to painting furniture from a chipboard thoroughly and, like all significant projects, to divide this business into stages. The more carefully selected, the better the end result will be.
Before you repaint the furniture, you need to carry out the preparatory work. It is more comfortable to carry out any processing of furniture if you pre-disassemble an object into parts. Therefore, it is first necessary to dismantle all fittings (handles, rollers, corners), then remove the doors (at the cabinet), remove the drawers (at the dresser), remove the legs (at the table). The object to be painted should be disassembled as much as possible. Metal parts can also be updated. To do this, they need to hold for 24 hours in white vinegar. Substance dissolves rust. After that, the fittings can be repainted with anti-corrosion paint Zinga.
A. Removal of obsolete coverage
Removing the old coating - painstaking, slow work and the most difficult stage of furniture restoration. There are two ways to do this:
- Heat - it uses a building dryer to heat the old coating until it melts. The softened paint and varnish are easily removed with a spatula. Instead of a hair dryer, you can use a burner or iron through the foil. This method is especially good for old paint. When heated, it forms bubbles and is easier to remove. It is also ideal for the floor, because after removing the old layer it can be painted immediately, without waiting for drying, which reduces repair time;
- Chemical (most effective) - special reagents are used here. They dissolve the resin contained in the paint, and it is removed with a scraper. Funds are divided into volatile organic solvents and washes. The latter are pasty or liquid substances based on acids, alkalis or organic solvents.

Thermal

Chemical
The action algorithm for chemical paint stripping is as follows:
- Means is applied on a long-painted surface with a roller or a nylon brush in one direction;
- It is aged on the coating for a certain time specified in the annotation for the wash;
- The softened coating is removed with a stainless steel brush;
- The procedure is repeated if the coating consists of several layers.
After removing the paint requires sanding the surface with sandpaper. It gives smoothness that will facilitate the subsequent painting. Disposal of old layers should be completed by degreasing the surface with detergent.

Apply the wash

We remove the spatula

Rubbed with sandpaper
B. Primer and sanding
After the furniture dries, you need to check it for signs of accidental mechanical damage. If any, it is advisable to seal them with a special mixture. It is easy to prepare: you need to mix the PVA glue with fine wood chips. Hard putty for chipboard is also suitable for smoothing irregularities. Next, you need to wait until the putty hardens, and again sand the surface, first with coarse-grained and then fine-grained sanding paper. At the same time, movements should be sweeping, and it is necessary to move along chipboard fibers. Dust should be brushed off with a flat brush.
This is followed by a primer. This process provides excellent adhesion (adhesion) of dissimilar layers, ensures a uniform distribution of paint over the entire surface and reduces its consumption by three times. To avoid rotting of the material in the primer, you can add a hydrophobic additive. It will prevent the appearance of fungus, mold and permanently preserve the appearance of the restored product.
The primer should be applied with a roller or brush, trying to completely soak the treated surface. Its one layer is quite enough. At the same time, the air temperature in the room should be more than 5 ° C. The soil layer on the surface of the product is completely dry in a day. Then you can start painting.

Putty putty

We treat sandpaper

Apply primer
B. Painting technology
It is advisable to put the workpiece horizontally. This will eliminate the possibility of leakage. Vertically located objects are recommended to be painted from top to bottom. Only unidirectional brush or roller strokes will result in a smooth finish. If the paint is aerosol, then before starting it is necessary to shake the balloon for half a minute. It is better to apply paint from a distance of 23 centimeters.
First apply the background layer. After it dries, after 30 minutes, the next one lies on it. There should be three layers. Hard-to-reach places (internal corners, joints, protuberances, concavities) are best handled by a radiator brush having a curved handle. Paints (especially acrylic) inevitably fade over time. Three layers of topcoat varnish will be an excellent protection against this. The varnish should be applied with a sponge, according to the “stamp” principle, but not “smearing”.
Laminate paint can also be. For painting such material the following sequence of steps is used:
- Dirt washing and degreasing - this will help the means that break down fat. After the main wash, you need to wipe the laminate with clean water and wipe it with a dry cloth;
- The transformation of a smooth coating into a rough - for this it is necessary to process the surface of the most fine-grained sandpaper. This is important for creating adhesion;
- Primer - suitable primer on a polyurethane basis. At the drying of its layer should be allocated 12 hours;
- Alignment of cracks - latex putty;
- Re-priming and drying;
- Coloring - flooring from LDSP ideally takes alkyd enamel. It is also suitable for laminate;
- Varnishing - varnish (anti-slip) is applied with a wide brush in three layers.
How to paint the furniture of chipboard at home - a matter of relevance for creative natures. This is a more interesting and profitable process than purchasing new furniture. To make the result excellent, you need to clearly know how to paint chipboard. Choose the appropriate option and go for it!

Quite often, old furniture that has lost its original luster remains strong and reliable, quite suitable for further use. Therefore, the question of how to paint furniture from chipboard with your own hands, is interesting to many. And the reason is not only in the lack of funds for a new one.
If the wardrobe, chest of drawers or nightstand are comfortable and fit well into the space reserved for them, why look for something similar, if you can upgrade what you have?
It would seem that it could be easier than to take a brush, paint and?
In fact, in order for the new coating to lie flat, adhere well to the surface and keep on it for a long time, it is necessary to follow a certain painting technology. And here everything is important from the selection of tools to the application of the finishing layer.
Tools and consumables
Preparation for work begins with thinking over design. After all, the furniture can be simply covered with a layer of fresh paint, or it can be painted in different colors, painted, artificially aged. From this will depend on the choice of tools, paints and other necessities.

Tools that will be needed anyway include:
- Brushes of different sizes or rollers with a short nap (see);
- Screwdriver or screwdriver;
- Fine sand and coarse sand;
- Putty knife;
- Paint tray;
- Gloves;
- Rags.
In addition to them, masking tape, artistic brushes, new furniture accessories, stencils, stamps, etc. may be needed.
Finishing and paintwork materials
Decide what paint to paint furniture from chipboard. Best for this purpose suitable special furniture varnishes and enamels, but it does not have to be them. In principle, oil and acrylic paints and alkyd enamels, including in the form of an aerosol, will also fall well on a properly prepared surface.

Council Choose paints and other paints and varnishes only from well-known manufacturers such as Tikkurila, Dulux, Yaroslavl paints, Rainbow, Prosperity, Tex. Their price is higher, but the quality of coloring and the service life of the coating are incomparable with the same parameters of cheap compounds of unknown origin.
The most environmentally friendly and harmless are water-soluble acrylic paints, which can be given any desired shade with the help of special pigments. If you repaint the furniture for the children's room, it is best to use them. But paint alone is not enough for restoration work.
In addition to her, most likely you will need:
- and chipboard;
- Remover to remove old paint;
- Solvent (for acrylic paints - water);
- Varnish
The primer is necessary, lacquer is optional, the rest is dependent on the original condition of the furniture and the freshness and density of the paint.
Calculate the desired amount of it is quite simple: calculate the area of \u200b\u200bthe painted surface, multiply by the number of layers that will be applied, and divide by the average consumption. This characteristic can be found on the label, there is also an instruction on the use of the composition.
Staining technology
If you are going to just open the paint, dip the brush in it and start painting, this is wrong. Before you repaint the furniture of laminated chipboard, you need to perform a number of preparatory work.
Surface preparation
First you need to disassemble the cabinet or dresser. Not completely, but it is necessary to remove the doors, pull out the drawers and unscrew all the accessories from them. At the same time, check how well the loops and other elements are preserved. You may have to replace them.
Then every detail needs to be prepared for painting:
- If it is necessary to remove the old paint layer, it is cleaned with coarse sandpaper, after which the surface is fine-grained. If this layer is smooth, without delaminations and scratches, and you just want to change the color of the furniture, you can skip this step.
Council The method of removing paint by stripping is rather dusty and time consuming. You can do otherwise: heat the paint layer with a building dryer and clean off with a metal spatula. There are special washings that are applied in strict accordance with the instructions.

- The next step is cleaning the dust and degreasing the surface. To do this, it is wiped with a damp cloth, and then rubbed with a solvent.
- If there are pits, irregularities and cracks on the front side of the furniture part, they need to be puttied with acrylic putty on wood, let it dry and level with the smallest emery paper. Of course, the resulting dust is removed.

- The last preparatory stage - applying a primer in one or two layers, depending on the degree of absorption of the base. Each layer should dry well before you apply the next one or paint it.
Even before you begin to prime the furniture, you need to get rid of dust in the air and lying on the surfaces. Especially if you have chosen a tint or varnish as a decorative coating for old furniture.
Painting
We have already talked about what kind of paint can be used to paint furniture made of chipboard. But on which of them you choose, measures for the preparation of paint depend. If it is an aerosol, then the cartridge should be shaken well before use. The furniture part is laid on a layer of old newspapers or a film so that the paint does not stain other surfaces.
Council When working with alkyd compounds, use a respirator or multi-layer gauze bandage.
Too thick oil paints, enamels and varnishes diluted with a solvent to the desired consistency, acrylic - with water.
Irrespective of the technology of dyeing, the first background layer is applied by brush or roller all over the entire surface and left to dry. Drying times are indicated on the label.
Then, in the case of a monochromatic dyeing and in the case when the color of the substrate appears from under the first layer, the second is applied. And after its drying - varnish. Although you can do without it.

If you decide to paint the furniture façade in several colors, then a masking tape is stuck on the border between them, which is carefully removed after the colored section dries.

Similarly, they work with stencils for drawing a pattern or ornament.

After completing the coloring, the parts need to be allowed to dry for several days in order for the coating to gain strength. And only after that proceed to the assembly of furniture and installation of furniture.
Conclusion
As with many other construction, finishing and restoration works, repainting old furniture from chipboard takes up most of the time and effort of preparatory work. But if they are neglected, the result may turn out even worse than its original state. Either the coating will begin to quickly peel off and crack.
In order not to be disappointed, you need to accurately follow the technology. And the video in this article will help you to consolidate the information received.
Restoration of old furniture - an interesting option to update the interior elements and show their creative abilities. It is not necessary to go to a furniture store or factory and buy new furniture. Showing imagination, you can give the tables, chairs, shelves an attractive look and a special highlight. The simplest and most economical way to renew your old wardrobe is to paint the furniture using decorative paintwork materials.
Wallpapering, decoupage, photo printing, photo wallpaper and decorative plaster can also be used for restoration. But which way to choose?
The easiest and cheapest way to update the closet that has lost its appeal is to paste over wallpaper or photo wallpapers. This decoration is suitable for the restoration of the wardrobe, wardrobe, chest of drawers and bedside tables, which are installed in dry rooms.
The most suitable are flizilinovye and vinyl wallpaper or wallpaper, which are sold in hardware stores.

Pasting is carried out partially or completely. How to update old furniture:
- Wall-paper used for restoration should be different in pattern from those with which the walls in the room are pasted, but have a common style and color solution;
- If the walls of the room are covered with light canvases, for the renovation of the old cabinet choose bright wallpaper. When the interior has wallpaper with a pattern or pattern, furniture is pasted over with plain wallpaper;
- You can decorate the interior shelves and external facades in different combinations. Additionally use new fittings. It is convenient to finish the furniture with self-adhesive wallpaper;
- The work will require a brush, PVA glue, a construction knife, decorative wallpaper. It is easier to glue paper sheets, but vinyl and non-woven fabrics are more durable;
- The product is measured, the wallpaper is cut into strips of the desired length, the glue is evenly distributed over the surface, glue the wallpaper sheets, carefully smooth the coating.
Before sticking wallpaper, degrease the surface with alcohol, acetone or gasoline. Self-bonding is applied to the elements of the cabinet and smoothed so as not to form air bubbles.

Drawing volumetric drawings
Decorative plastering and painting under the stencil is an interesting way to restore the old cabinet. This design will ennoble the furniture and give the surfaces a voluminous decor.
Suitable for not only wardrobes and chest of drawers, but also for the restoration of kitchen furniture (sideboard, cupboard for dishes).

Paint will reliably protect products from temperature extremes and moisture. For work use decorative plaster, acrylic paint, varnish, stencil with the desired pattern, spatula, masking tape, sandpaper, brushes. Painting the cabinet with your own hands requires compliance with the exact algorithm of work:
- Furniture is removed from the furniture.
- Remove the old coating layer.
- Handled with sandpaper.
- Cracks and chips are puttyed up.
- The stencil is fixed masking tape.
- Prepare the plaster according to the instructions.
- Apply the material with a flat trowel.
- The stencil is removed, the pattern is corrected with a knife.
- After drying, the image is polished with sandpaper.
- Paint is applied to the renewed substrate.
- To consolidate the effect of varnish.
The same method is used to paint the old cabinet under the stencil, but without decorative plaster. On the background of the patterns, the accessories painted with a gold or silver shade look spectacular.
To get a contrasting pattern, the product is coated with white paint. After the layer dries, a stencil is attached and sprayed onto it (shake it up) with the desired shade - the decorative coating is ready and the furniture gets an interesting appearance.

So that the paint evenly covers the furniture and does not peel off, cabinets, bedside tables, dressers, wardrobe prepare to paint, removing dust, dirt, grease stains.
Any shade can be used as a basic background, but the pattern is most impressive when the cabinet under the stencil is painted white.

Coloring polished furniture
Interior items made of natural wood and covered with a polished layer, you can give an unusual look using paint for the cabinet. The old product, refined in modern design, will be the central element of the room and will give the room a special charm.

How to paint a wardrobe or ennoble wardrobe:
- For work using acrylic paint with a matte effect.
- Apply acetone or white spirit to degrease the base.
- For applying paint brushes are needed, and for the decor - new pens.
- From the cabinet remove the old furniture, take shelves and drawers.
- Treat all surfaces with a grinder.
- For the tool pick up large-and fine-grained sandpaper.
- If there are large chips on the surface, they need to be puttied.
- Treat furniture with white spirit or acetone, dried.
- How to paint the cabinet - put a thin base coat of paint.
- After drying, rub over with fine-grained paper.
- Remove dust with a dry cloth, apply the next layer, and dry.
- Again rubbed and put another layer until you get the desired effect.
With this method, you can transform the old polished wardrobe into the original vintage furniture that will adorn the classic interior. Accessories are screwed on former places.
For exclusive work, you can use not a complete painting, but a dot painting - a pattern is applied to the facades of furniture with a marker and drawn with acrylic paint.

Updating cabinets from chipboard
Furniture made of chipboard, over time, loses its appeal, no matter how carefully it is not exploited. You can return the beautiful appearance to the products and add fresh colors to the interior by staining old cabinets made of chipboard.
It should be noted that chipboard does not absorb paint because the furniture is covered with a water-repellent laminated layer.

In addition, if the condition of the cabinet fasteners is unsatisfactory, it is recommended to replace the fittings and further strengthen it. How to paint an old wardrobe from chipboard:
- All removable elements are removed from furniture so that an empty frame remains for painting.
- With the help of coarse sandpaper, a layer of old paint (if any) and varnish are removed.
- It is necessary to wipe surfaces in order not to damage the base. The cabinet is swept away with a dry dust cloth.
- Corners, edges, joints and protruding elements are treated with fine-grained sandpaper.
- Water-based acrylic paint is a better option than painting chipboard. Color solution is chosen according to your taste.
- Before painting the cabinet of chipboard must be primed so that the paint is less absorbed into the material.
- The primer is applied in a thin uniform layer and allowed to dry out - usually acrylic primers dry out no more than 12 hours.
- Apply several layers of paint with a roller or a brush (more practical with a brush), each time drying the coating before painting.
- When the furniture is painted for reliable fixation of the coating after a complete drying, the cabinet of chipboard is treated with varnish, assembled the product using new accessories.
For painting furniture choose only high-quality tools that do not leave a pile on a painted surface. The more paint layers will be applied, the richer the color of the decorative coating will be. It is necessary to repaint with a brush in one direction - from top to bottom, with a roller they apply paint with cross-shaped movements.

On the video: detailed instructions for updating the old cabinet of chipboard.
How to upgrade kitchen cabinets
The kitchen is a wet and often used room. The furniture in this room is exposed to temperature, steam, moisture, and mechanical influences, so kitchen cabinets lose their original appearance rather than living room or bedroom furniture. You can restore the old cabinet in the kitchen by painting or finishing products with rattan cloth.
What paint to paint? Suitable acrylic moisture-resistant composition or alkyd enamel. Looks spectacularly updated cabinet with a glossy shine.

The order of staining kitchen cabinets is as follows:
- Furniture preparation - the doors are removed from the hinges, thoroughly cleaned of dirt, degreased, washed with soda to remove all contaminants;
- Removing the old cover - all surfaces of the kitchen cabinet are treated first with a coarse-grained, and after - with fine-grained emery paper, wiped with a dry cloth from dust;
- Apply acrylic or alkyd primer with roller or brush - depends on the selected paintwork material. The primer is allowed to dry;
- How to repaint the cabinet? Thinly put the first paint coat using brushes or rollers. After drying, the second layer is applied with a paint pad in longitudinal and transverse strokes;
- When the front side is dry, you can paint the edges of the furniture parts and the inside. When working on the pad do not press, so as not to leak;
If the resulting color in saturation and brightness does not match the desired hue, the product is painted again. The use of white color is suitable for any kitchen interior. Furniture is assembled using new fasteners and decorative accessories (handles, rails, moldings).
If during the disassembly of the cabinet there are difficulties in unscrewing the fasteners, a little oil can be dropped onto the screws. And you can also lubricate the doors so that they do not creak.

Chiffoniers, dressers, bedside tables are painted in the same way, but for them it is not necessary to use water-repellent paint - oil, acrylic and alkyd compositions can be used for interior work.
To give the old cabinet an unusual look, they use not only staining, but also upholstery, decoupage, vinyl stickers, stained film and other decoration techniques. In which cases they can be used to restore the old cabinet with their own hands:
- Closet. It is usually mirrored or glass doors. You can decorate the furniture with the help of stained glass film or vinyl stickers. The decor is glued to the doors of the wardrobe.

- Old wooden furniture made of plywood and fiberboard will be transformed if you use decoupage or artificial aging for renovation, decorating furniture in retro style.

- A vintage cupboard can be refined by applying the technique of applying decorative plaster or repainting the furniture completely white, using whitening paste.

- Wardrobe in the nursery. The child will enjoy “cheerful”, bright furniture, which was repainted on its own with the help of a dot painting with children's scenes.

- Closet in the living room. Uniquely decorated furniture, decorated with a collage of photos. Beautiful pictures stick on the closet completely or in some places and covered with colorless varnish.

Using your own imagination and creativity, you can update the old cabinet and make it a highlight of the interior. Furniture will sparkle with new colors and become the central element of the room. For decorating apply the most unusual technology, the choice of which will satisfy any artistic taste.
Master classes from experts (2 videos)
New life of old cabinets (33 photos)


 Szafa pomalowana na bialo i oklejona powiekszonymi fotografiami. Wykonanie i aranzacja: Malgorzata Szczepanska


